Service Manual · Heritage 1854
The Model 81
9¾ Ligne Calendar · Model 80 Base
A calendar movement built on the Model 80. The entire calendar mechanism is housed between the date frame assembly and the dial, so it lifts off as a stack without disturbing the movement underneath.
Hand-wound
Calendar
V-Conic
Model 80 Base

Factory Service Manual · Model 81 · Dial Side & Movement Side
Ligne9¾
BearingsV-Conic
ConstructionTwo plate, full plates
Basic movementModel 80
CalendarBetween date frame and dial
Dial fixingFour tabs through the date frame
ManualService Manual · Model 81
Size (mm)18 × 21.95 mm
Height4.90 mm
Jewels0
EscapementPin lever
Beat rate18,000 bph
Power reserve41 h
Size in mm, height, jewels, escapement, beat rate and power reserve:
ranfft.org
Exploded View
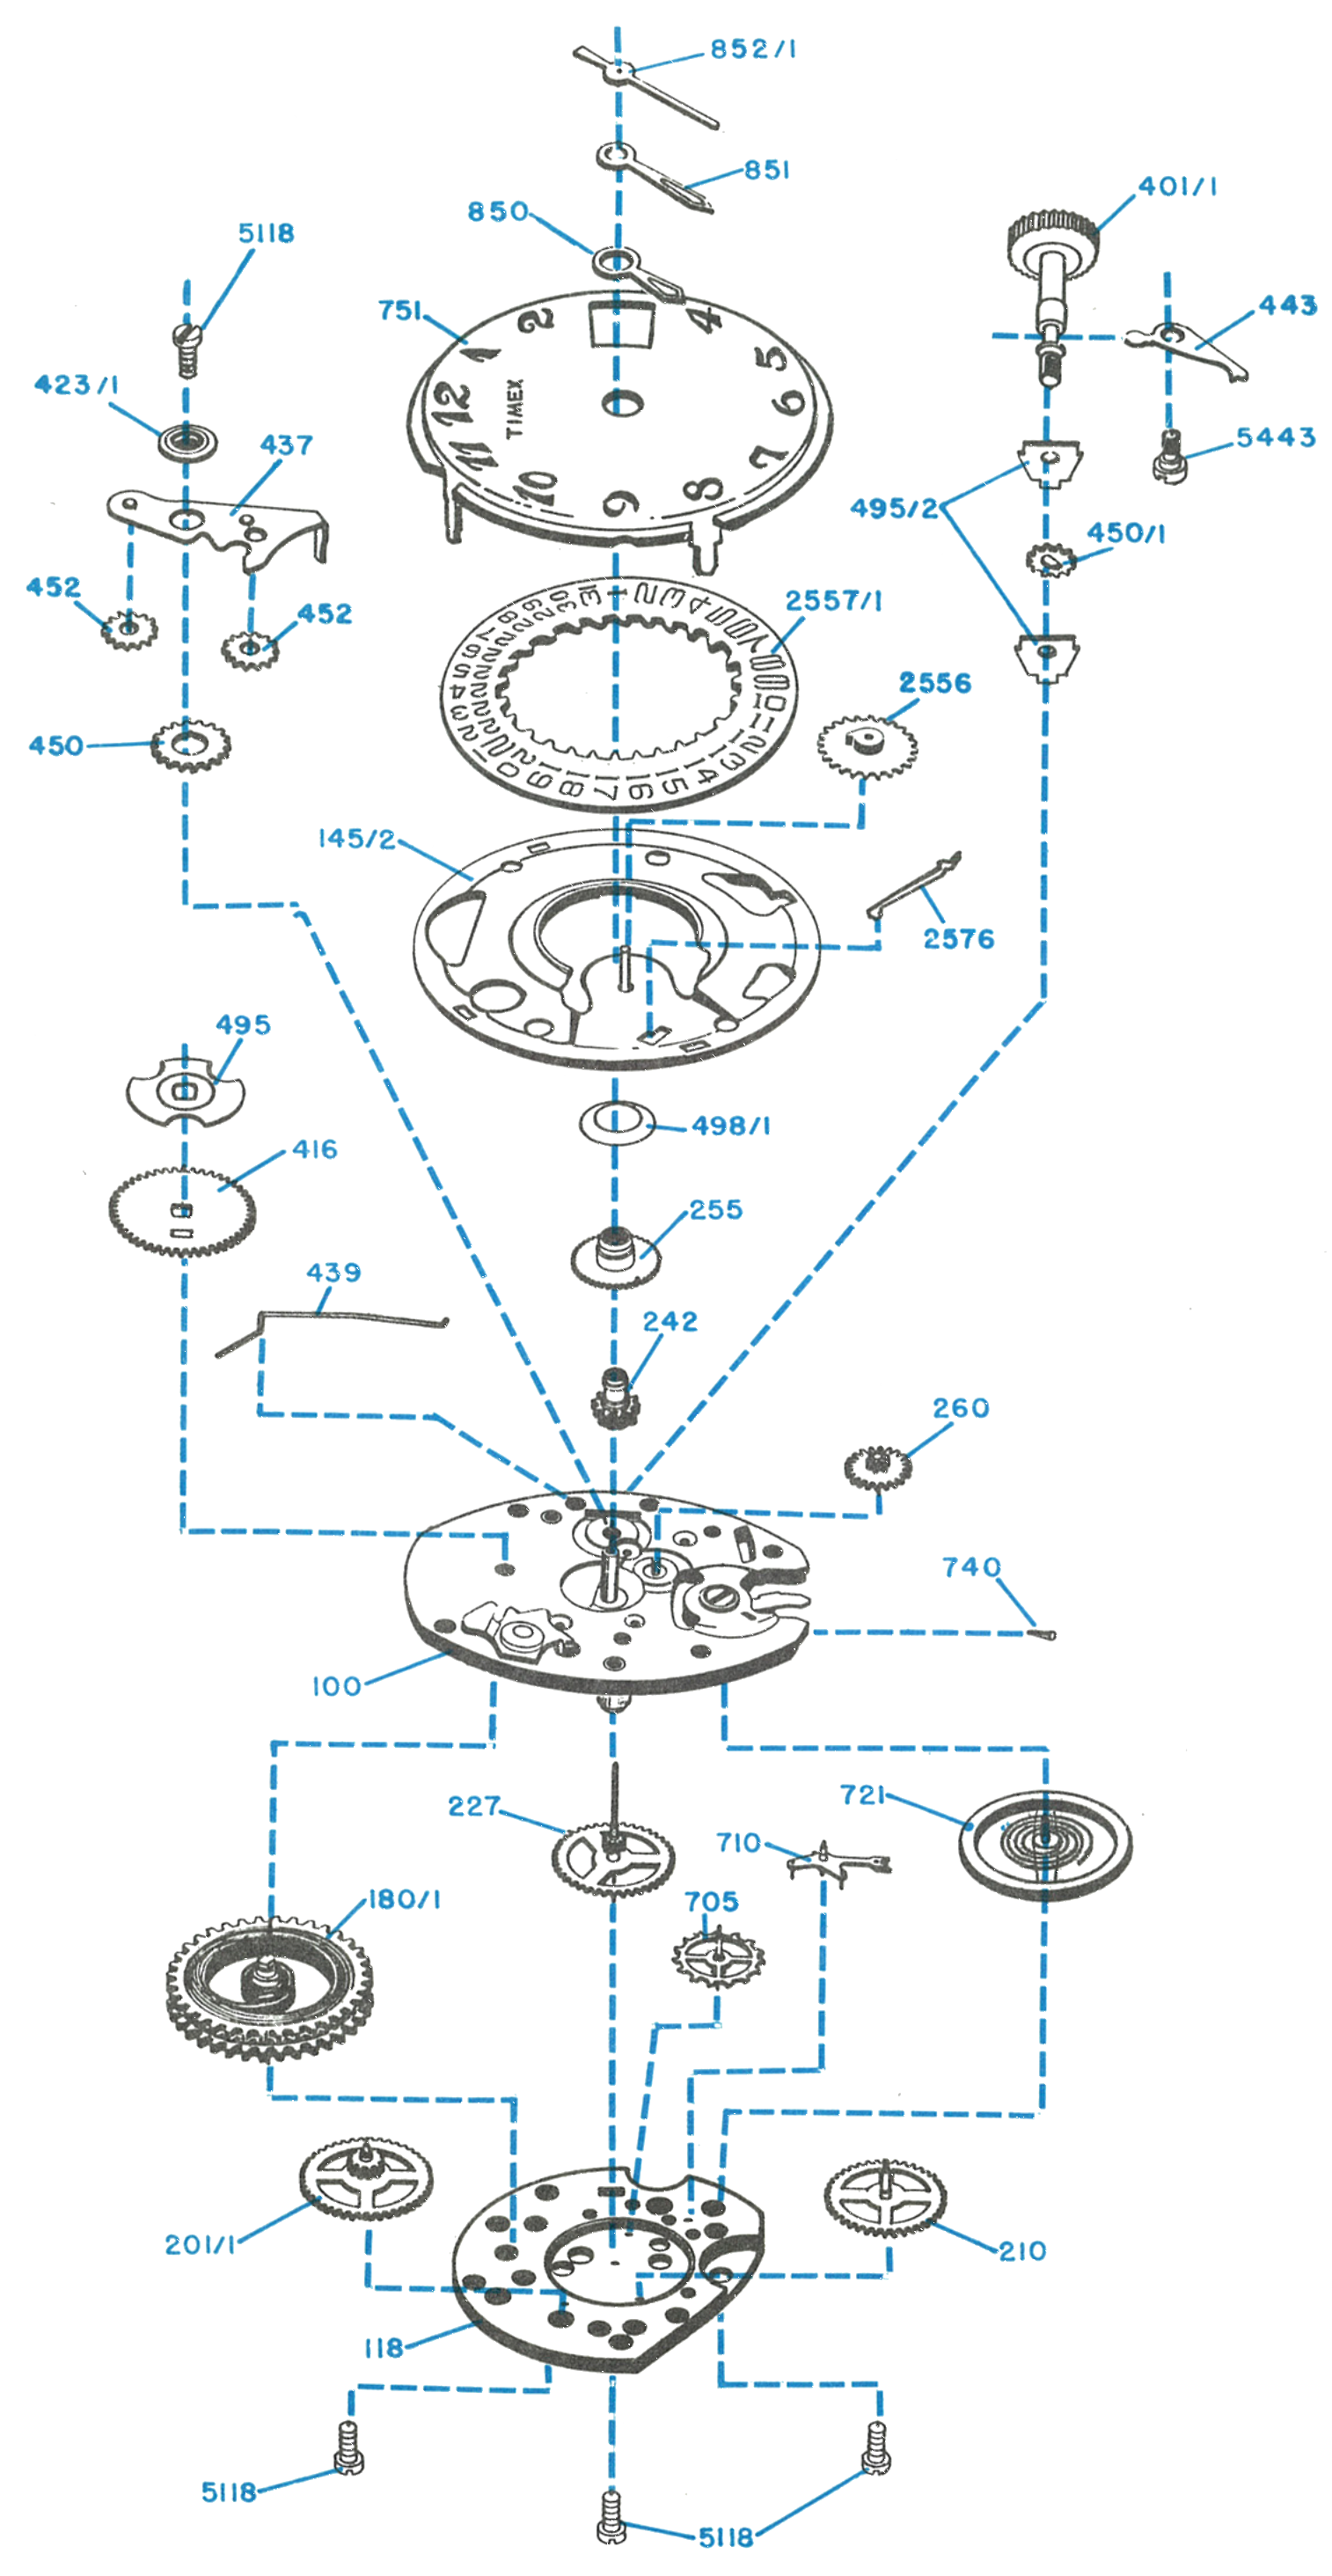
Model 81 · Exploded View
100Dial Plate Assembly
118Movement Plate Assembly
145/2Date Frame Assembly
180/1Barrel Assembly
201/12nd Wheel Assembly
2103rd Wheel Assembly
2274th Wheel Assembly
242Cannon Pinion Assembly
255Hour Wheel Assembly
260Minute Wheel Assembly
401/1Crown & Stem Assembly
416Ratchet Wheel
423/1Rocking Bar Bushing
437Rocking Bar Assembly
439Rocking Bar Spring
443Set Lever
450Intermediate Wind Pinion
450/1Winding Stem Pinion
452Wind & Set Pinion
495Ratchet Wheel Washer
495/2Winding Bridge
498/1Hour Wheel Washer
705Escape Wheel Assembly
710Pallet Lever Assembly
721Balance Wheel Assembly
740Hairspring Wedge Pin
751Dial
850Hour Hand
851Minute Hand
852/1Sweep Second Hand
2556Date Wheel Assembly
2557/1Date Ring
2576Detent Spring
5118Pillar Screw
5443Set Lever Screw
Disassembly for Cleaning
Getting the movement out of its case first? Case types and dust seals →
1 · Removing the Dial and Calendar
Remove the sweep second hand, the minute hand and the hour hand.
The dial assembly is clamped to the movement by means of four tabs which are inserted through slots in the date frame assembly into two holes in the dial plate, and then bent under the plate to secure the assembly. Bend the tabs slightly to free the dial from the movement.
Then lift off in order: dial, date ring, hour wheel washer, hour wheel assembly, date wheel assembly, date frame assembly, cannon pinion assembly.
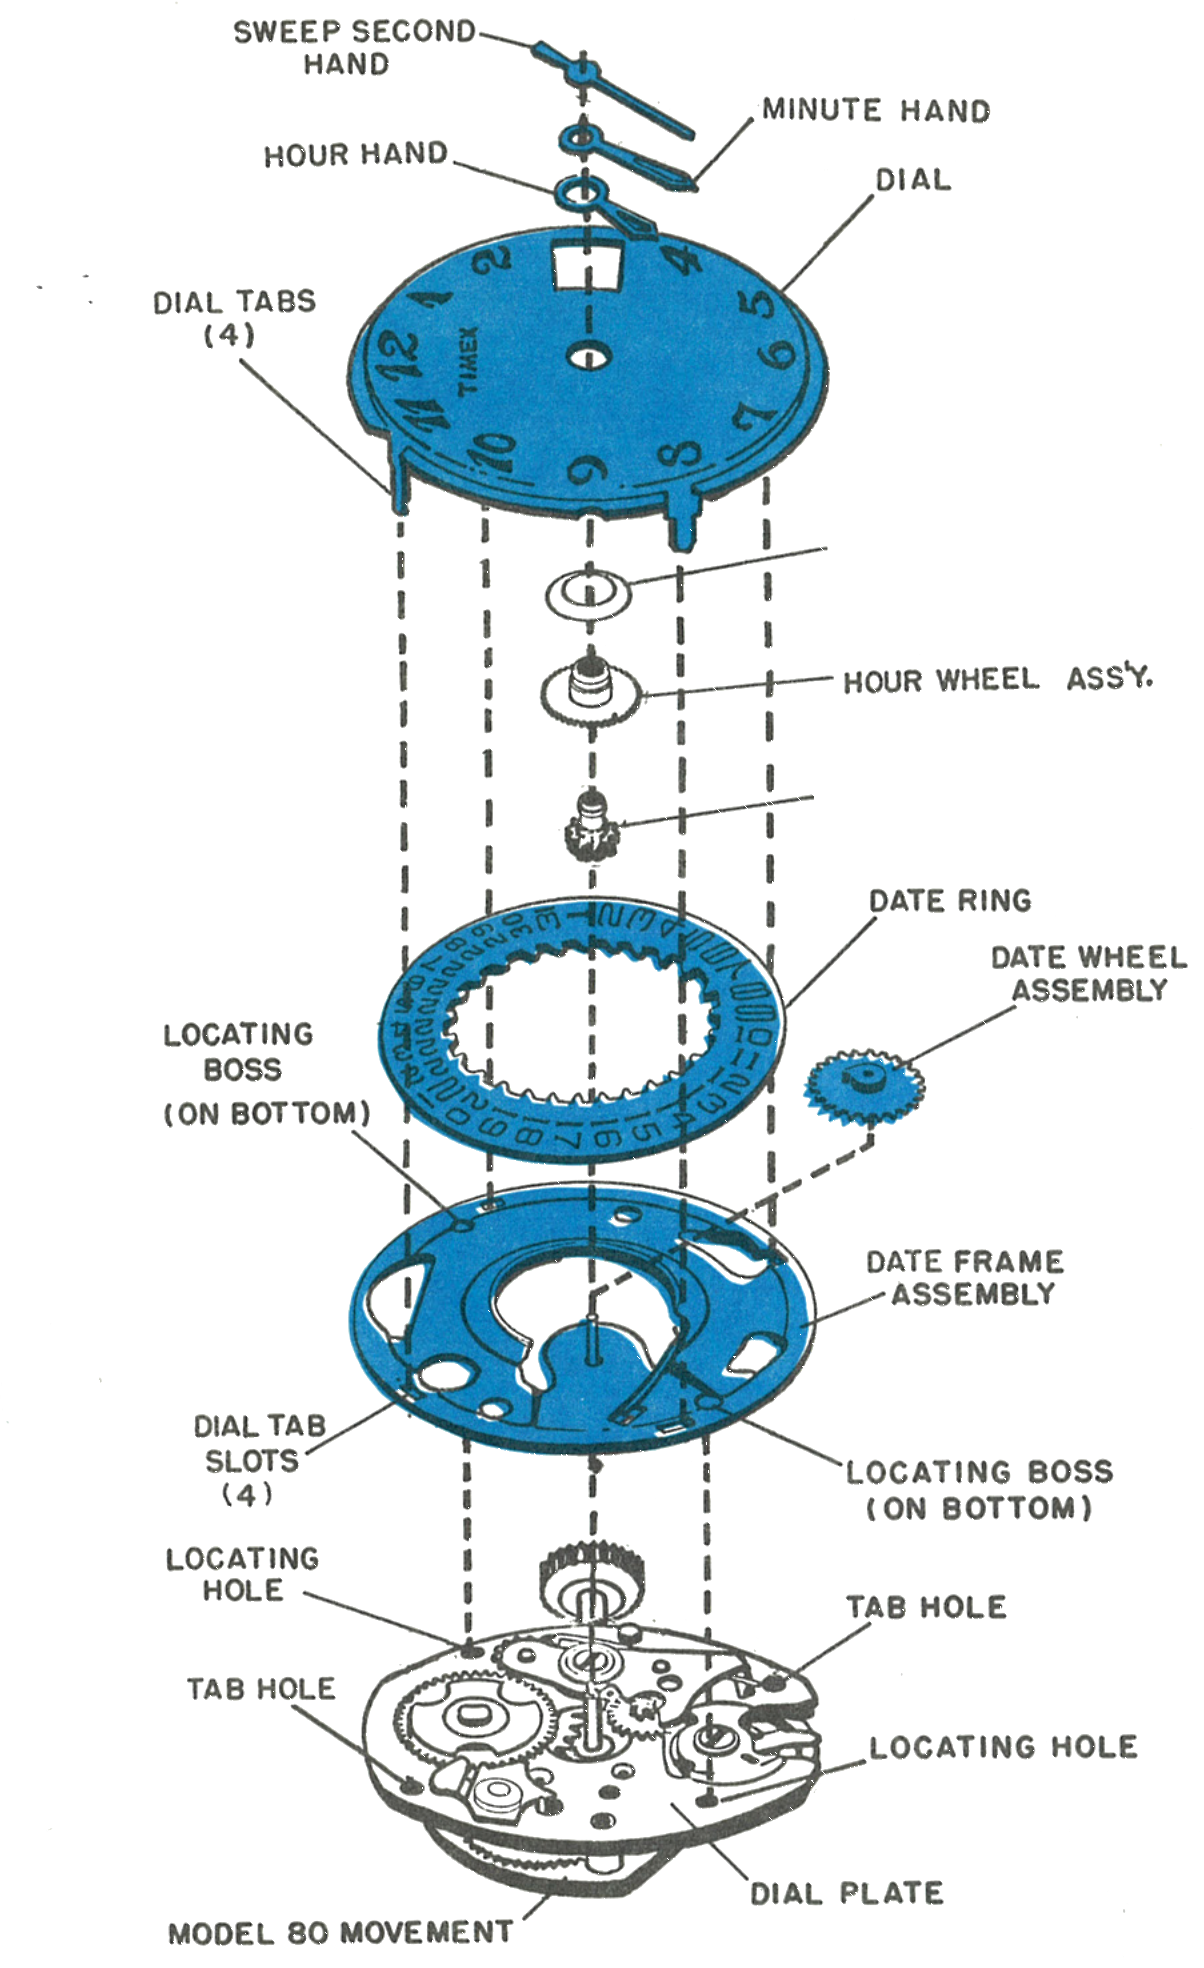
Fig. 81.3 · Calendar stack
2 · The Dial Tabs
Cross section showing a dial tab passing through the date frame assembly slot and the dial plate tab hole, bent under the movement plate.
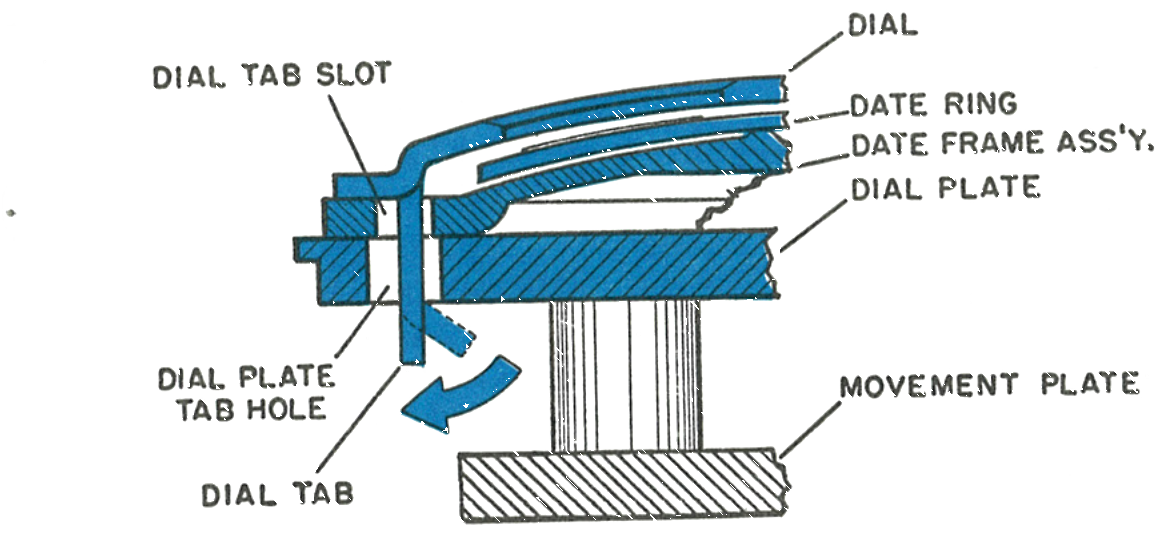
Fig. 81.3 · Dial tab
Reassembly
Lubricant change, June 1974: Timex Service Bulletin No. 111 replaced the factory oil for this model. Moebius Synt-A-Lube oil is used instead of Elgin M56B oil or Tenneco #415 oil. (It supersedes Bulletin No. 108.)
Assemble the detent spring, if loose, into the date frame assembly. Place the date frame assembly on the Model 80 movement, being sure the date frame bosses are located in the two holes in the dial plate. Then assemble in order: date wheel assembly, cannon pinion assembly, hour wheel assembly, hour wheel washer.
Lubricate the cannon pinion bearing area and the date wheel bearing area with fine watch oil, Elgin M56b in the factory. Position the date ring on the date frame assembly.
1 · Lubricating the Date Ring
Lubricate the face of the date ring and the detent spring with fine watch oil, Elgin M56b in the factory, as shown.
2 · To Position Hands for Proper Date Change
With the dial assembled to the movement, pull the crown and stem assembly into the set position and rotate the crown clockwise until the date starts to move. Continue to rotate slowly until the date jumps into place, then stop rotating. Replace all hands at the 12 o’clock position. Be certain the sweep second hand is set below the chamfer on the top of the staff.

Fig. 81.4 · Date ring & detent spring
Hands & Date
1 · Positioning the Hands
With the dial assembled to the movement, pull the crown into the set position and rotate clockwise until the date starts to move. Continue slowly until the date jumps into place, then stop. Replace all hands at the 12 o’clock position, with the sweep second hand set below the chamfer on the top of the staff.
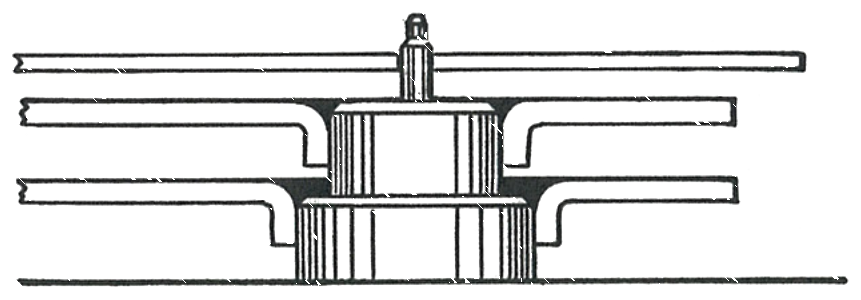
Fig. 81.4 · Setting the hands
To set the date: pull the crown out to the set position and rotate the hands forward clockwise until the date in the window changes. The date may then be advanced rapidly by first rotating the hands backwards past 9 o’clock and then forward past 12 o’clock, repeating the cycle.
Setting the time correctly: The date may also be advanced by rotating the hands forward through 24 hours. After the correct date is set, remembering that the date change occurred at the equivalent of 12 o’clock midnight, set the time properly for AM or PM. Otherwise the next date change will occur during mid-day instead of at midnight.