Very similar to the Model 78 and easily confused with it. The manual opens by telling you how to tell them apart, then names an oil for every lubrication point.
Hand-woundV-ConicTwo PlateDial Spacer
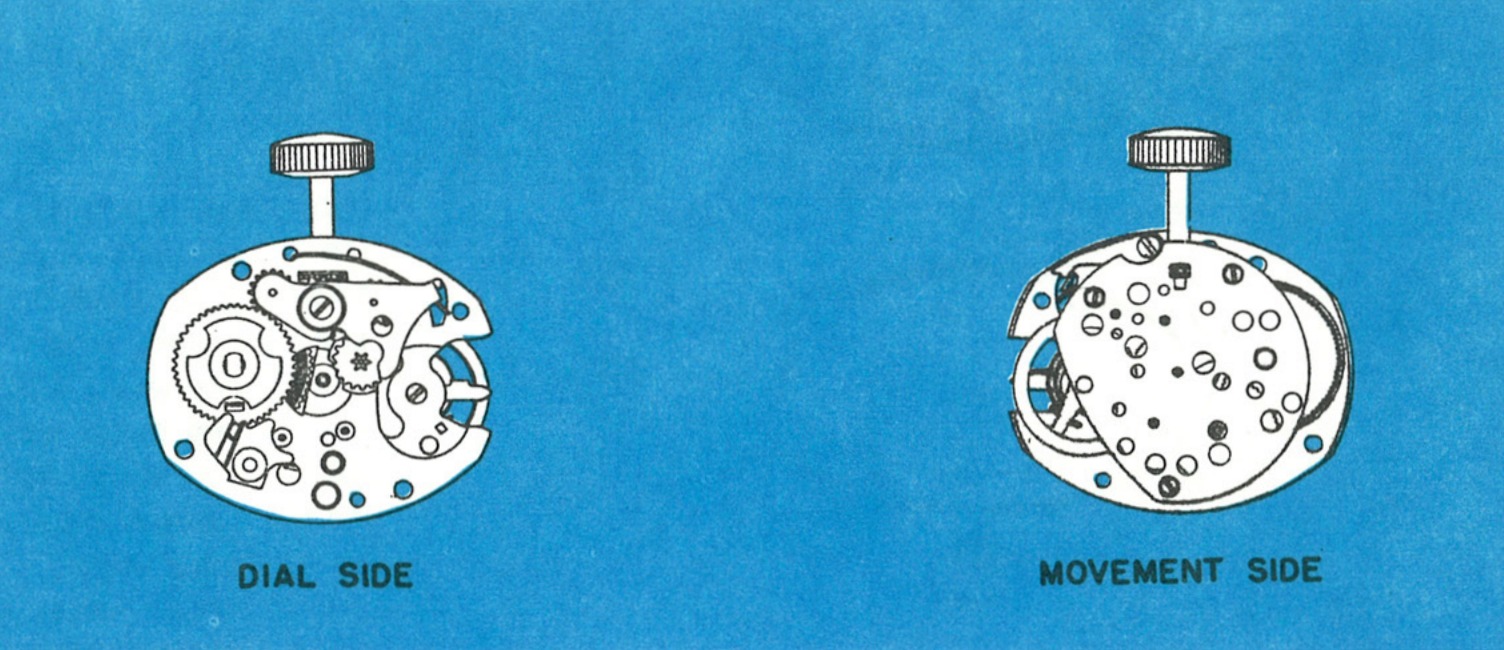
Factory Service Manual · Model 80 · Dial Side & Movement Side
Size8 x 9½ ligne
BearingsV-Conic
ConstructionTwo plate, full plates
PillarsThree grooved
Dial plate holesFive, near the third wheel
Dial fixingFour tabs through a dial spacer
ManualService Manual · Model 80
Size (mm)18 × 21.95 mm
Height4.90 mm
Jewels0
EscapementPin lever
Beat rate18,000 bph
Power reserve41 h
Size in mm, height, jewels, escapement, beat rate and power reserve: ranfft.org
Not the Model 78
The TIMEX Model 80 is an 8 x 9½ ligne movement featuring the “V-conic” bearings system and rugged two plate design very similar to the Timex Model 78 movement. Whereas many watches utilize bridges, Timex has constructed the Model 80 with full plates to take advantage of the accuracy inherent in this type of design, insuring complete interchangeability for the escapement and gear train without the need for selective fitting.
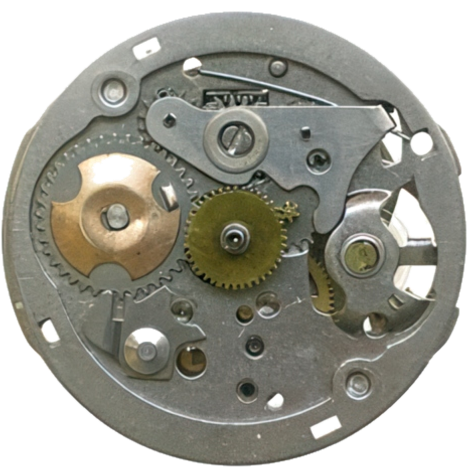
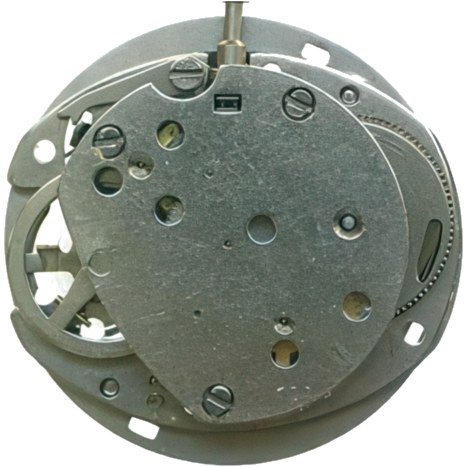
Telling them apart: The Model 78 has two grooved and one smooth pillar while the Model 80 has three grooved. The Model 80 has five holes in the dial plate near the third wheel where the 78 has three.
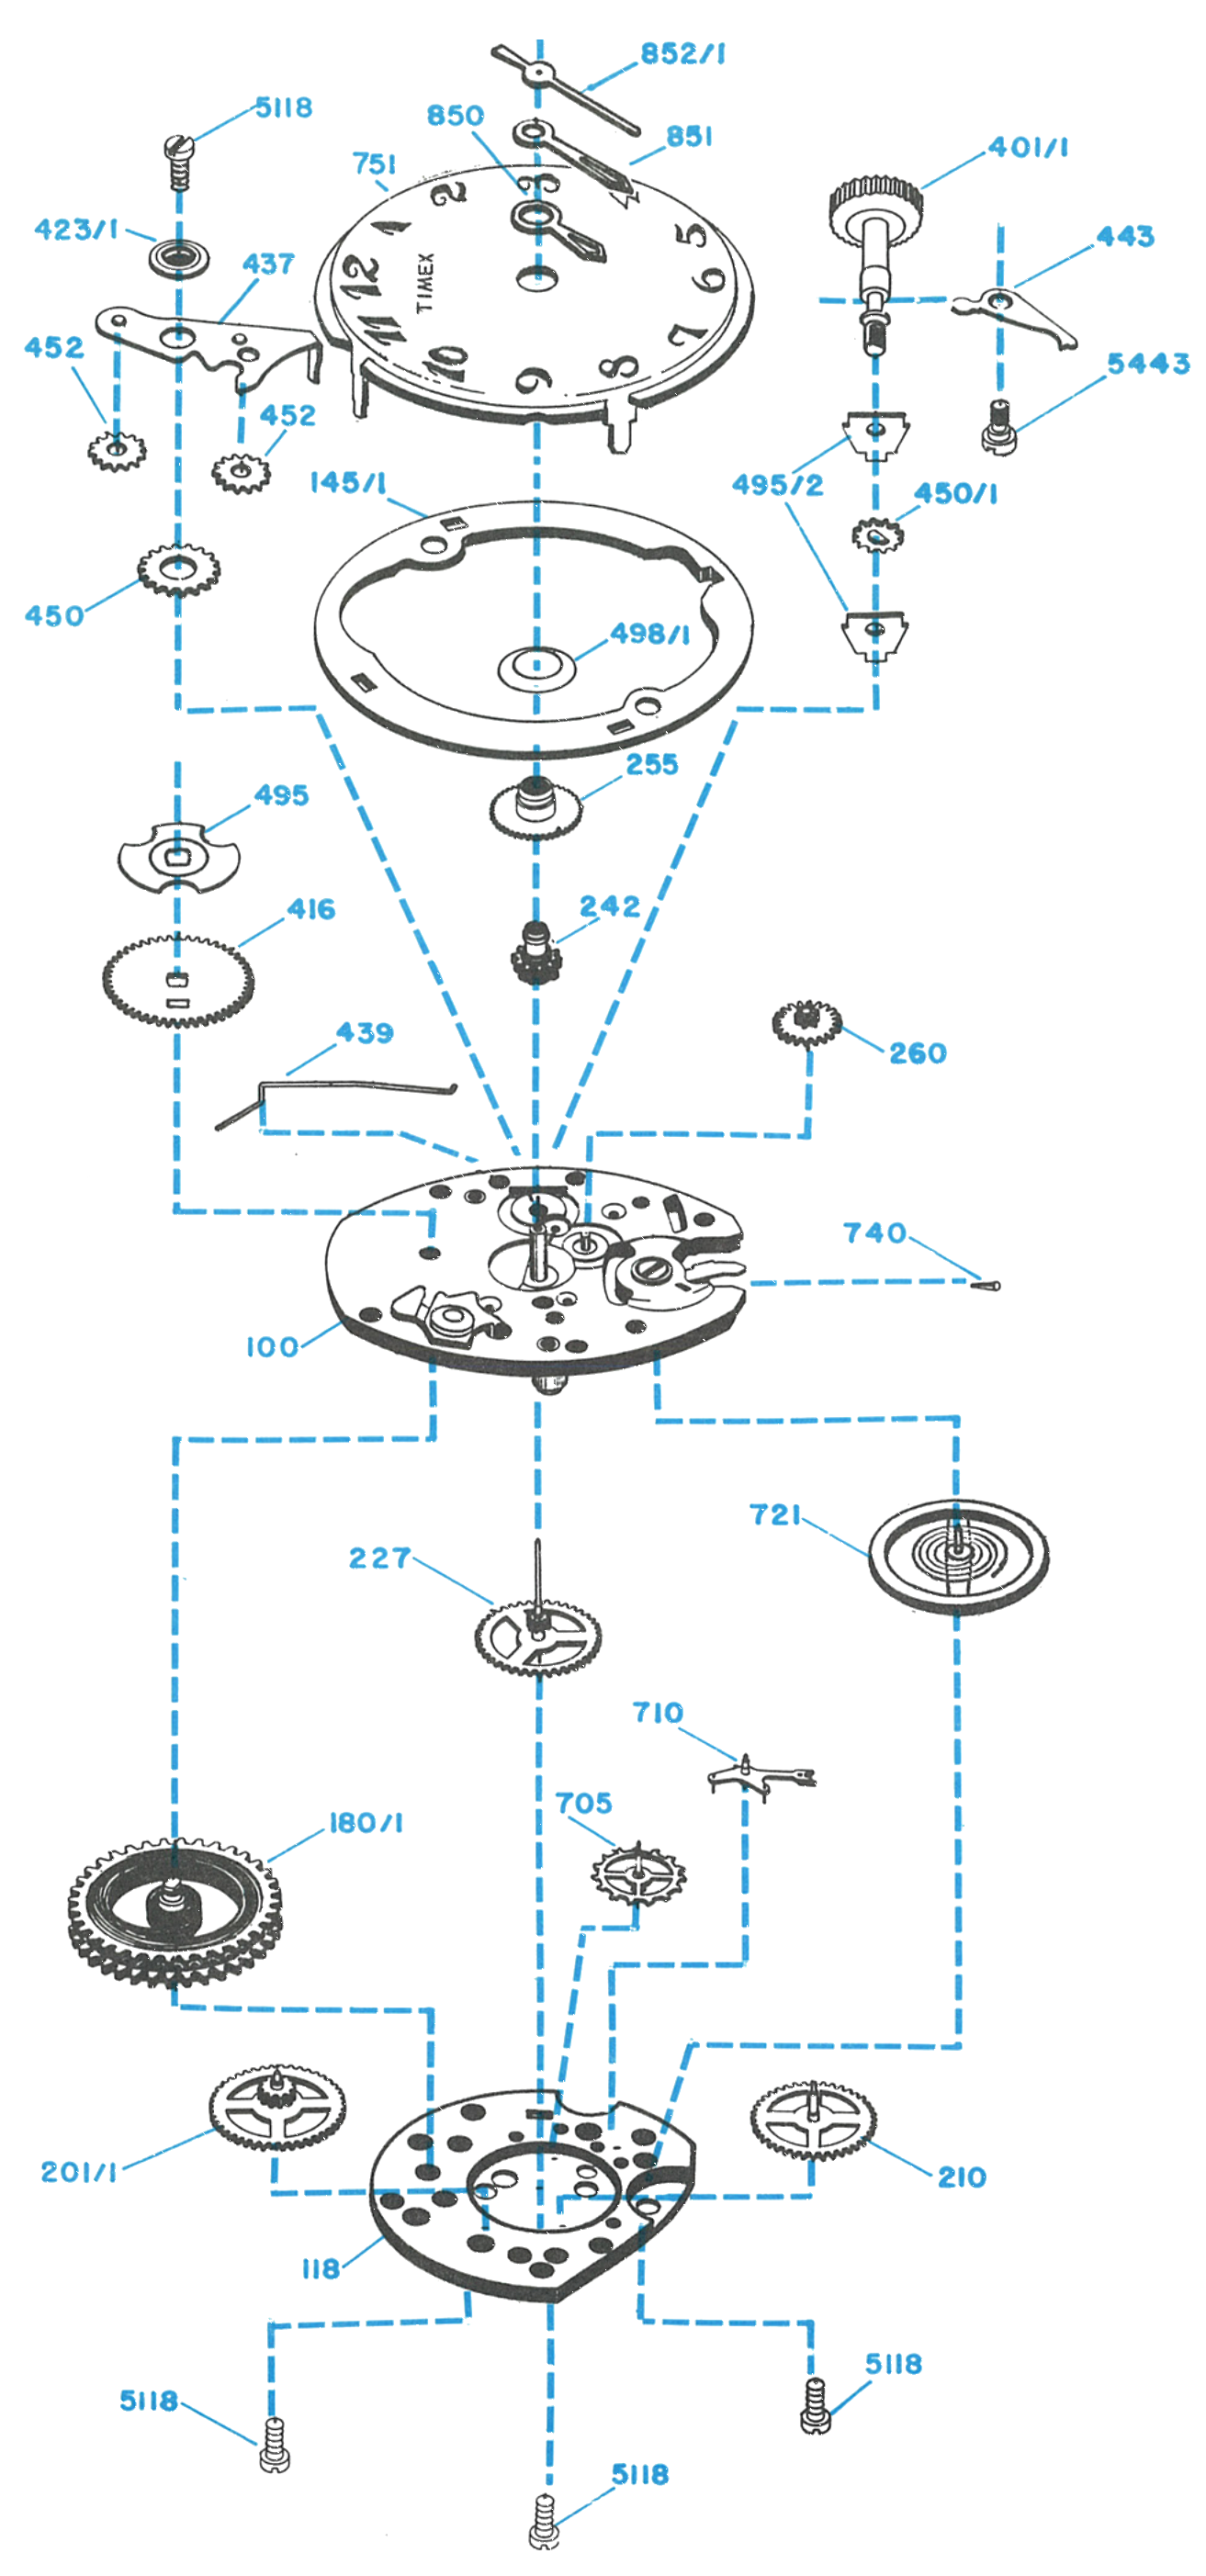
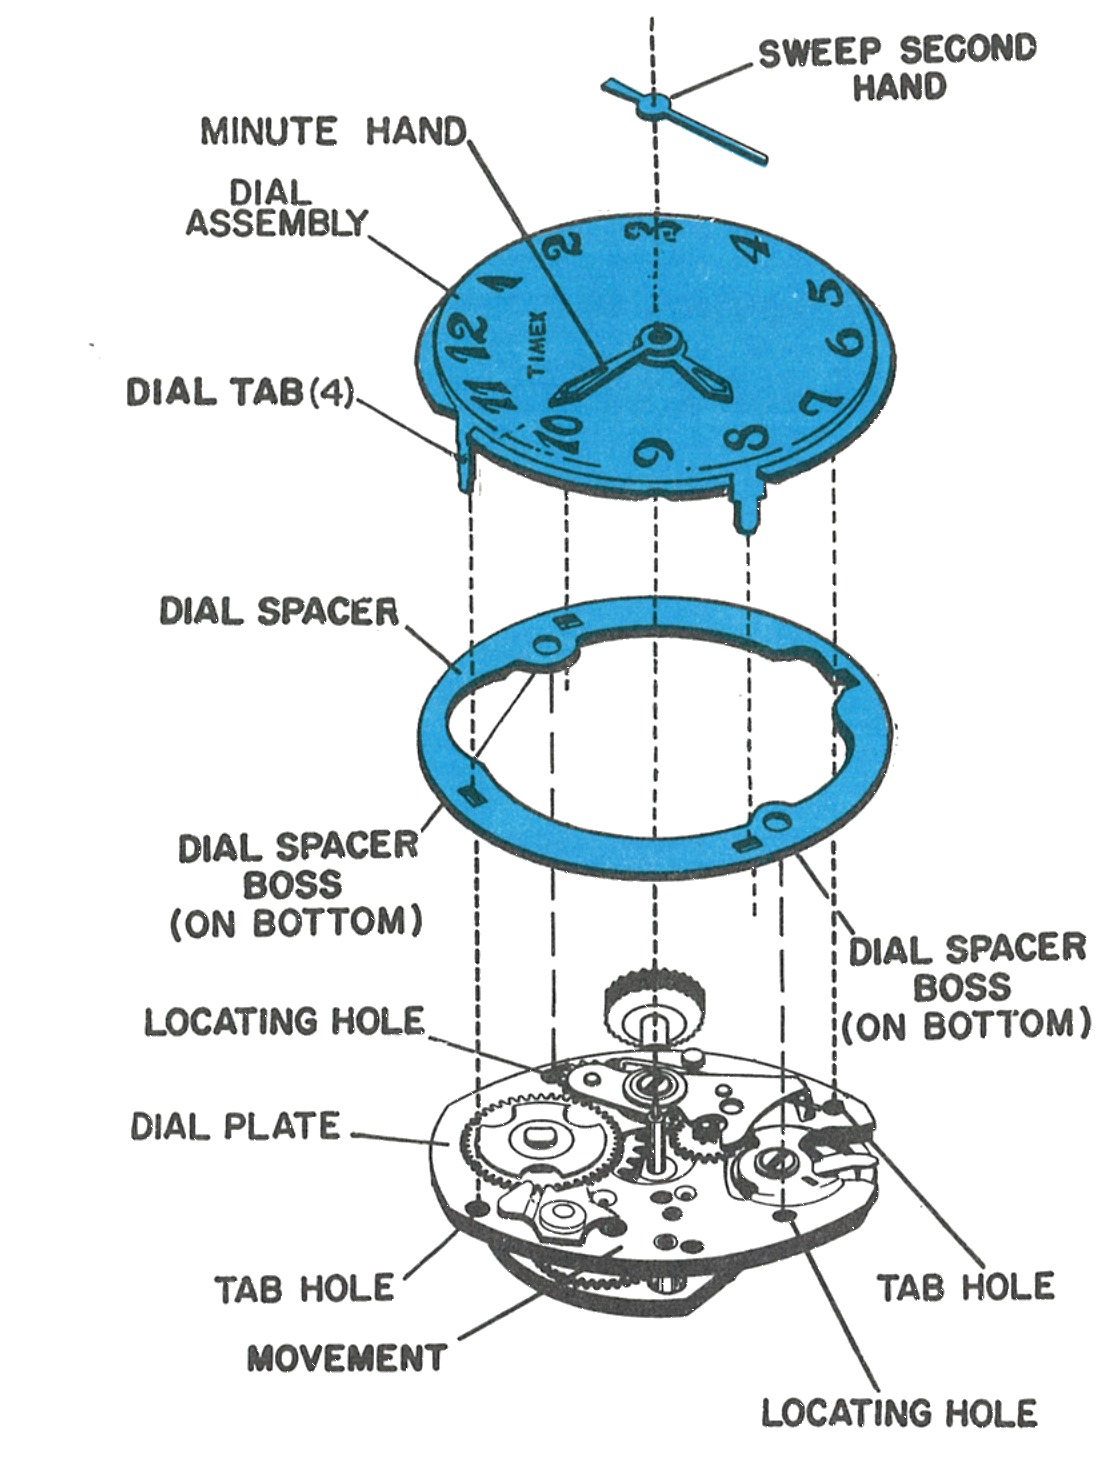
A further difference shows at the dial: the Model 80 carries a dial spacer, part 145/1, and fixes its dial with four tabs, where the Model 78 clamps directly with two.
Remove the sweep second hand. Do not remove the minute or hour hand.
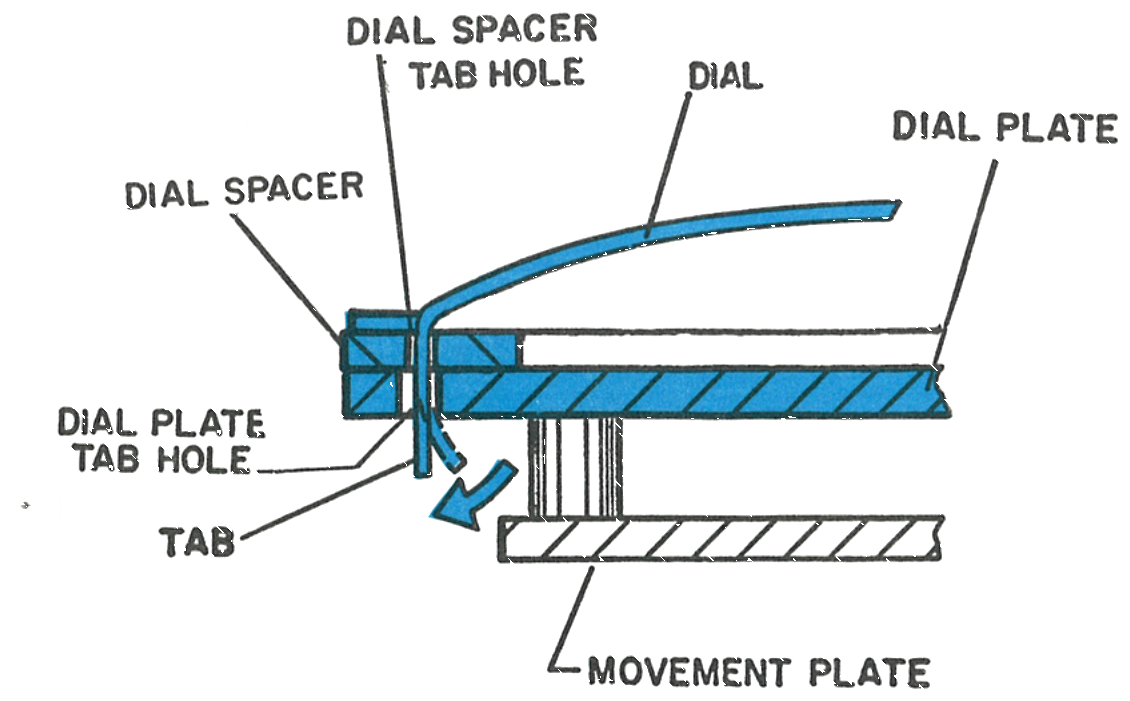
The dial is clamped to the movement by means of tabs which are inserted through dial holes located in the dial spacer and dial plate. The tabs are bent under the dial plate.
Once the dial is off there is no need for further disassembly in the dial area unless severe contamination is present on the friction and cannon pinions. Should further disassembly be necessary, removal of the minute hand will free the friction and cannon pinion assembly. The friction pinion is held in the cannon pinion by a snap fit.
Fig. 80.3 · Dial & dial spacer
2 · The Dial Spacer
Cross section through the dial, dial spacer, tab and dial plate. The spacer carries its own tab holes and locating bosses on the underside.
Fig. 80.3 · Dial spacer
3 · Removing the Balance Wheel
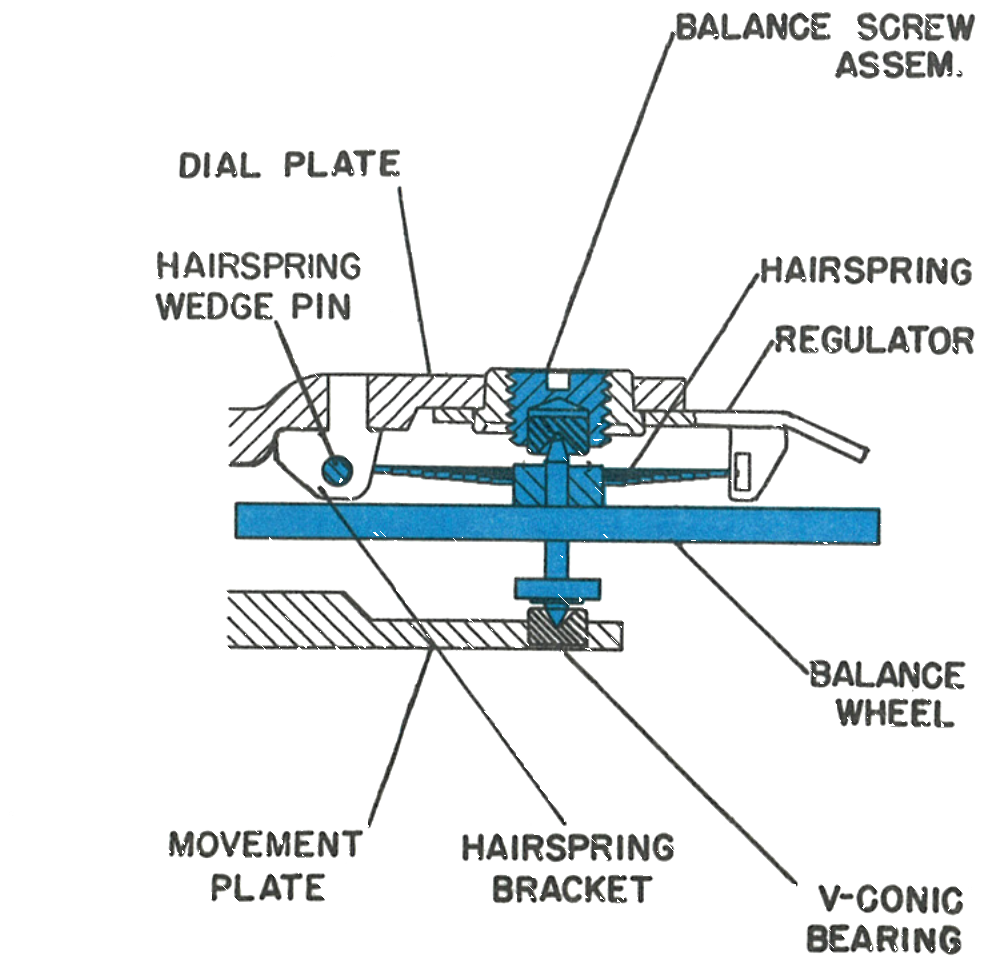
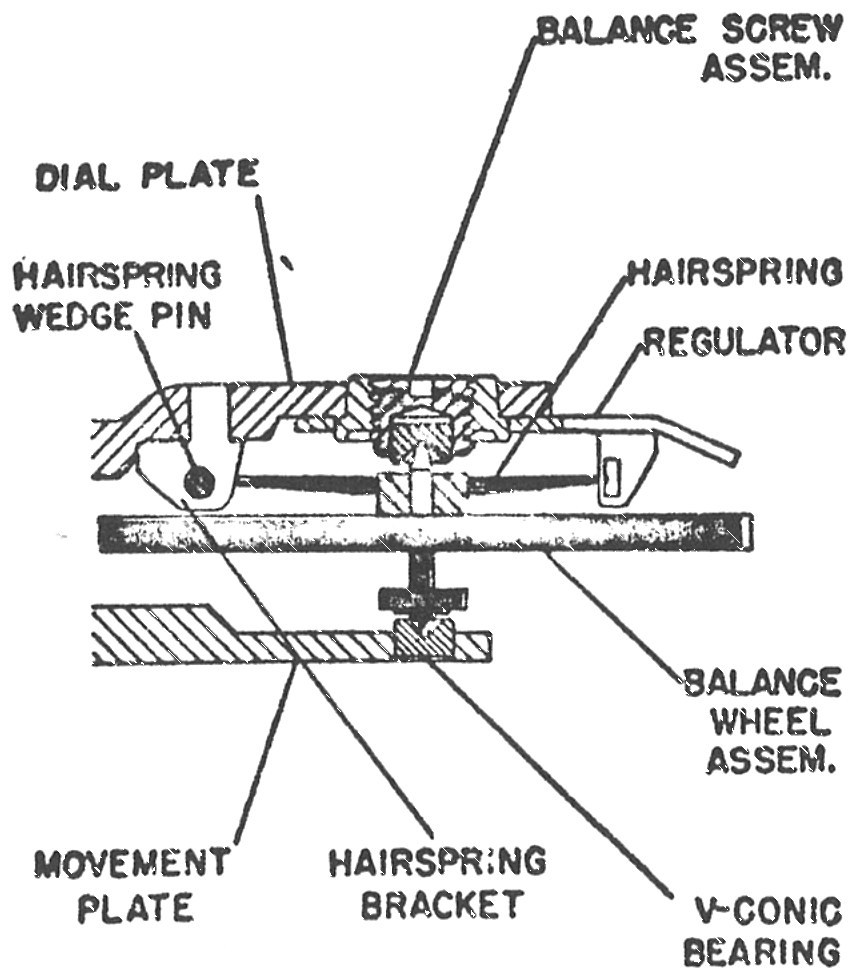
Two “V-conic” bearings are used with the balance staff. The bearing on the dial plate is mounted in a screw so that fine endshake adjustment is possible.
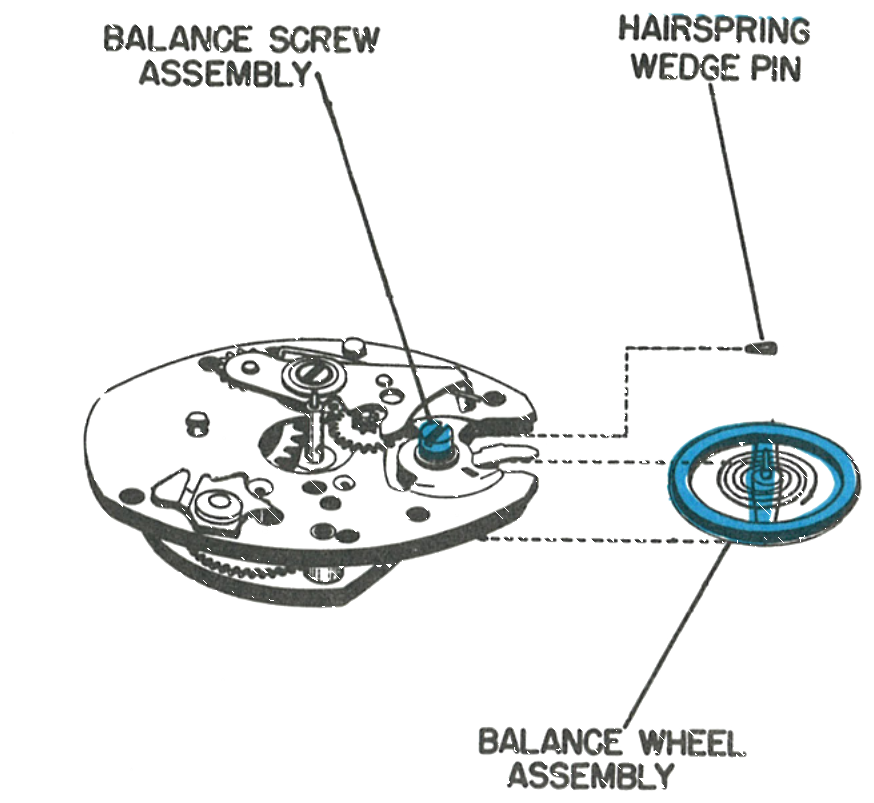
Remove the hairspring wedge pin, being careful not to distort either the pin or the hairspring.
Rotate the balance wheel slowly until the hairspring tail is free of the hairspring wedge pin bracket and the regulator.
Loosen the balance screw assembly counter-clockwise using a suitable screwdriver, until the end of the balance staff is free of the “V-conic” bearing.
Caution: Apply only minimum downward pressure with the screwdriver. Excessive pressure could seriously damage the balance staff points.
Fig. 80.4 · Balance wheel
4 · The V-Conic Bearing
Cross section through the balance, showing the V-conic bearing, hairspring bracket and regulator.
Fig. 80.4 · V-conic bearing
Fun-Timer Cases
Timex Service Bulletin No. 107
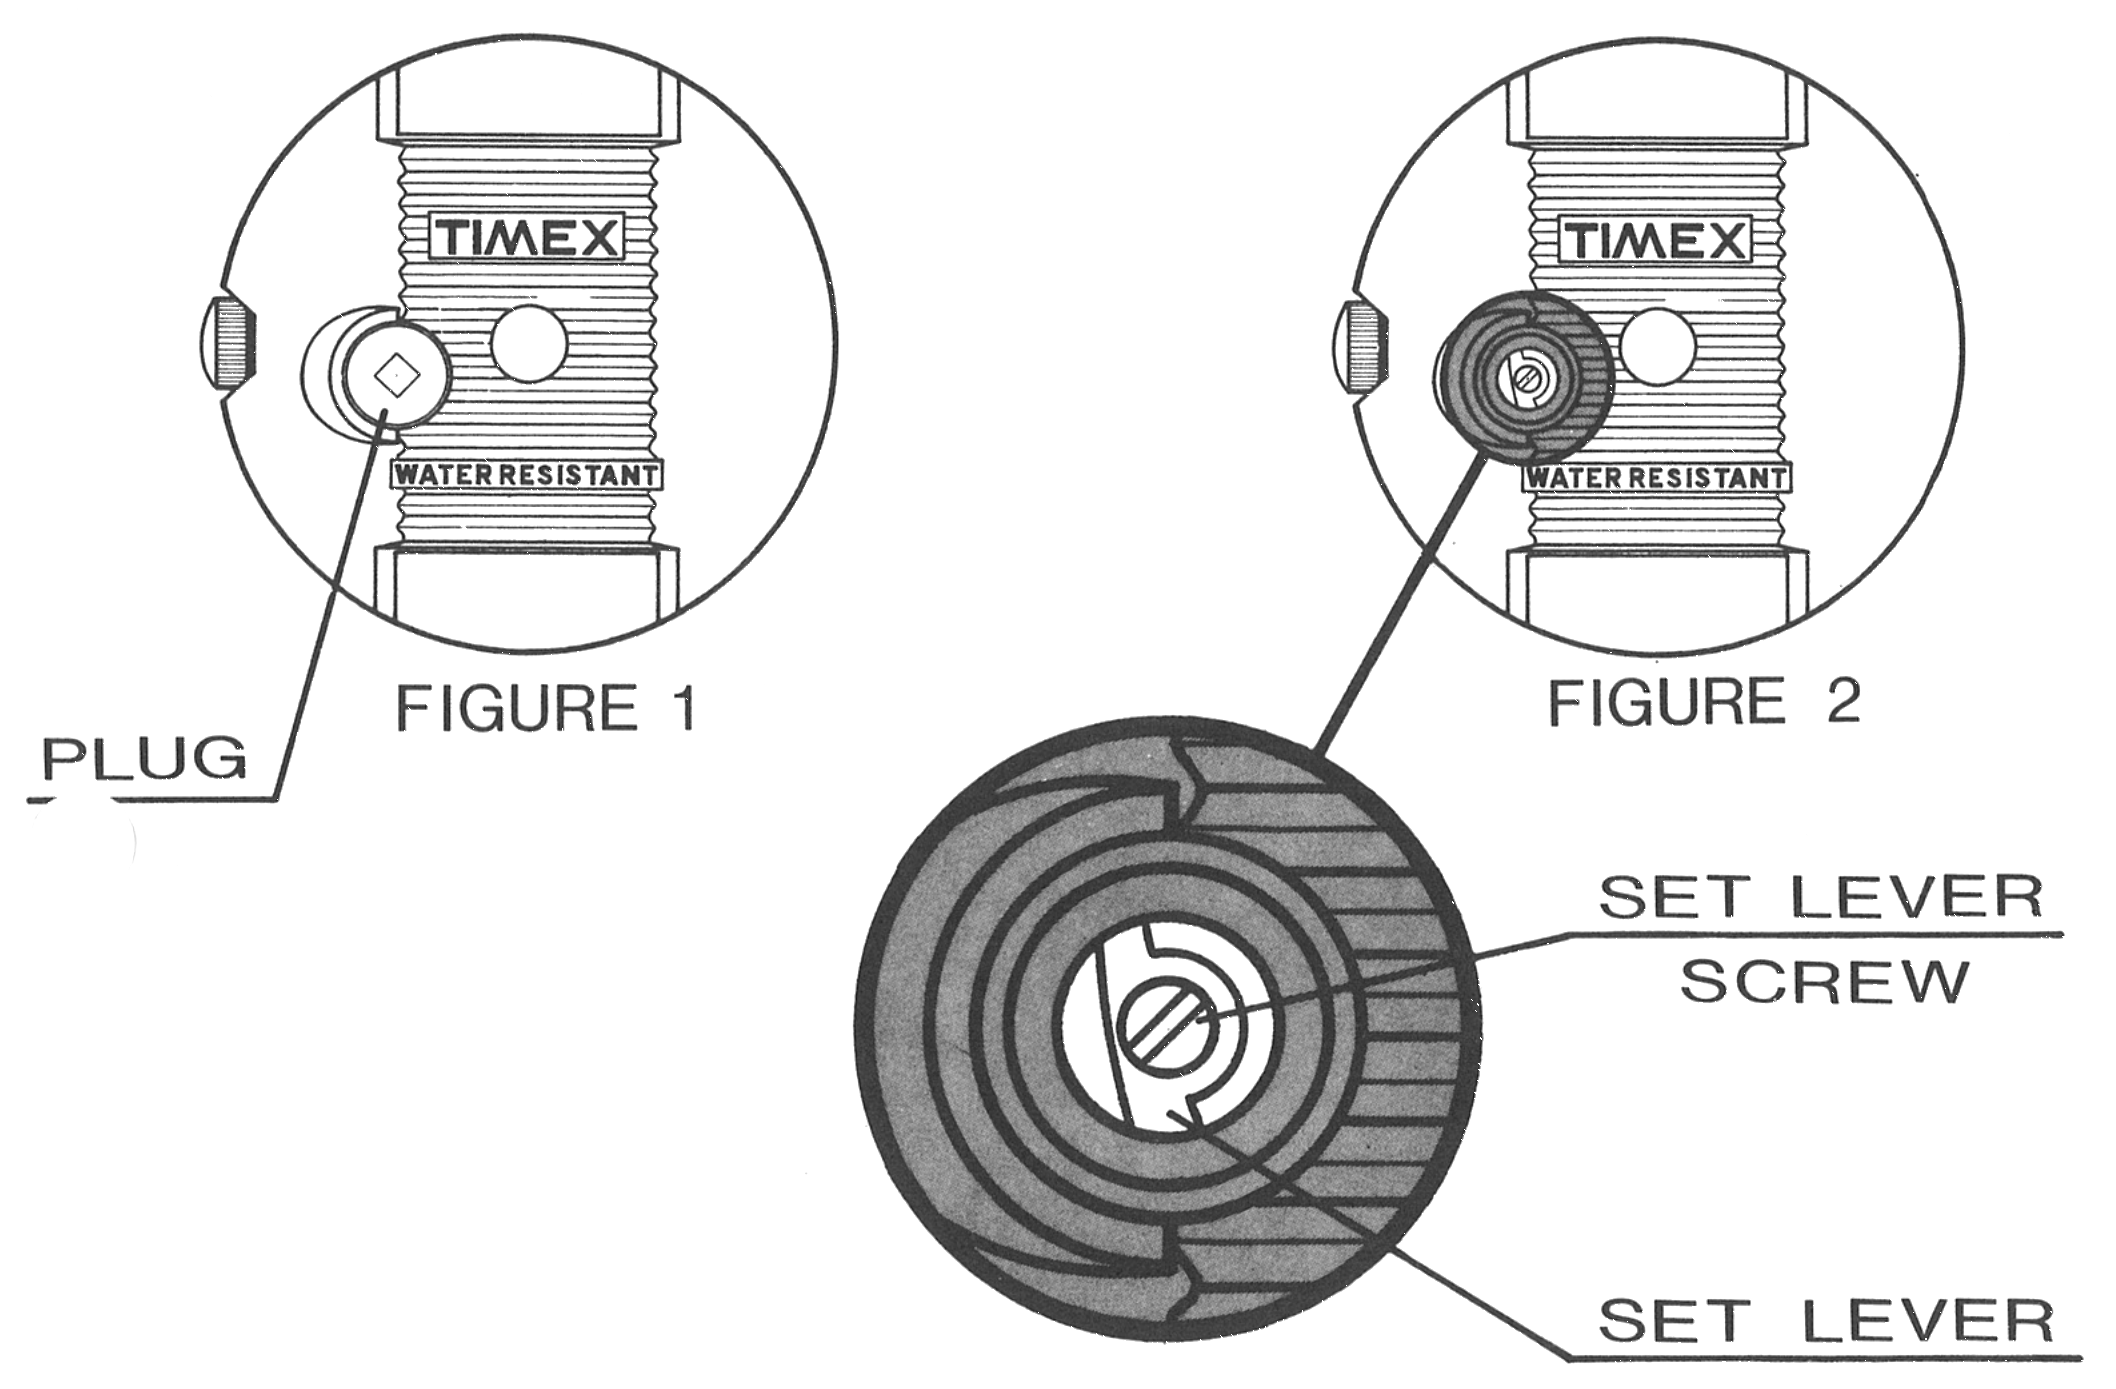
The Timex Fun-Timers contain the basic Model 80 movement in a water resistant plastic case. To remove the movement from the case for regulation or service, it is necessary to follow the following steps:
Remove the plug from the back of the case by unscrewing in a counter clockwise direction (a screwdriver with a 7/64 inch wide blade will fit diagonally across the hole). See Figure 1.
Loosen the set lever screw (see Figure 2) by turning counter clockwise until the crown and stem assembly can be pulled out of the case.
Remove the crystal with a crystal removal tool.
Turn the watch over and the dial and movement will fall out. The movement is serviced as outlined in the Model 80 section of the Timex Service Manual.
Cleaning
After removal of the balance wheel and the other parts mentioned on pages 80.3 and 80.4, the movement is ready to be cleaned. If a cleaning machine is used, place the movement in the basket with the dial plate down to insure proper drainage of the fluid from the mainspring barrel. It should be well swirled in the cleaning fluid, after which two sets of rinsing fluid should be used. The final cleaning fluid must be absolutely clean. After cleaning, the movement should be thoroughly dried.
If a cleaning machine is not available, the same procedure should be followed manually, by grasping the movement firmly and shaking it in the cleaning and rinsing fluids to insure that the fluid will pass through the entire mechanism. The balance wheel assembly should be cleaned separately in a small jar to prevent damage to the hairspring. Only standard watch cleaning solutions should be used.
Lubrication
Lubricant change, June 1974: Timex Service Bulletin No. 111 replaced the factory oil for this model. Moebius Synt-A-Lube oil is used instead of Elgin M56B oil or Tenneco #415 oil. (It supersedes Bulletin No. 108.)
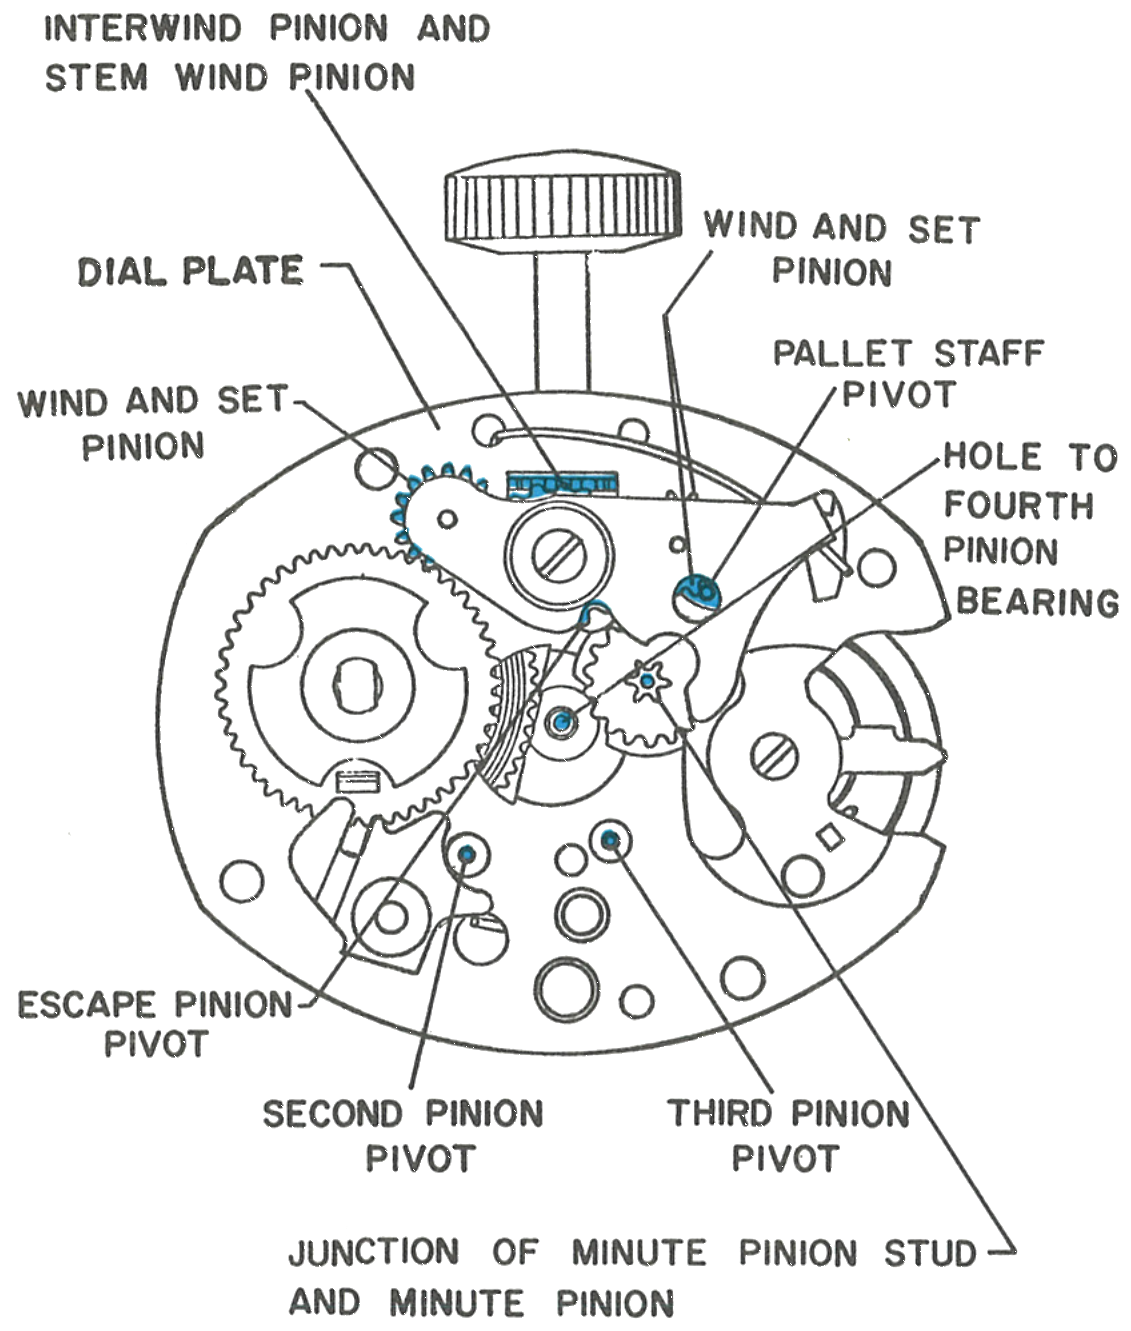
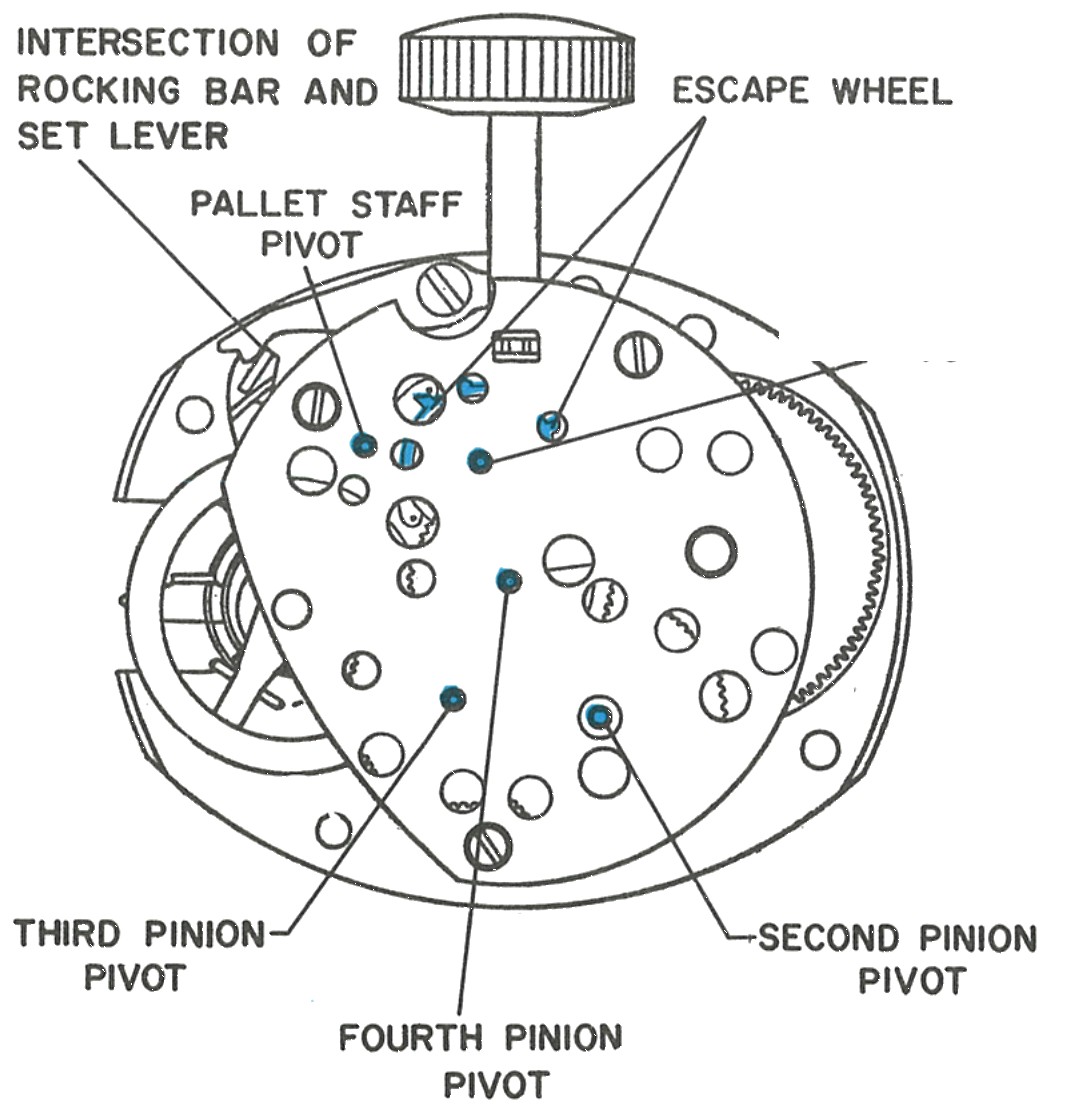
The Model 80 movement should be lubricated using only high grade watch lubricants. Apply fine watch oil, Elgin M56b in the factory, to the pivots, pinions and other bearing surfaces noted on Figures A and B. The oil should be put on the working surfaces of two full escape wheel teeth.
Caution: The mainspring is permanently lubricated with a solid film coating and should not require lubrication.
1 · Oil Points, Front View
The interwind pinion and stem wind pinion, wind and set pinion, pallet staff pivot, escape pinion pivot, second and third pinion pivots, the hole to the fourth pinion bearing, and the junction of the minute pinion stud and minute pinion.
Fig. 80.6 · Figure A, front view
2 · Oil Points, Rear View
The intersection of the rocking bar and set lever, the escape wheel, the pallet staff pivot and the escape pinion pivot.
Fig. 80.6 · Figure B, rear view
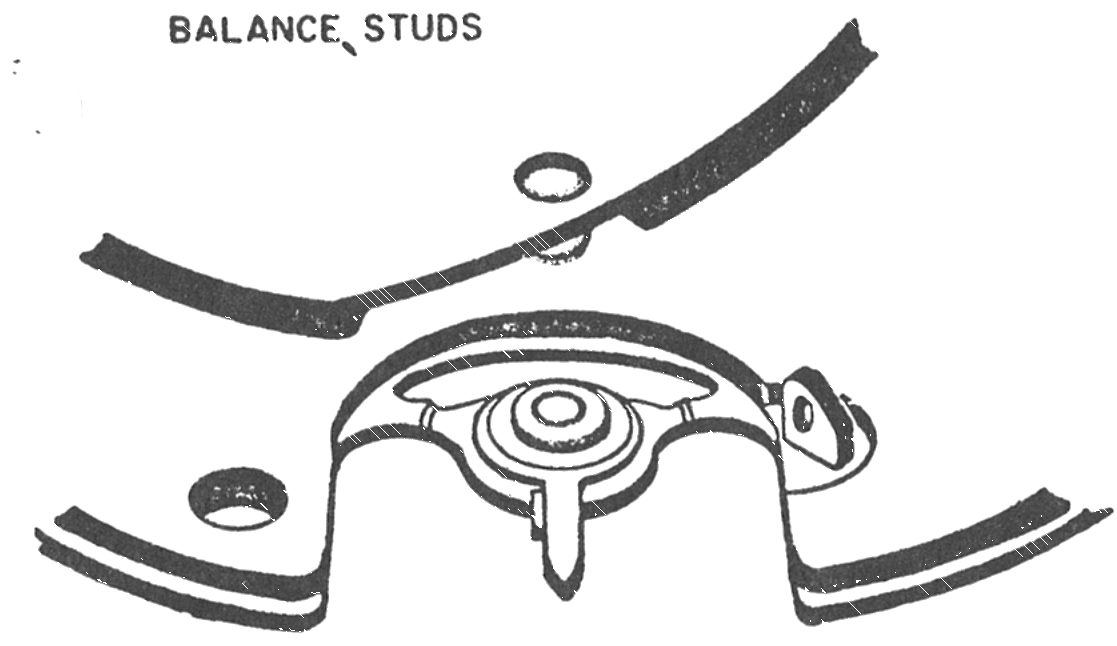
3 · The Balance Studs
Both balance studs should be filled ¾ full with fine watch oil, Elgin M56b in the factory.
Fig. 80.7 · Figure C, balance studs
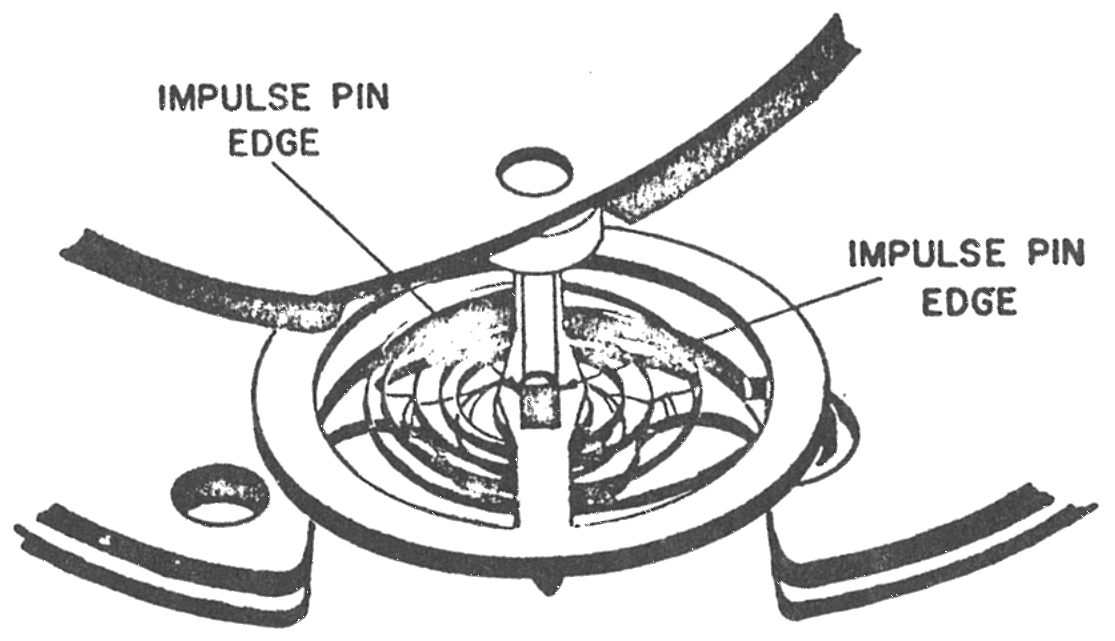
4 · The Impulse Pin
Oil both edges of the impulse pin where contact is made with the pallet lever.
Two further points call for different lubricants. Apply a spreading type oil, Woods AAAA in the factory, to the ends of the main arbor, by putting oil in the counter-sink in the back frame and at two points at the side of the main arbor where the flat has the greater gap with the ratchet wheel washer. Apply fine watch oil between the cannon pinion and the friction pinion if they have been cleaned.
Fig. 80.7 · Figure D, impulse pin
Two further points call for different lubricants. Apply a spreading type oil, Woods AAAA in the factory, to the ends of the main arbor. Apply fine watch oil between the cannon pinion and the friction pinion if they have been cleaned.
Water resistant models: These require special lubricants to maintain sealing. The manual names Dow Corning 200 Silicone Fluid, 200 Cs viscosity.
Reassembly
1 · Replacing the Balance
Replace the balance wheel assembly carefully by tilting the wheel and inserting first the dial side pivot, the hairspring side, then the movement side pivot into the “V-conic” bearing. Adjust the balance screw assembly enough to hold the balance in place.
By rotating the balance wheel, insert the hairspring into the regulator slot and hairspring bracket. Before repinning, make certain the impulse pin is within the slot in the fork of the pallet lever.
Repin the hairspring making sure the wedge pin is straight and true, as any distortion could interfere with the normal breathing of the hairspring. The endshake is now finally adjusted.
Fig. 80.8 · Replacing the balance
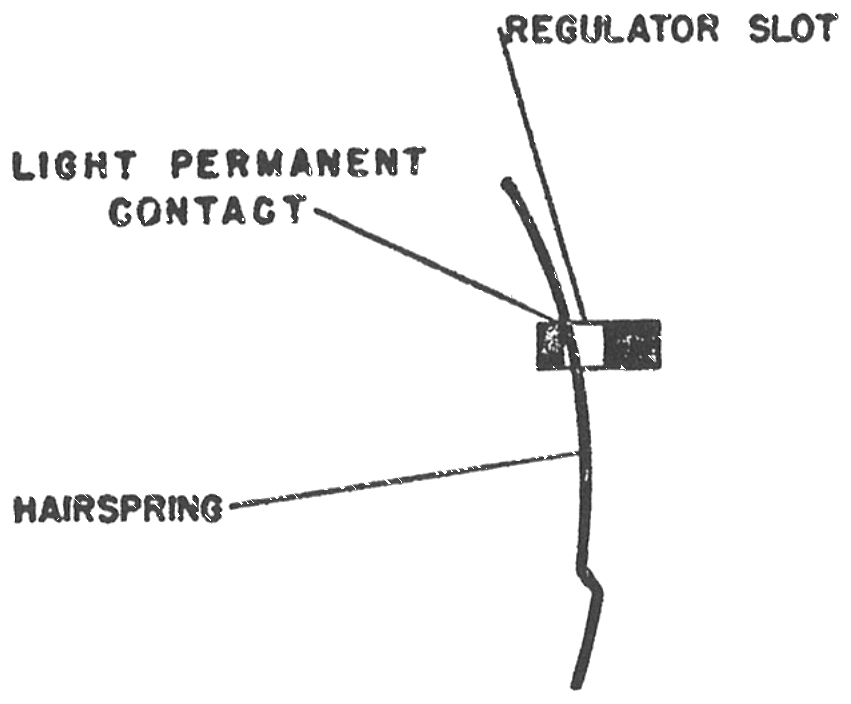
2 · The Regulator Slot
The hairspring should be in light permanent contact with the inside edge of the regulator slot.
Fig. 80.8 · Regulator slot
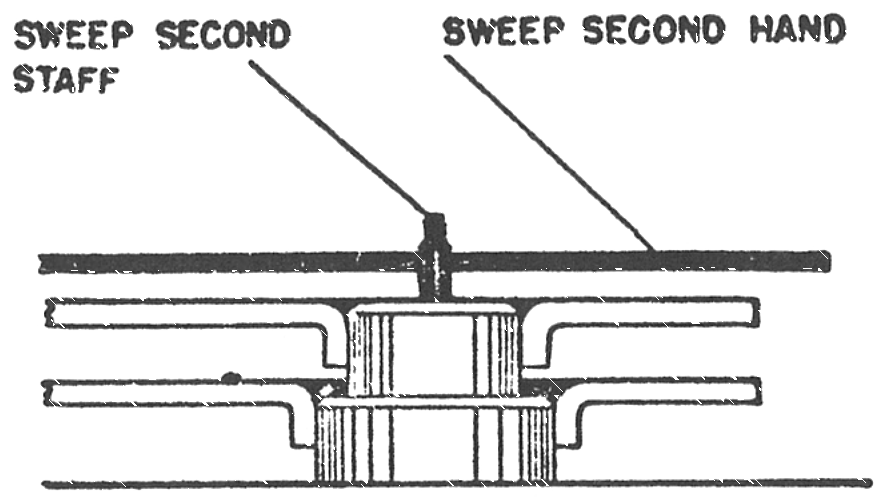
3 · The Sweep Second Hand
Be certain the sweep second hand is set below the chamfer on the top of the staff.
Fig. 80.8 · Sweep second hand
This guide is based on the original Timex factory service manual for the Model 80 movement.