A 7¼ ligne round movement with 17 jewels and plate-and-bridge construction rather than two full plates. Its manual walks a complete teardown.
Hand-wound17 JewelsPlate & BridgeCap Jewel
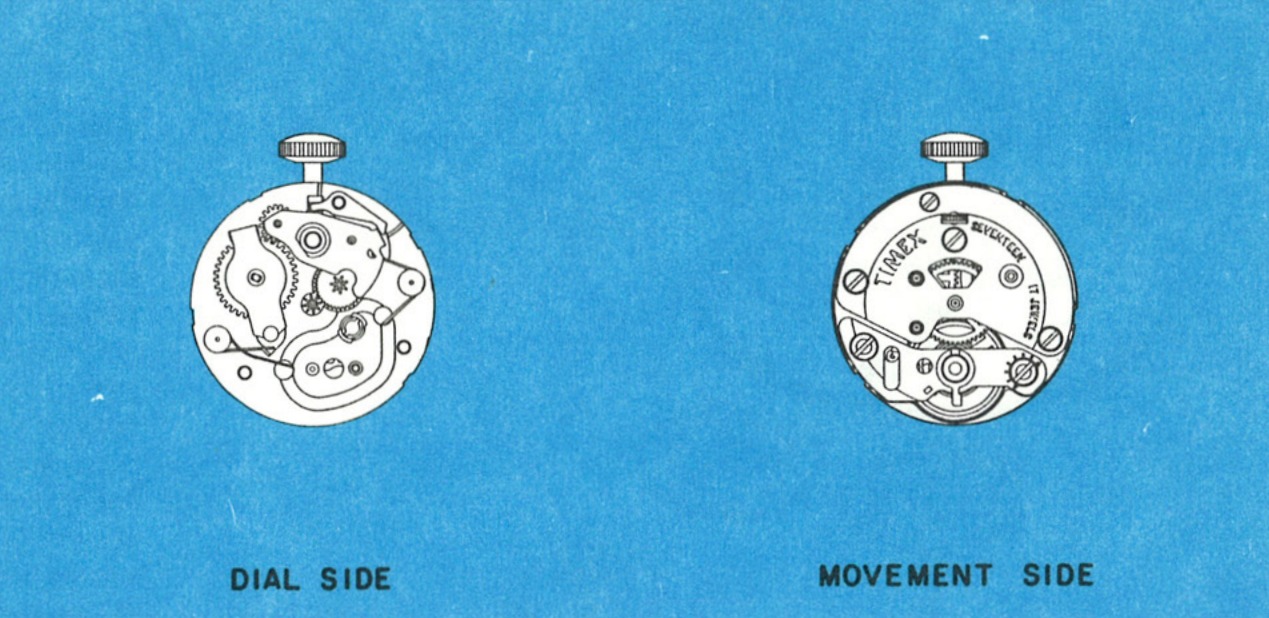
Factory Service Manual · Model 79 · Dial Side & Movement Side
Ligne7¼
Diameter16.51 mm
Diameter (inches).650 in
Jewels17
ConstructionPlate and bridge
EscapementJewelled lever
ManualService Manual · Model 79
A Bridge-Built Timex
An important feature of the Model 79 is the escapement. Timex developed a jewelled lever escapement which functions exactly as the conventional escapements but eliminates the danger of loose pallet stones. In conventional jewelled club-tooth lever escapements the pallet stones lie horizontal to the plane of the lever and are normally shellacked in place, which leads to frequent loosening of the stones during cleaning and so to readjustment. The Timex design instead uses pallet stones vertical to the pallet lever, driven permanently in place. Since they are not fixed with shellac or other adhesives they will not loosen during cleaning and will not require adjustment, thus retaining full accuracy in the escapement.
The Timex Model 79 is a 7¼ ligne round movement featuring 17 jewels and plate and bridge construction. Its manual walks a complete teardown all the way down to the train.
Its escapement is a jewelled lever design that eliminates the danger of loose pallet stones. The pallet stones are vertical to the pallet lever and driven permanently in place, so they will not loosen during cleaning and will not require adjustment.
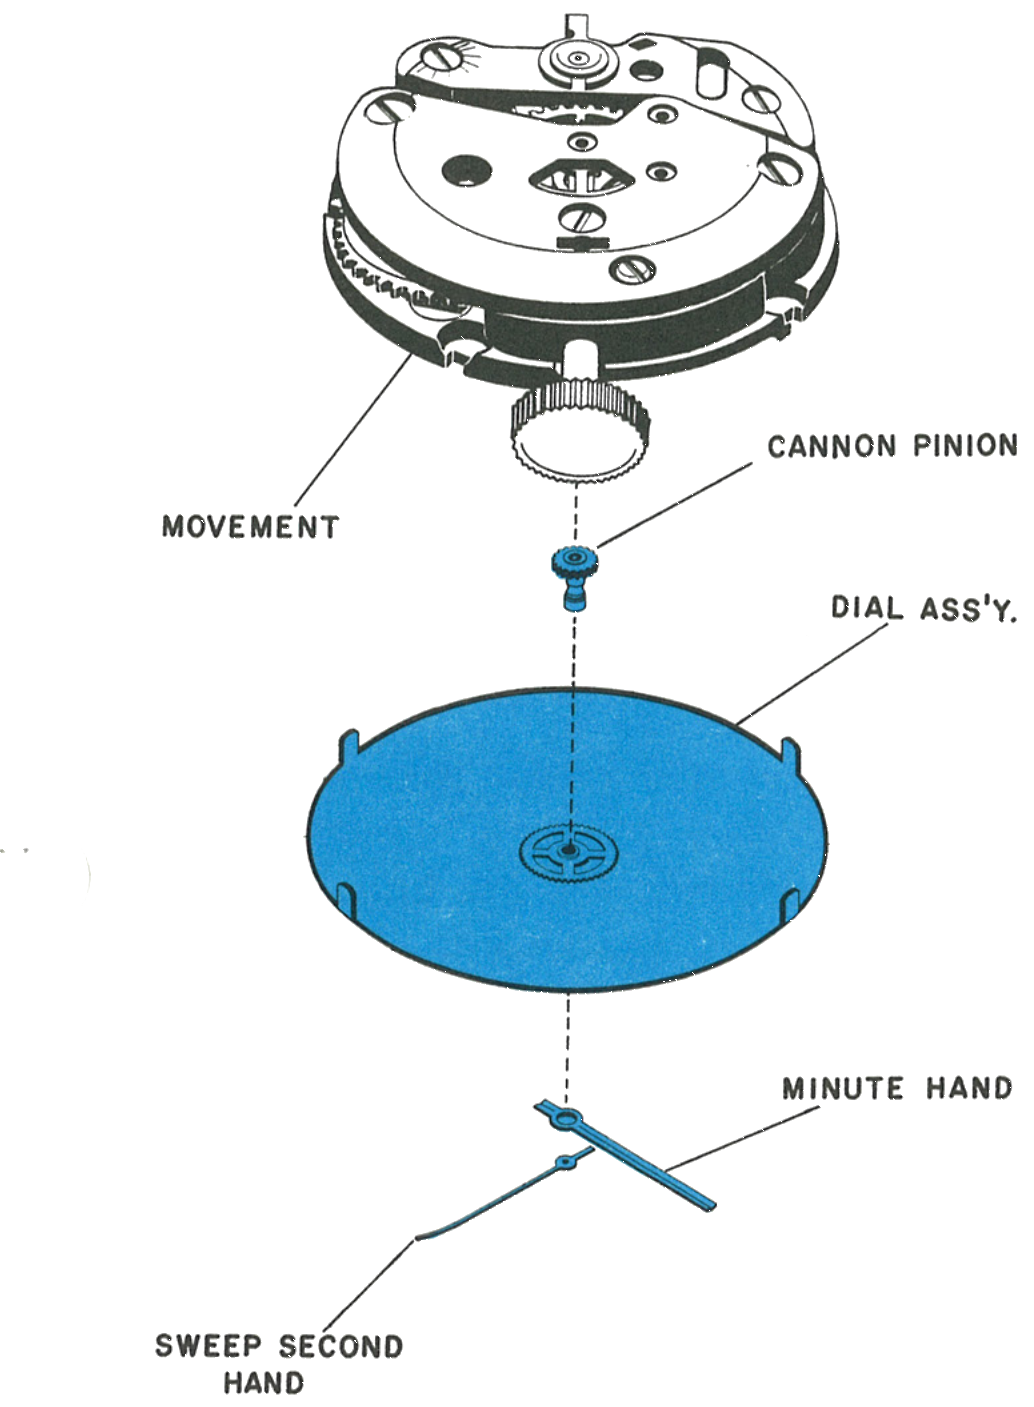
Note: To clean the Model 79 you need remove only the sweep second hand, minute hand, dial assembly, balance bridge and balance. The teardown below is for when further dismantling is required.
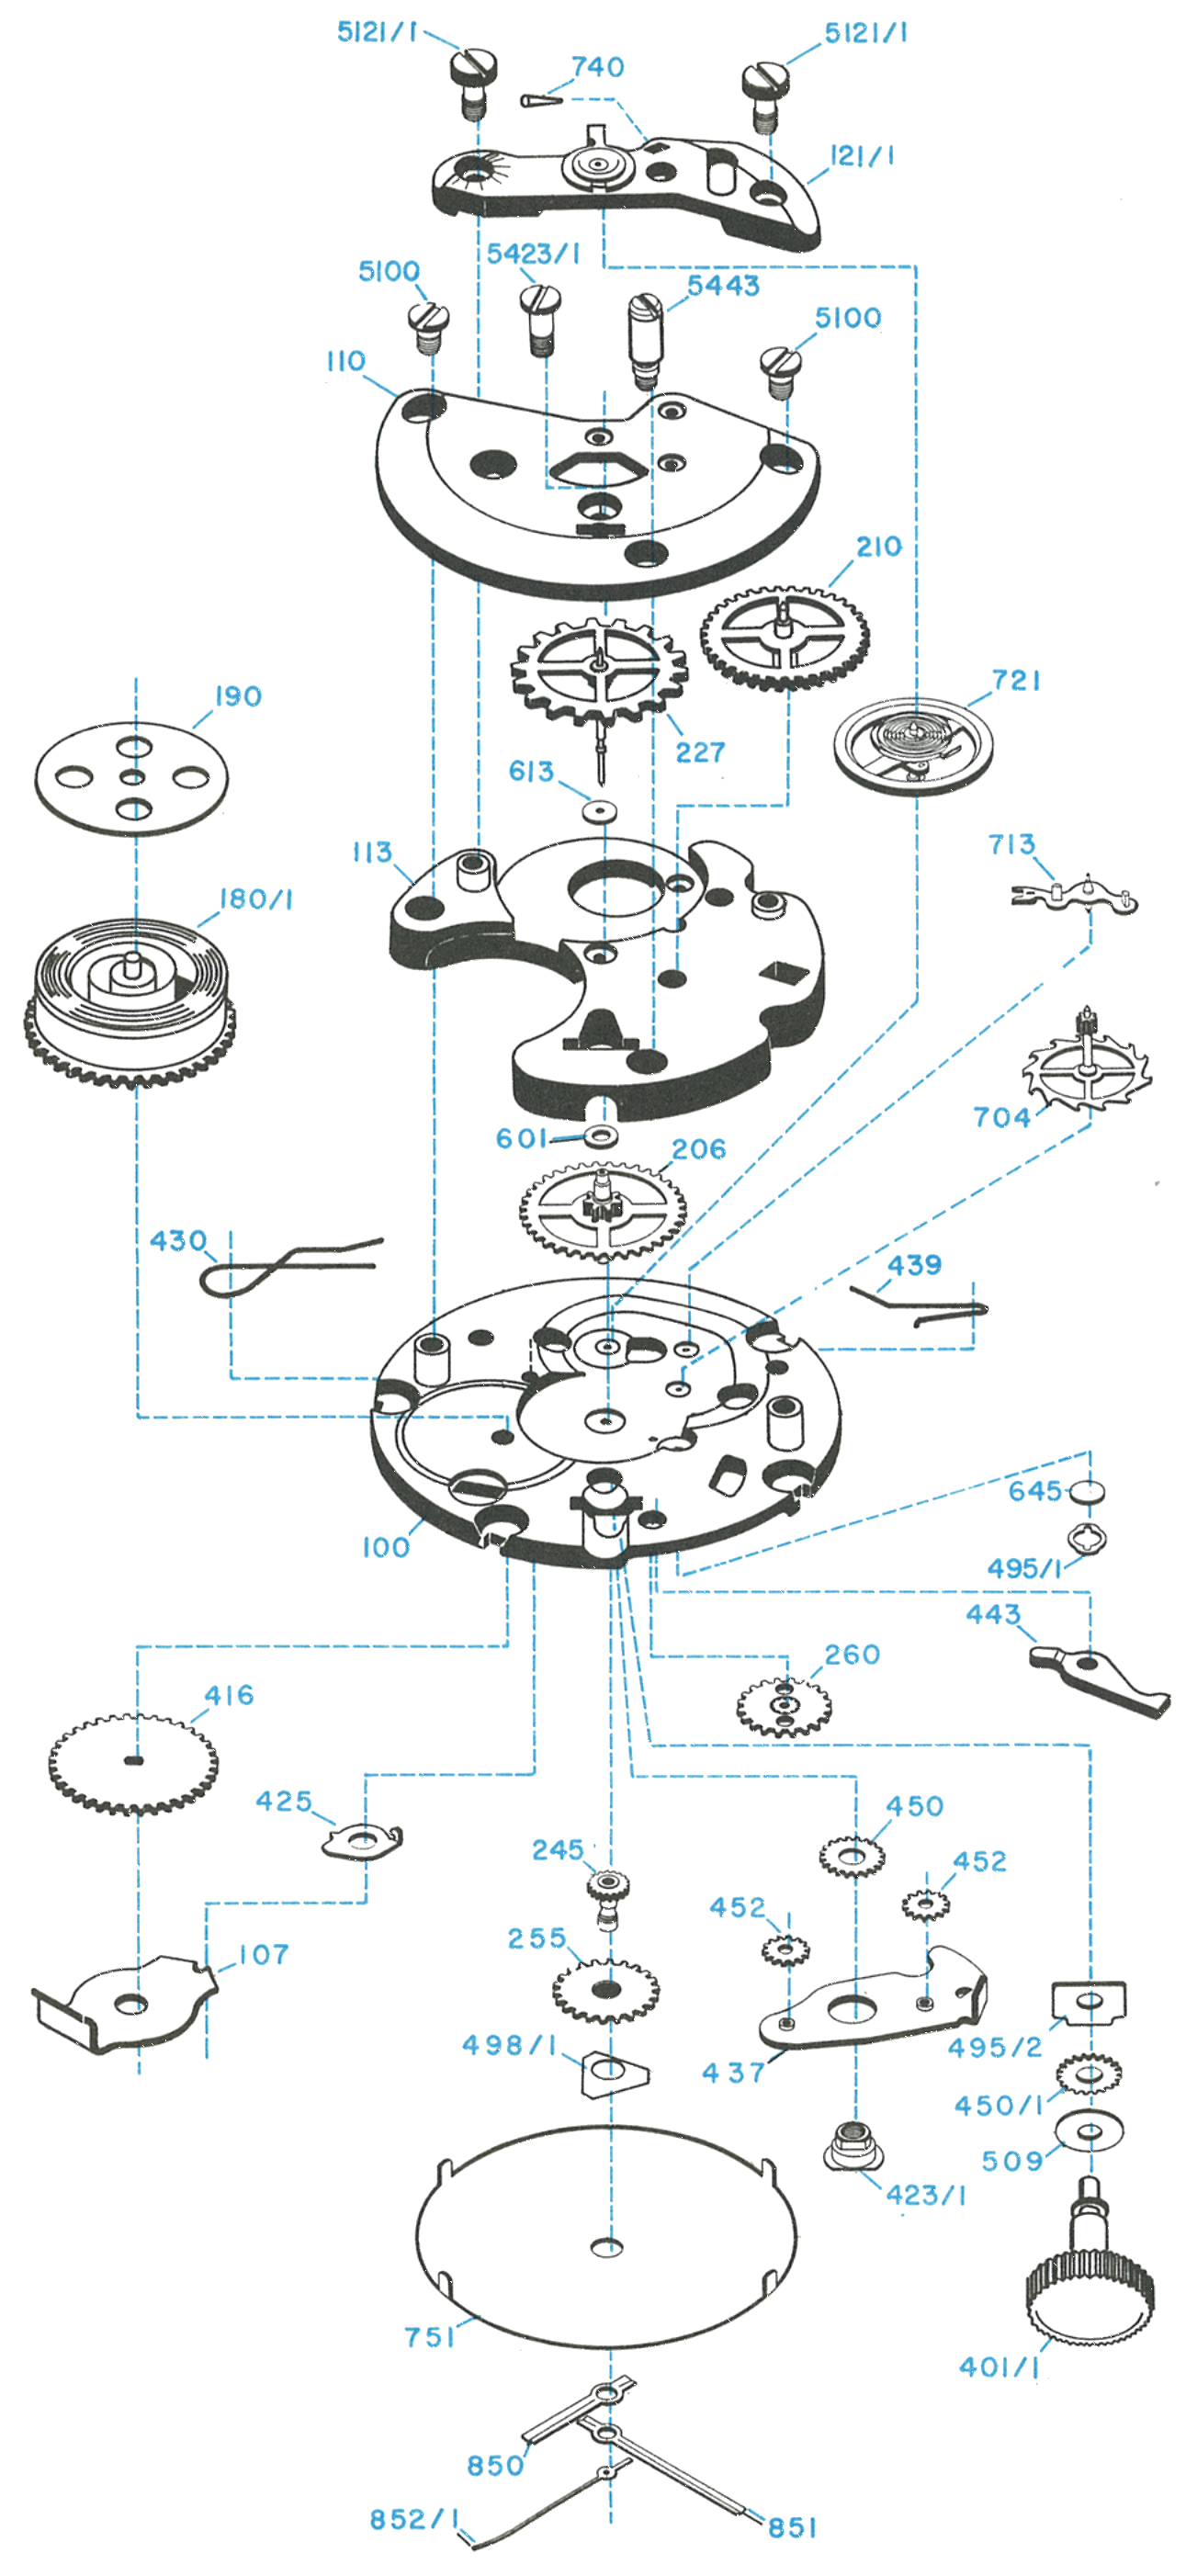
Exploded View
The bridge construction shows in the list: a ratchet wheel bridge, a train wheel bridge, a balance wheel bridge and a spacer block, none of which appear on the two-plate calibres.
The dial is clamped directly to the movement by means of four tabs which are bent over the dial plate. The dial may be removed by straightening these tabs.
Fig. 79.3 · Dial & hands
2 · Letting Down the Mainspring
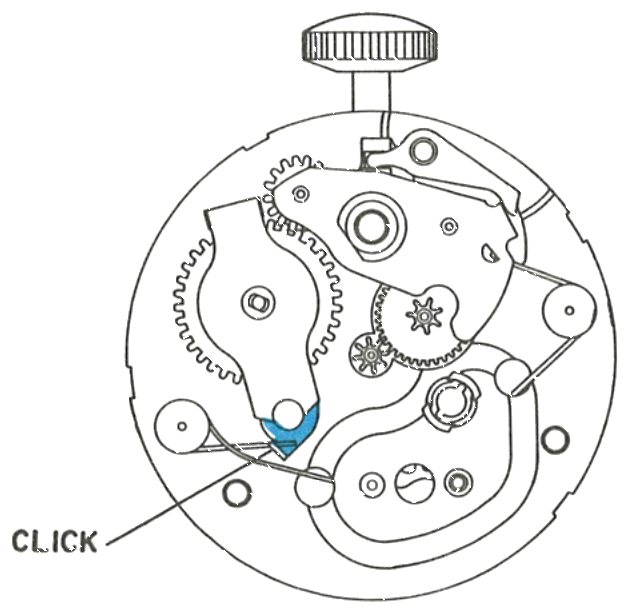
Before proceeding further with disassembly the mainspring should be let down. Grasp the crown in the fingers of one hand and release the ratchet wheel by holding the click out of engagement with the ratchet wheel. Let the crown revolve slowly in the fingers, being careful not to let the crown slip.
Fig. 79.4 · Releasing the click
3 · Removing the Balance
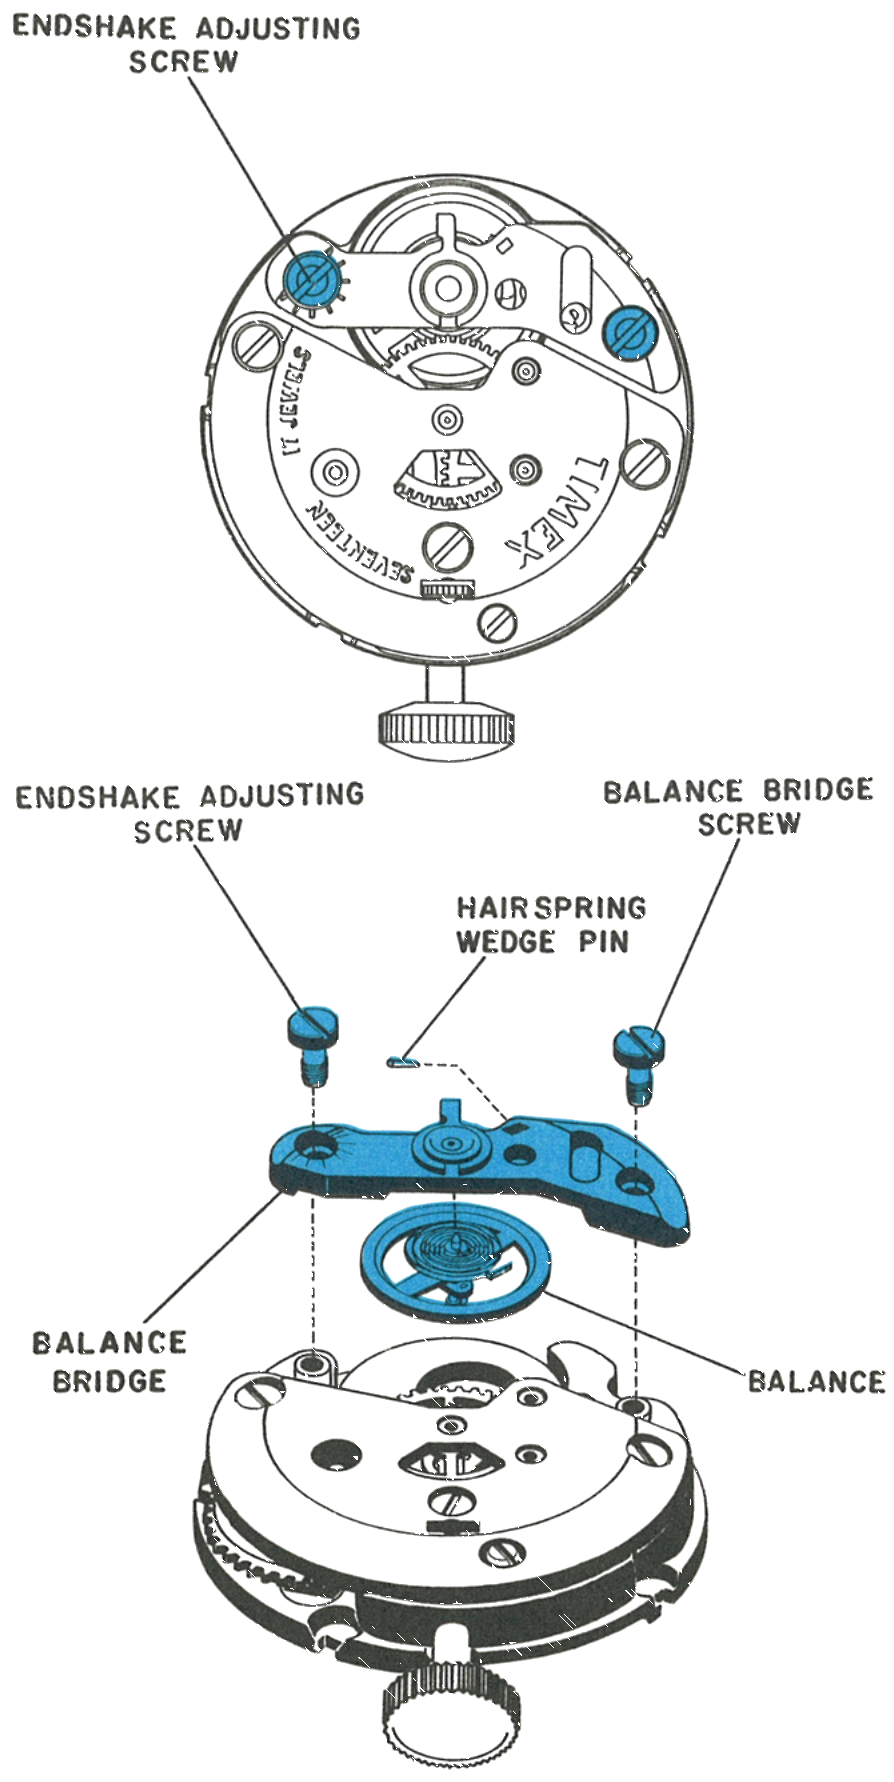
The balance and bridge may now be removed. Two “V-conic” jewels are used as bearings for the balance on the Model 79 movement, and endshake adjustment is provided by means of the endshake adjusting screw on the balance bridge.
Fig. 79.4 · Balance & bridge
4 · Removing the Ratchet Wheel
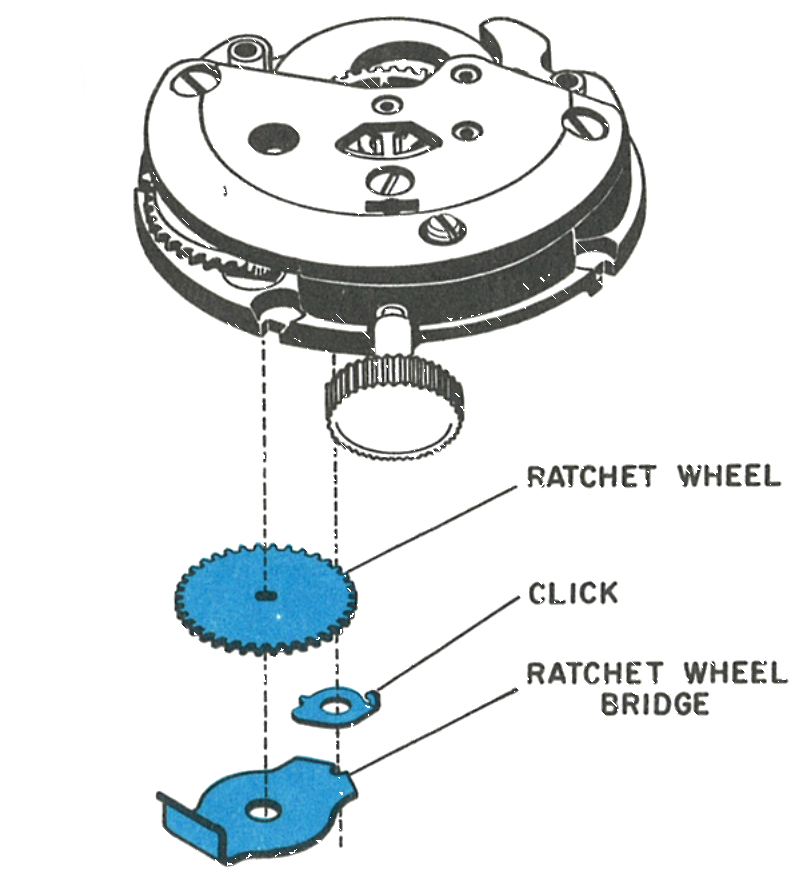
Remove the ratchet wheel bridge by unhooking the front edge of the bridge from the slot in the dial plate.
Unhook the click spring from the click and remove the click. The click spring will remain with the dial plate.
Fig. 79.5 · Ratchet wheel
5 · Removing the Stem
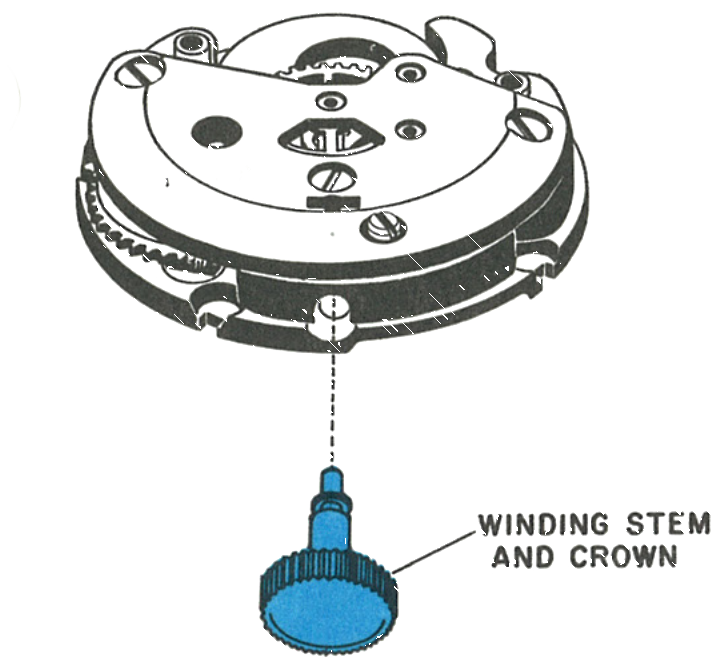
The stem is removed in the conventional manner by loosening the set lever screw. If further disassembly is required, remove the set lever screw and set lever.
Fig. 79.5 · Winding stem & crown
The Full Teardown
1 · Removing the Wind and Set Mechanism
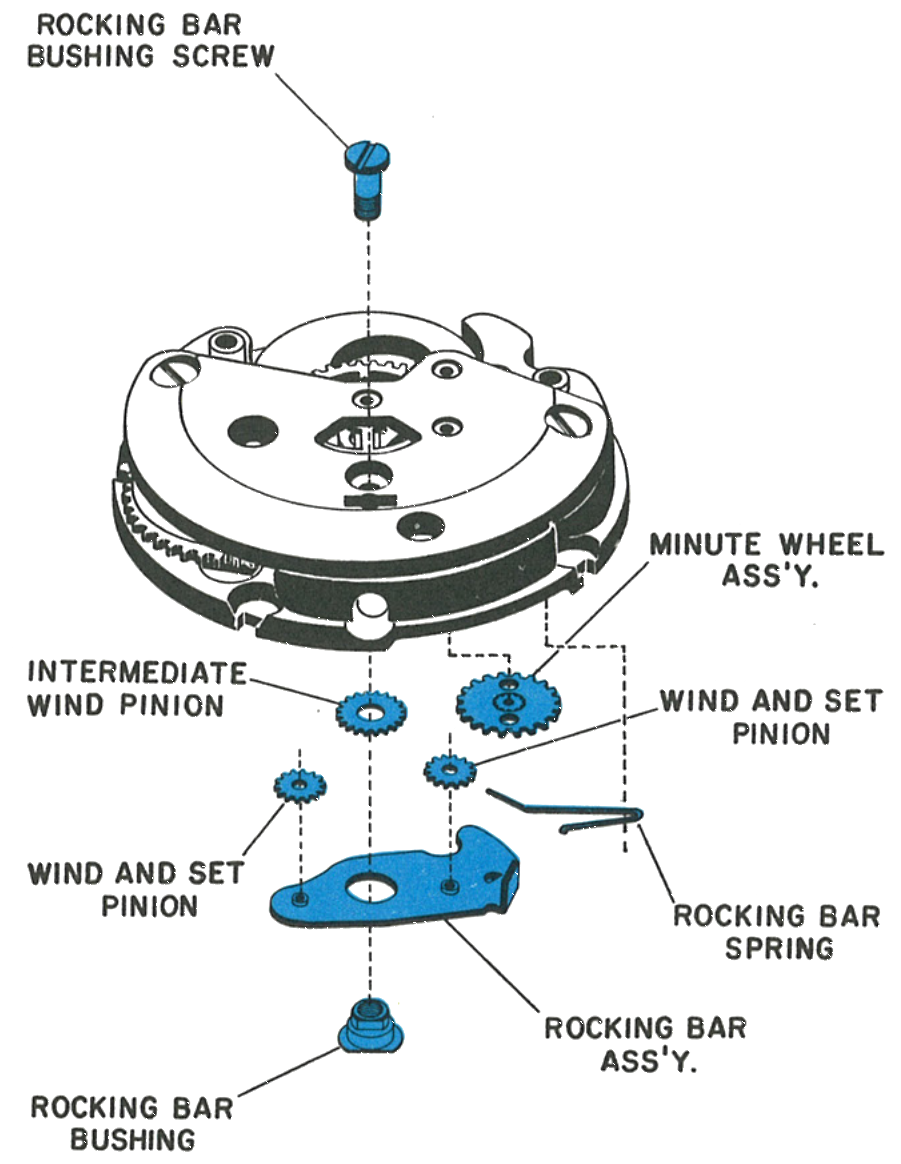
Removal of the rocking bar bushing screw will allow disassembly of the wind and set mechanism and the rocking bar spring.
Fig. 79.6 · Wind & set mechanism
2 · Removing the Train Bridge and Train
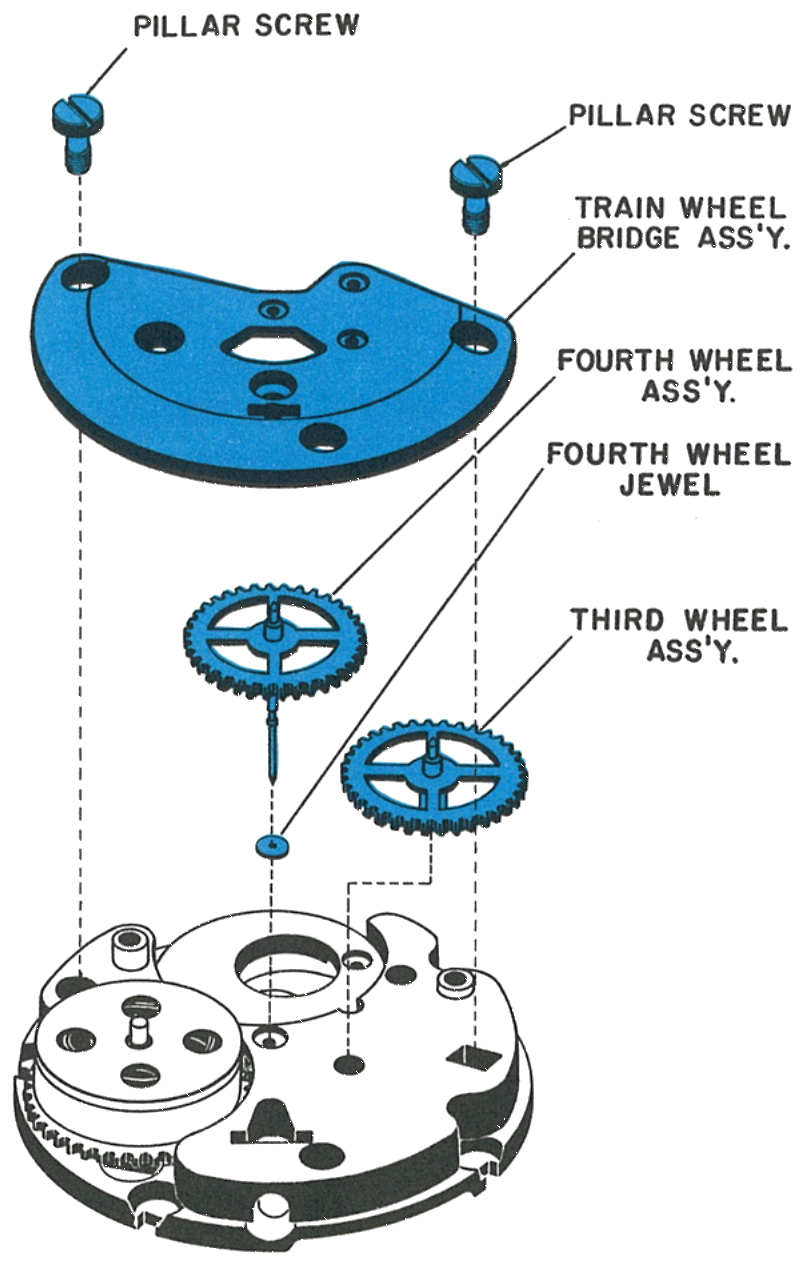
The Model 79 construction utilizes a spacer block between the train wheel bridge and dial plate.
To remove the train wheel bridge, remove the two pillar screws. Next, gently remove the train wheel bridge, the fourth wheel assembly and third wheel assembly.
Note: Note the loose fourth wheel jewel located between the fourth wheel and the spacer block.
Fig. 79.6 · Train bridge & train
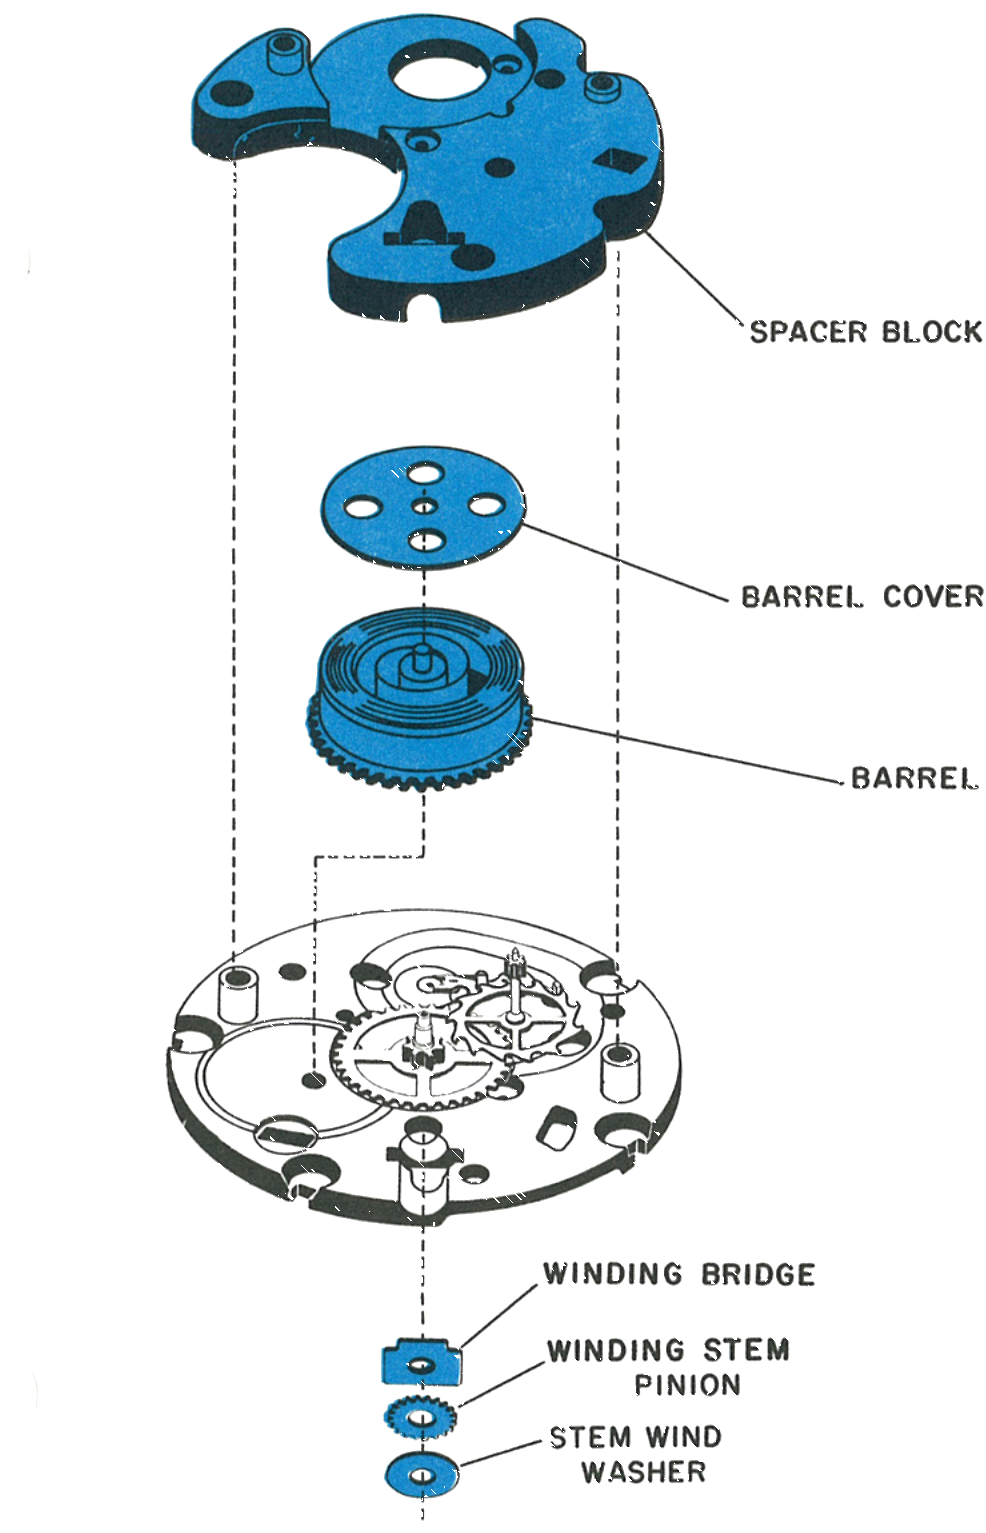
3 · Removing the Spacer Block
The next step is to remove the spacer block. Once this is removed, the remainder of the train together with the barrel may be removed.
Note: Note the position of the loose centre wheel jewel located between the centre wheel and the spacer block.
Fig. 79.7 · Spacer block & barrel
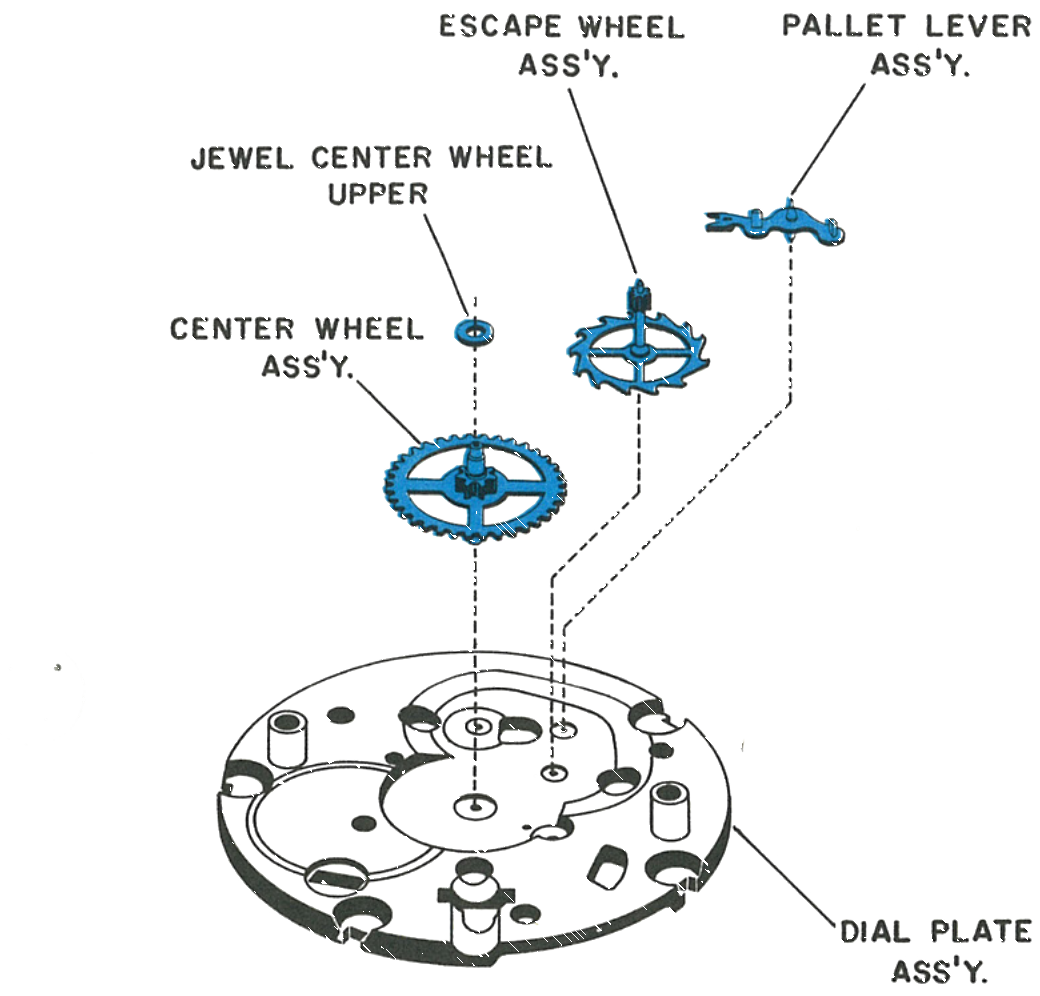
4 · The Train and Dial Plate
The escape wheel, pallet lever, centre wheel and the upper centre wheel jewel, laid out over the dial plate assembly.
Fig. 79.7 · The train
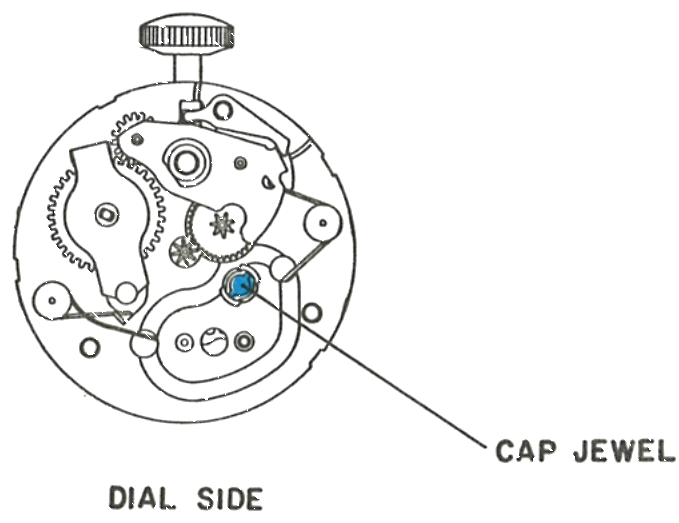
The Cap Jewel
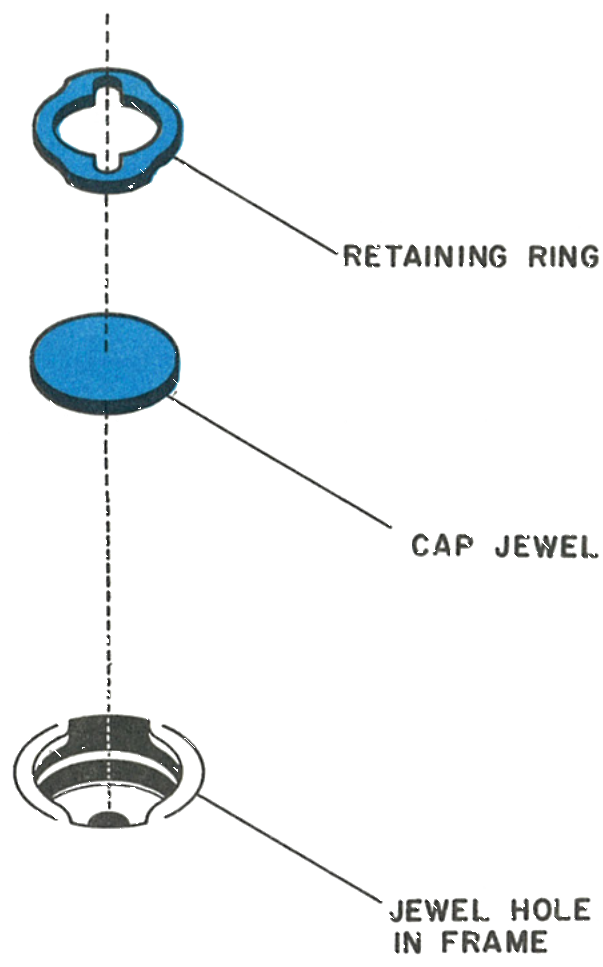
1 · Removing the Cap Jewel
Insert the tip of the revised screwdriver blade into the elongated slot on the retaining ring.
Turn the retaining ring a quarter turn in a clockwise direction.
Remove the screwdriver blade and carefully lift out the retaining ring and cap jewel.
Fig. 79.8 · Retaining ring & cap jewel
2 · Cap Jewel Location
The cap jewel sits on the dial side of the movement.
Fig. 79.8 · Dial side
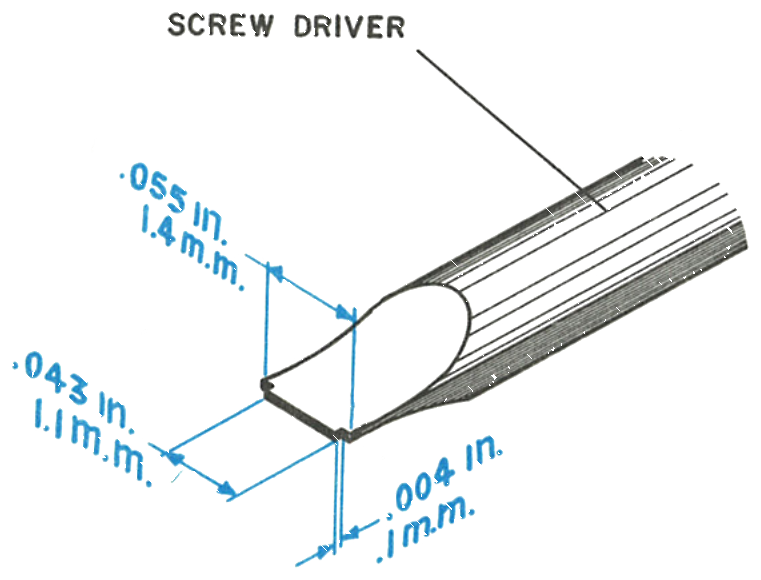
3 · The Reground Screwdriver
A screwdriver blade reground as shown is useful for the job. The manual gives the ground dimensions as .055 in (1.4 mm), .043 in (1.1 mm) and .004 in (.1 mm), and states the tool is available on request from the Timex Corporation.
4 · Reassembly
After cleaning, replace the balance and balance bridge. Replace the dial by bending the dial tabs to clamp the dial in place, then replace the minute and sweep hands. As with most Timex movements, the hairspring is curbed against the inside edge of the regulator slot.
Fig. 79.8 · Reground screwdriver
Cleaning & Reassembly
Lubricant change, June 1974: Timex Service Bulletin No. 111 replaced the factory oil for this model. Moebius Synt-A-Lube oil is used instead of Elgin M56B oil or Tenneco #415 oil. (It supersedes Bulletin No. 108.)
The balance assembly should be cleaned separately in a small jar to prevent damage to the hairspring. Only standard watch cleaning solutions should be used throughout.
The best method of cleaning the Model 79 is with only the dial, hands, balance bridge and balance removed. Place the movement in a cleaning machine with the train bridge side down. This will allow proper drainage of the cleaning fluid from the mainspring barrel. The movement should be well swirled in the cleaning fluid, after which two sets of rinsing fluids should be used. The final cleaning fluid must be absolutely clean. After cleaning, the movement should be thoroughly dried.
The “V-conic” bearing should be oiled ½ to ¾ full before replacing the balance. Oil both the top and bottom sides of the intermediate wind pinion and wind and set pinion. The movement should be re-lubricated in the normal manner using only high grade watch oils; the oil used in factory assembly is Elgin M56b.
Caution: The mainspring is permanently lubricated with a solid coating and should not be oiled.
Note: Support the centre of the fourth wheel staff at the train bridge side while replacing the sweep hand, to avoid damage to the fourth wheel jewel. If the movement was completely disassembled, lubricate during reassembly to reach the fourth wheel jewel and centre wheel jewel.
This guide is based on the original Timex factory service manual for the Model 79 movement.