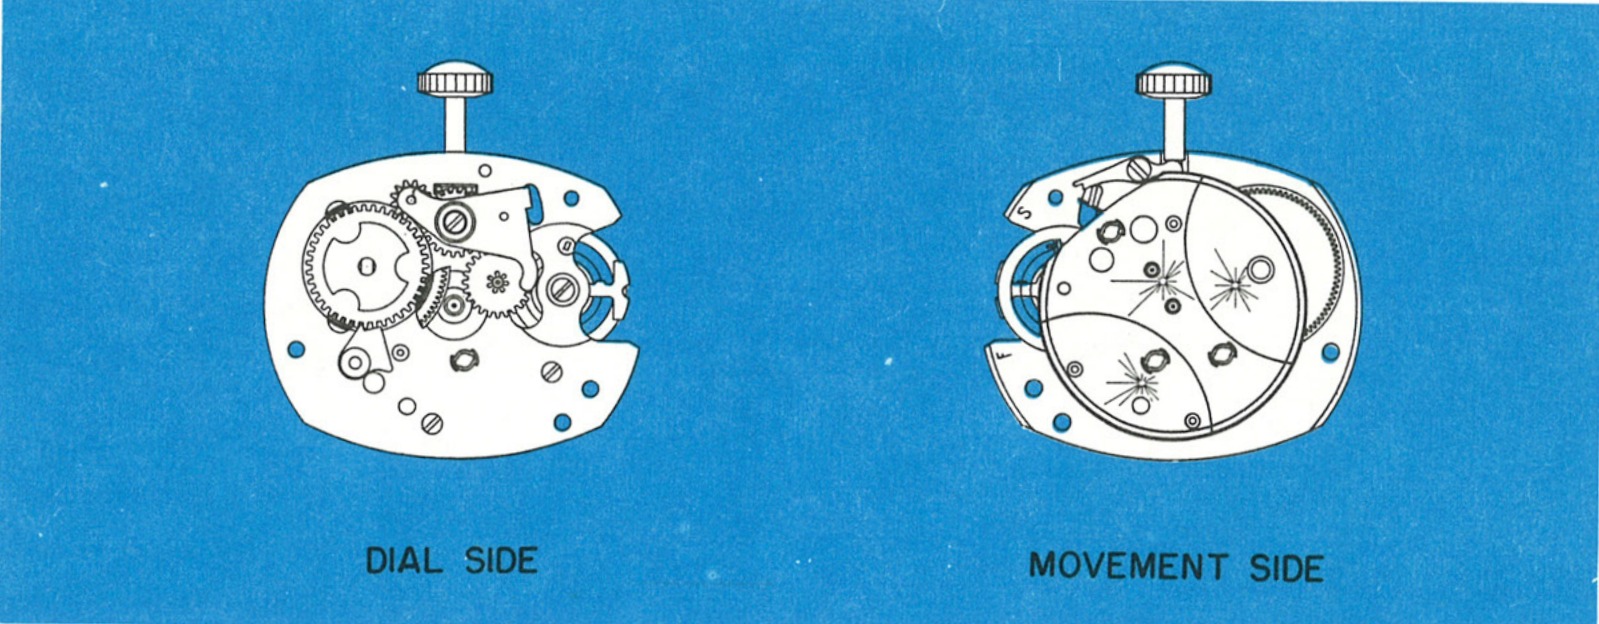
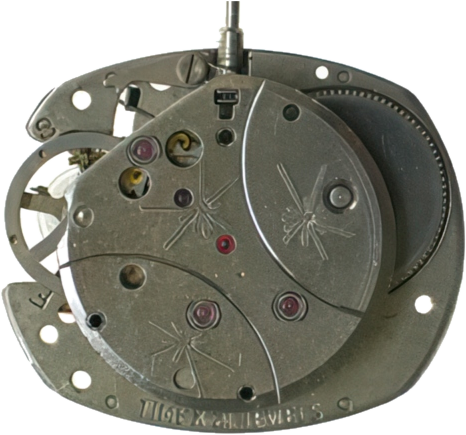
The Timex Model 72 is an 11¼‴ x 9¼‴ movement featuring 21 jewels and rugged two plate construction. It is readily distinguished from other Timex movements by the number of jewels and the small, gracefully decorated movement plate.
Whereas most watches utilize bridges, Timex has constructed the Model 72 movement with full plates to take advantage of the accuracy inherent in this type of design. This accuracy insures complete interchangeability of the escapement and gear train without the need for selective fitting and adjustments which complicate the repair of most watches.
Another important feature is the escapement. Timex developed a jewelled lever escapement which functions exactly as the conventional escapements but eliminates the danger of loose pallet stones. In conventional jewelled club-tooth lever escapements the pallet stones lie horizontal to the plane of the lever and are normally shellacked in place, which leads to frequent loosening of the stones during cleaning and so to readjustment. The Timex design instead uses pallet stones vertical to the pallet lever, driven permanently in place. Since they are not fixed with shellac or other adhesives they will not loosen during cleaning and will not require adjustment, thus retaining full accuracy in the escapement.
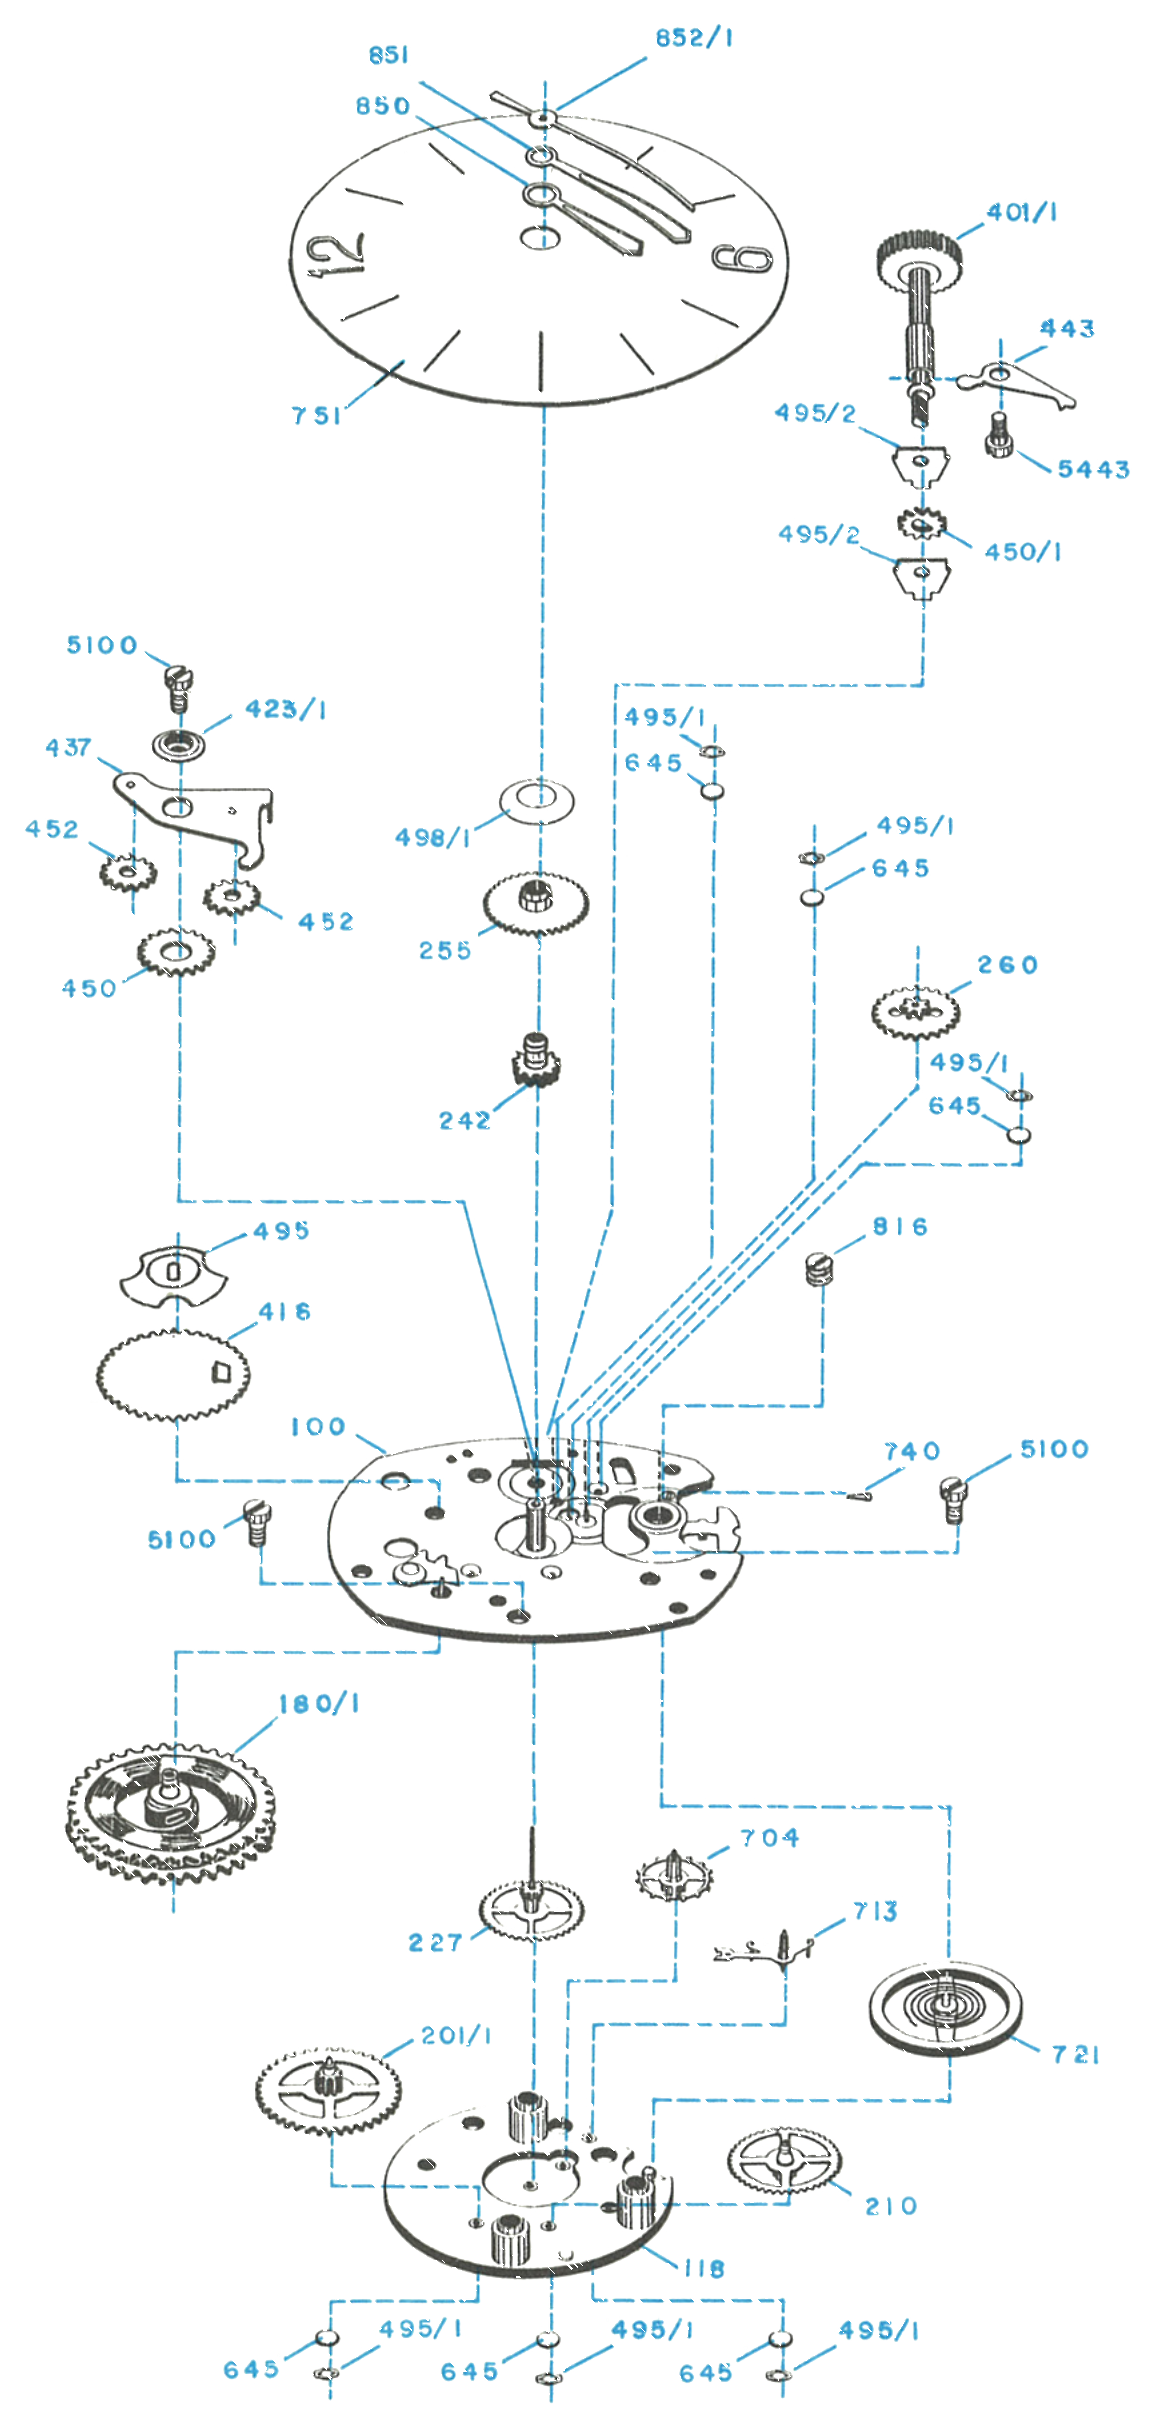
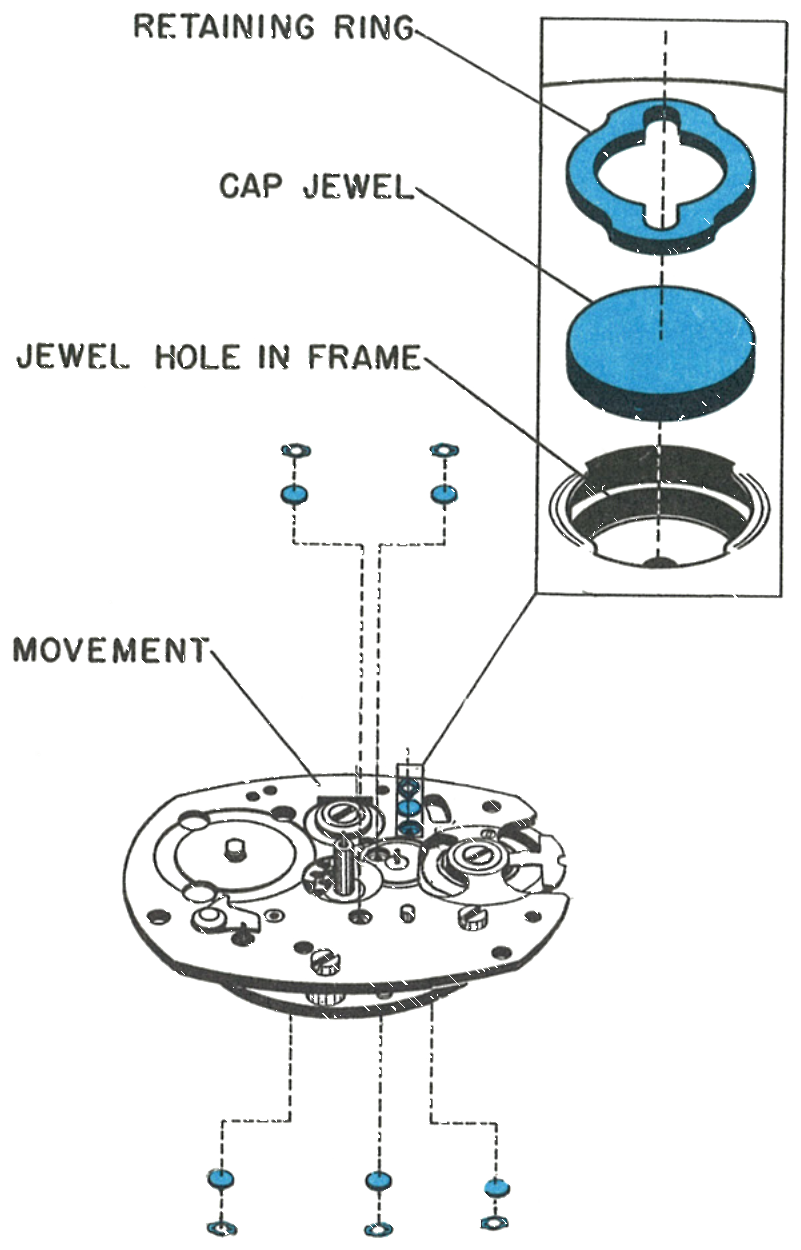
Note: All cap jewels are removable. To clean the movement you need remove only the sweep second hand, dial, ratchet wheel, wind and set mechanism, minute wheel, cap jewels and balance.
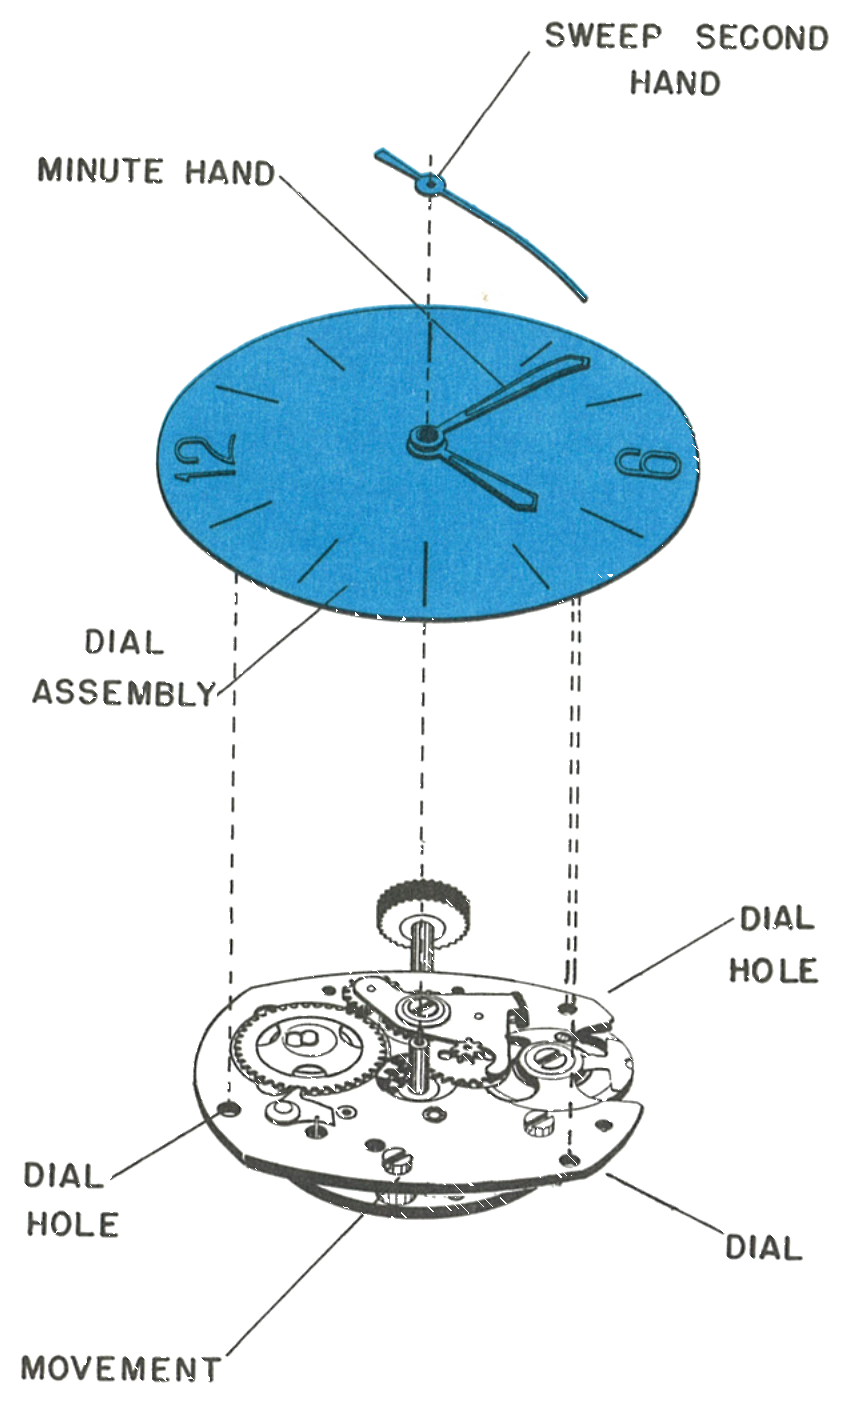
Remove the sweep second hand. Do not remove the minute or hour hand.
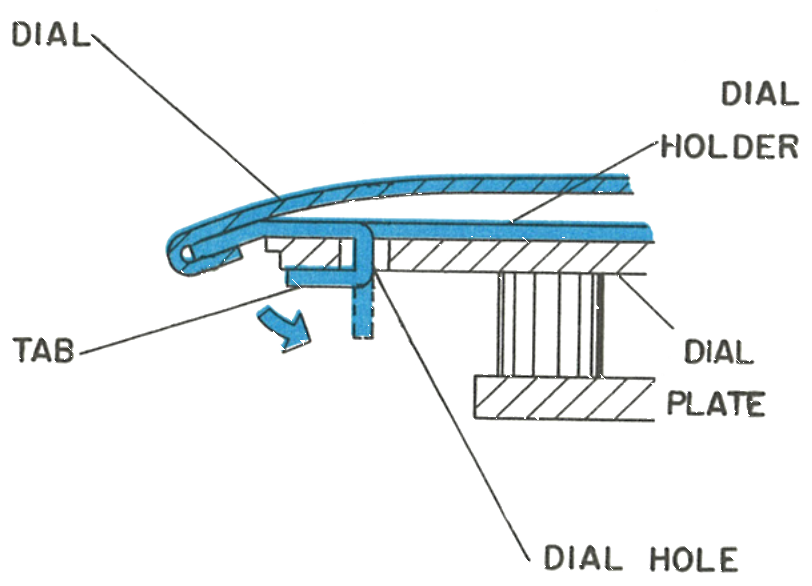
The dial holder, to which the dial is clamped, is held on the movement by means of three tabs which are bent through dial holes onto the dial plate.
Once the dial is removed there is no need for further disassembly of the dial assembly for cleaning unless severe contamination is present on the friction and cannon pinions. Should further disassembly be necessary, removal of the minute hand will free the friction and cannon pinion assembly. The friction pinion is held in the cannon pinion by a snap fit.
Note: On some models a dial holder is not used. On these, three tabs are formed on the dial itself.
Fig. 72.3 · Dial & hands
2 · The Dial Holder Tabs
Cross section through the dial, dial holder, tab and dial plate.
Fig. 72.3 · Dial holder & tab
3 · Removing the Ratchet Wheel
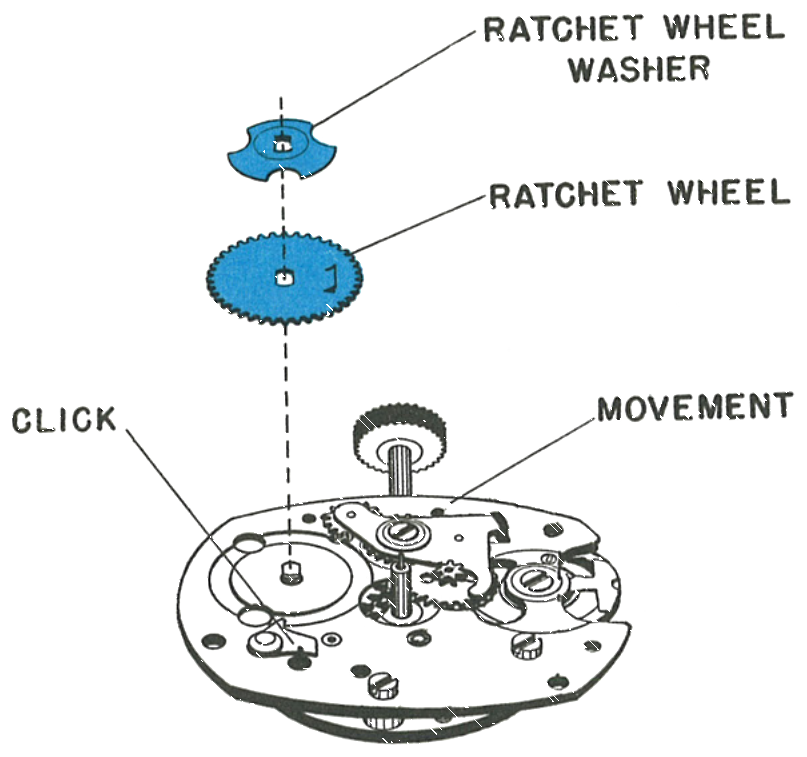
Grasp the crown in the fingers of one hand and release the ratchet wheel by holding the click out of engagement with the ratchet wheel. Let the crown revolve slowly in the fingers, being careful not to let the crown slip.
When the mainspring has been fully let down, remove the ratchet wheel washer and ratchet wheel.
Fig. 72.4 · Ratchet wheel
4 · Removing the Wind & Set Mechanism
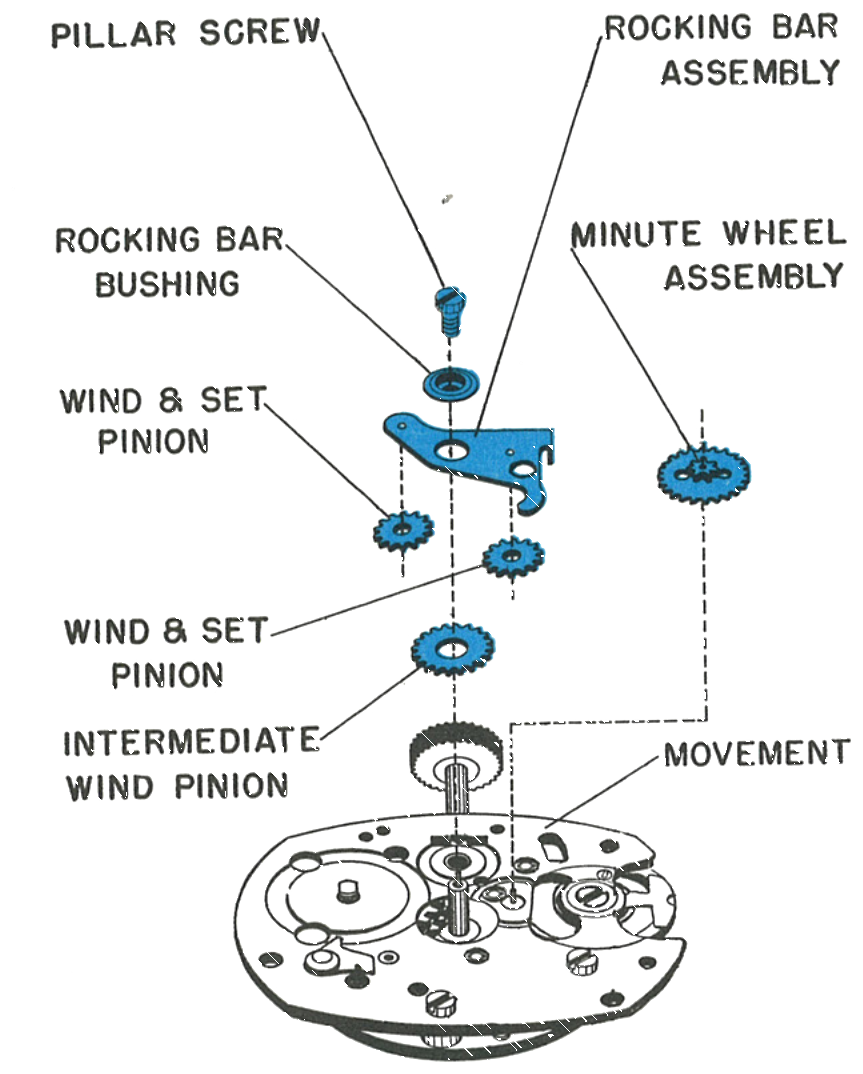
Start by removing the pillar screw. The rocking bar, bushing, wind and set pinions, intermediate wind pinion and minute wheel assembly are then taken off from the dial plate.
Fig. 72.4 · Wind & set mechanism
5 · Removing the Crown, Stem and Balance
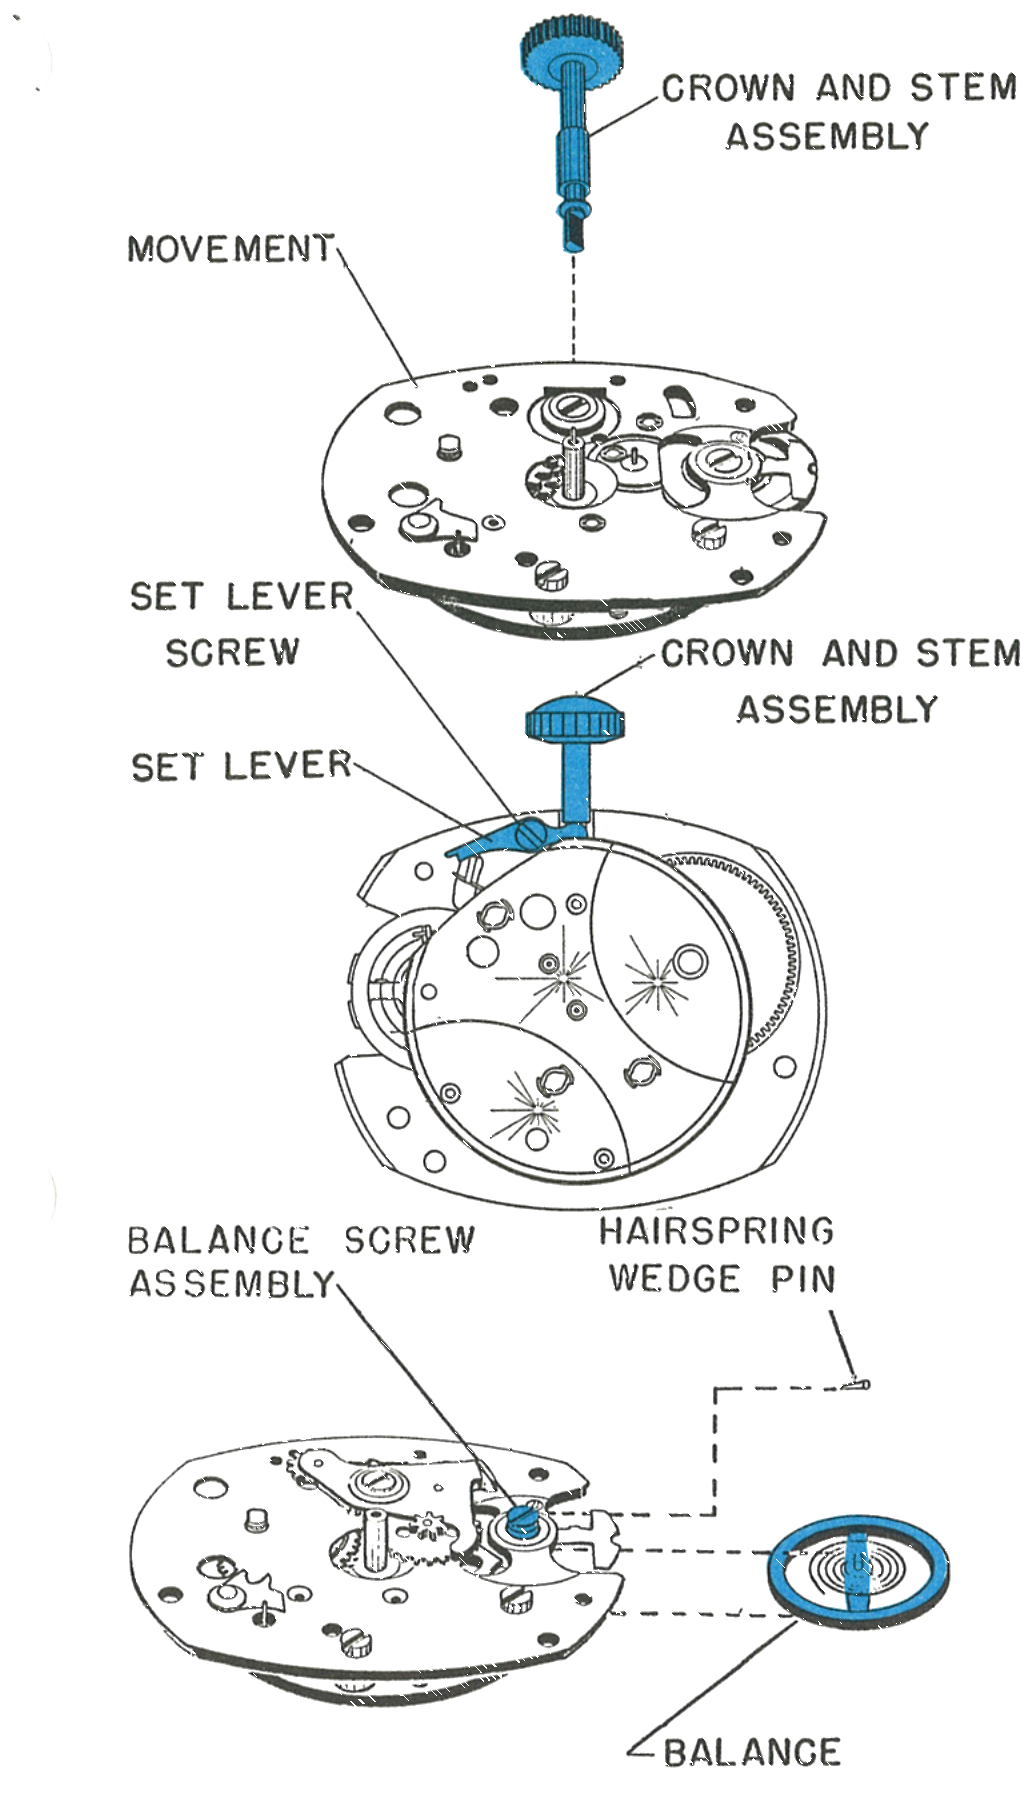
To remove the crown and stem assembly, invert the movement so that the movement plate is facing you. Turn the set lever screw approximately one turn and lift the tail of the set lever out of engagement with the stem.
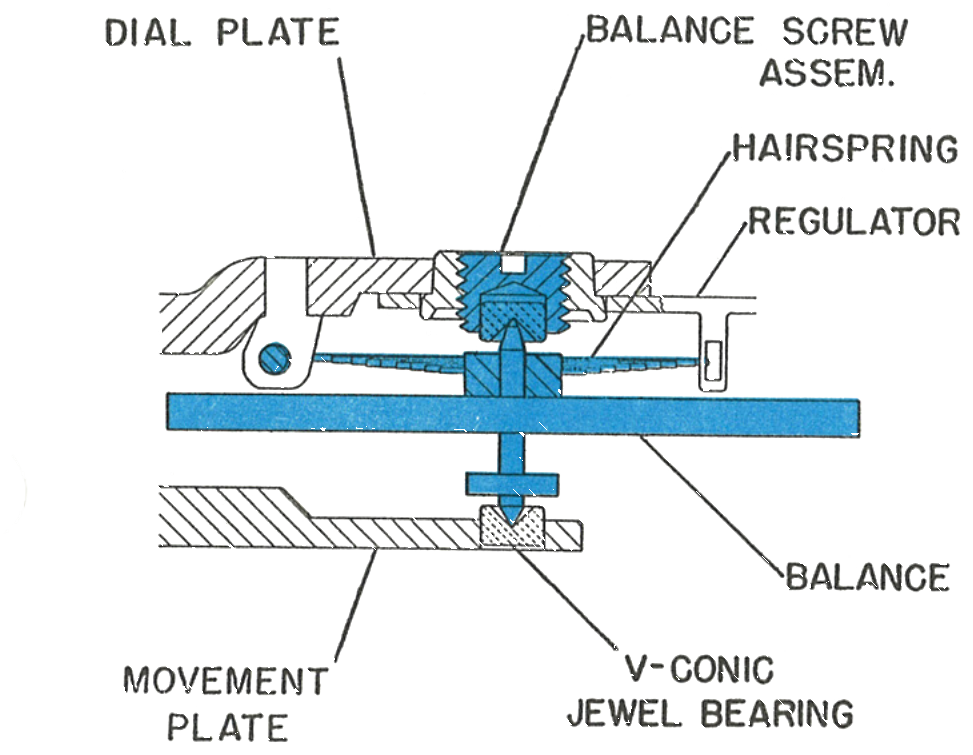
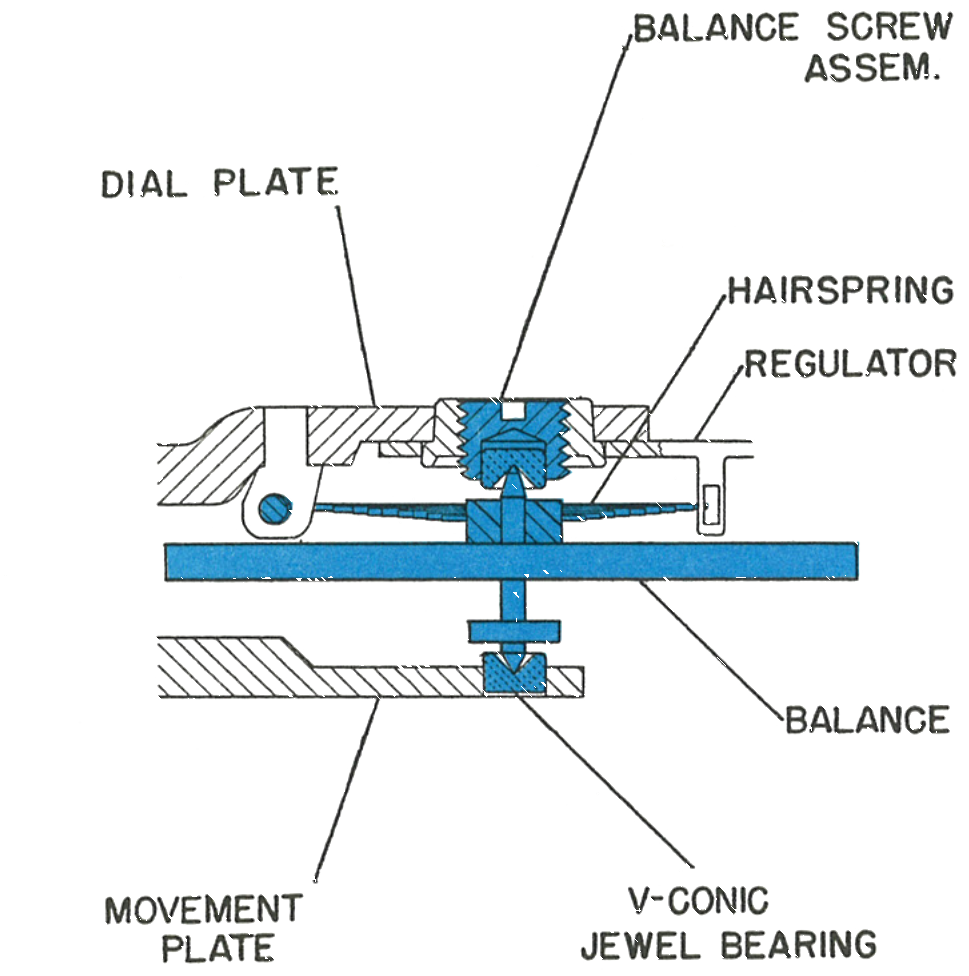
Two “V-conic” jewels are used as bearings for the balance staff. The jewel in the dial plate is mounted in a screw so that fine endshake adjustment is possible.
Remove the hairspring wedge pin, being careful not to distort either the pin or the hairspring. Rotate the balance slowly until the hairspring tail is free of the hairspring wedge pin bracket and the regulator.
Loosen the balance screw assembly counterclockwise until the end of the balance staff is free of the “V-conic” bearing, then carefully remove the balance assembly.
Caution: Apply only minimum downward pressure with the screwdriver. Excessive pressure could seriously damage the balance staff points.
Fig. 72.5 · Crown, stem & balance
6 · The V-Conic Jewel Bearing
Cross section through the balance, showing the V-conic jewel bearing in the dial plate and the balance screw assembly above it.
Fig. 72.5 · V-conic jewel bearing
The Cap Jewels
1 · Removing the Cap Jewels
Insert the tip of the revised screwdriver blade into the elongated slot on the retaining ring.
Turn the retaining ring a quarter turn in a clockwise direction.
Remove the screwdriver blade and carefully lift out the retaining ring and cap jewel. Six cap jewels are used in the movement.
Fig. 72.6 · Retaining ring & cap jewel
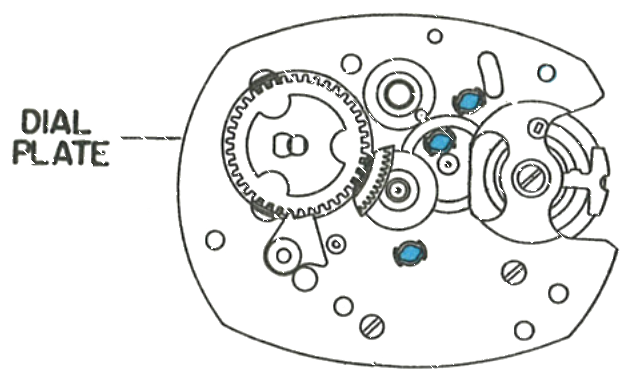
2 · Cap Jewel Locations
The cap jewel positions on the movement plate and on the dial plate.
Fig. 72.6 · Dial plate
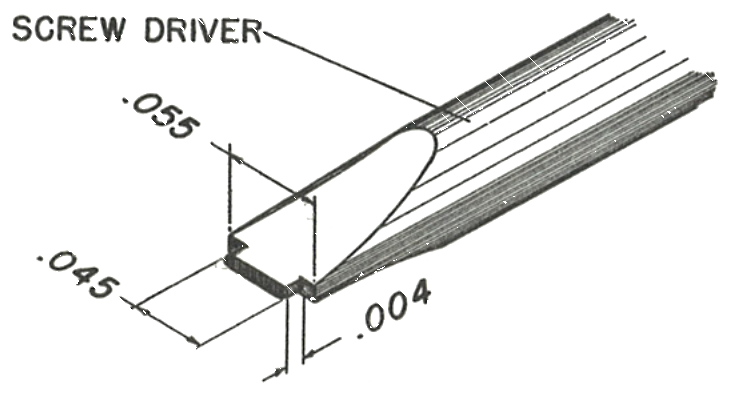
3 · The Reground Screwdriver
To remove and replace the jewels, a screwdriver blade reground as shown is very useful. The manual gives the ground dimensions as .055, .045 and .004 inches, and states the tool is available on request from U.S. Time Corporation.
Fig. 72.6 · Reground screwdriver
Cleaning & Lubrication
Lubricant change, June 1974: Timex Service Bulletin No. 111 replaced the factory oil for this model. Moebius Synt-A-Lube oil is used instead of Elgin M56B oil or Tenneco #415 oil. (It supersedes Bulletin No. 108.)
If a cleaning machine is not available, the same procedure should be followed manually, by re-inserting the stem, grasping the movement firmly around the area of the stem and shaking it in the cleaning and rinsing fluids to insure that the fluid will pass through the entire mechanism. The balance assembly should be cleaned separately in a small jar to prevent damage to the hairspring. Only standard watch cleaning solutions should be used throughout.
After removal of the balance and the other parts mentioned on pages 72.3 through 72.6, the movement is ready to be cleaned. If a cleaning machine is used, place the movement in the basket with the dial plate down to insure proper drainage of the fluid from the mainspring barrel. It should be well swirled in the cleaning fluid, after which two sets of rinsing fluids should be used. The final cleaning fluid must be absolutely clean. After cleaning, the movement should be thoroughly dried.
The balance assembly should be cleaned separately in a small jar to prevent damage to the hairspring. Only standard watch cleaning solutions should be used throughout.
Re-oil in the normal manner using only high grade watch oils; the oil used in factory assembly is Elgin M56b. The “V-conic” bearings should be oiled no less than ¾ full before replacing the balance. Oil both the top and bottom sides of the intermediate wind pinion and the wind and set pinion.
Caution: The mainspring is permanently lubricated with a solid coating not affected by normal cleaning solutions, and should not be oiled.
Reassembly
1 · Replacing the Balance
Replace the balance carefully into the movement by tilting the wheel and inserting first the top pivot, the hairspring side, then the lower pivot into the “V-conic” bearings. Adjust the balance screw enough to hold the balance.
Insert the hairspring into the regulator slot and hairspring wedge pin bracket. Before repinning the hairspring, make certain the impulse pin is within the slot of the pallet fork.
Repin the hairspring making sure that the wedge pin is straight and true, as any distortion to the pin will interfere with the breathing of the hairspring. The endshake can now be finally adjusted.
Caution: Apply only minimum downward pressure to the balance screw. Excessive pressure could damage the points of the balance staff.
Fig. 72.8 · Replacing the balance
2 · The Hairspring and Regulator Slot
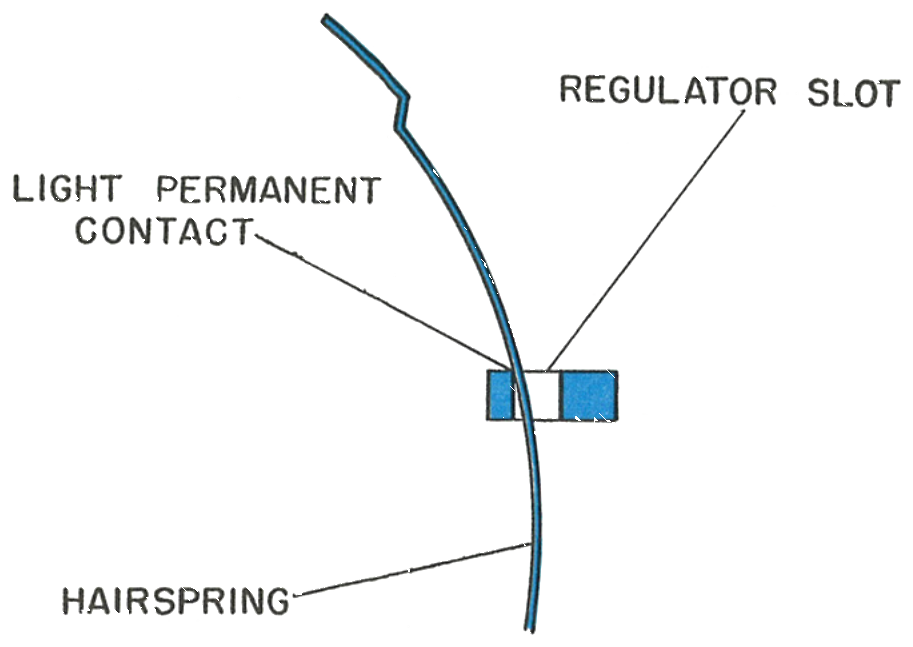
Inspect the hairspring to be certain it is properly adjusted. The hairspring should be in light permanent contact with the inside edge of the regulator slot, and should not leave that edge at any time during the complete maximum oscillation of the balance.
Fig. 72.8 · Hairspring & regulator slot
3 · The Dial and Sweep Second Hand
When replacing the dial assembly, position the hour and minute hands to 12:00 before inserting the tabs on the dial holder into the holes on the dial plate. Bend the tabs to secure the dial.
If the minute hand has been removed, replace it on the dial assembly together with the friction and cannon pinions before the dial assembly is put on the movement.
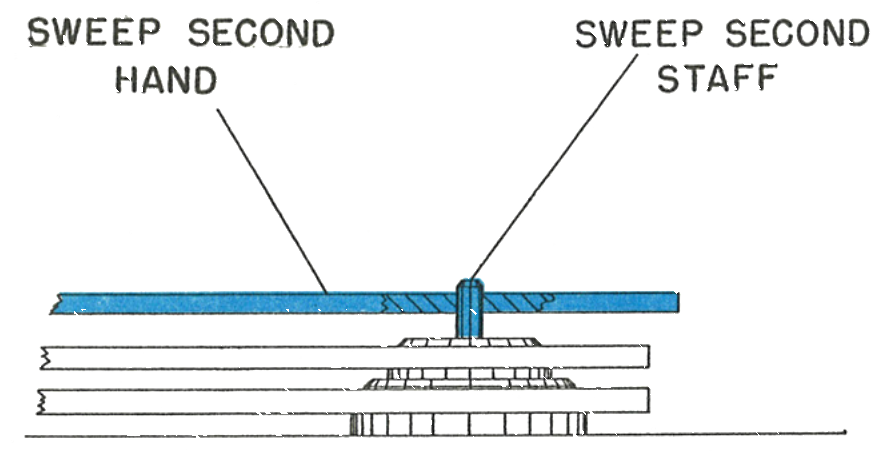
Replace the sweep second hand by driving it just below the end of the sweep second staff. Be certain the sweep hand is set below the chamfer on the top of the staff.
Fig. 72.8 · Sweep second hand
This guide is based on the original Timex factory service manual for the Model 72 movement.