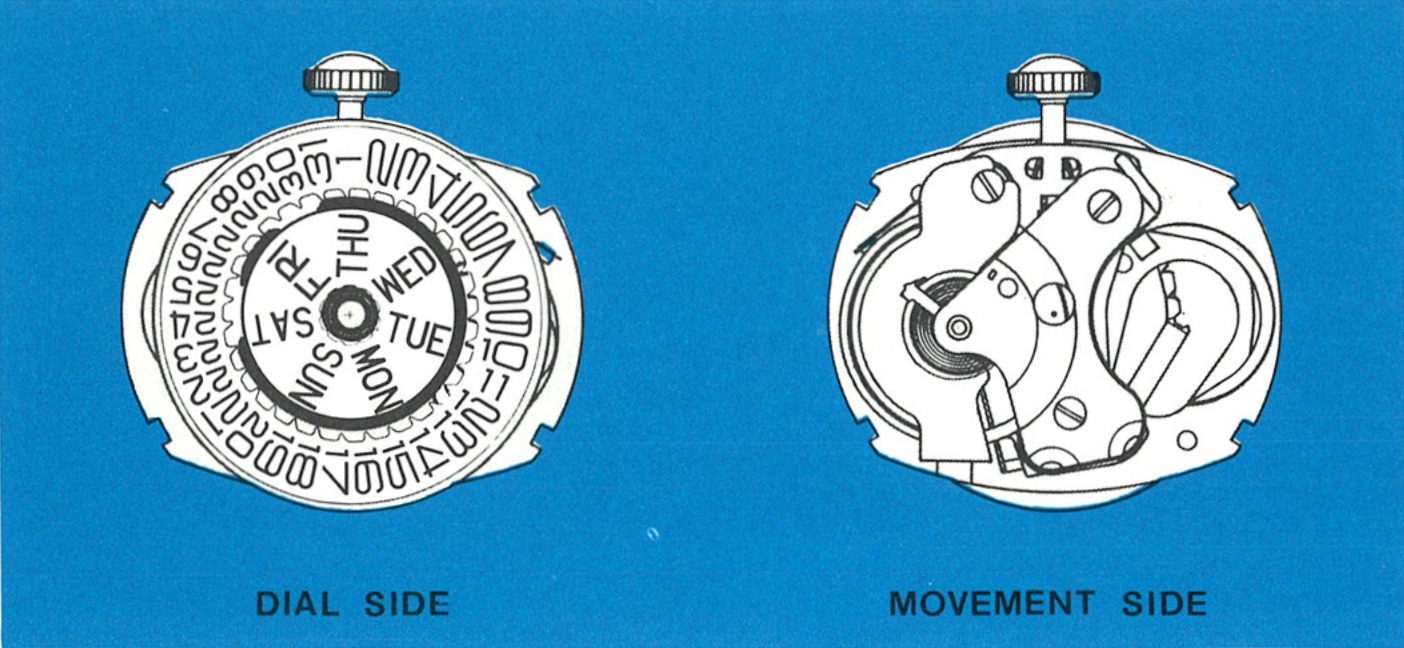
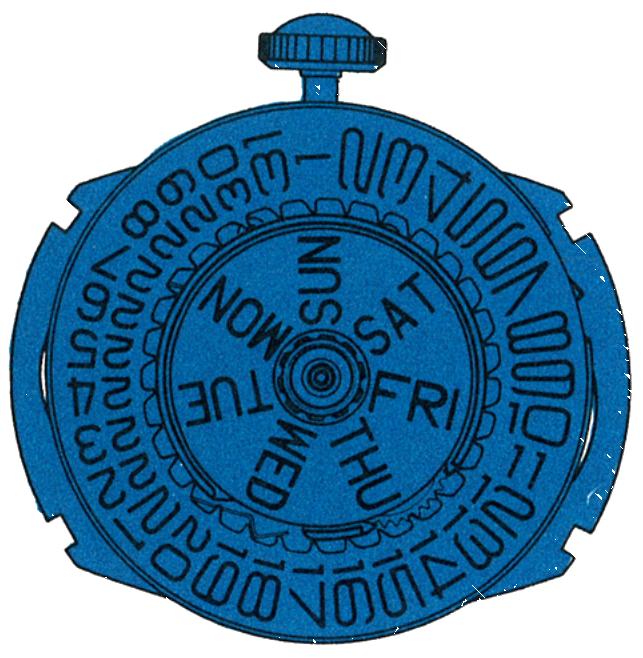
The Model 260 with day and date, and with a mechanism that sets both without turning the hands through 24 hours. Its day and date parts are not interchangeable with any other Timex electric day-date.
ElectricDay & Date28,800 bphQuick Set
Model 262 · Dial Side & Movement Side
Ligne11¾ by 12¾
Dimensions26.51 by 28.76 mm
Basic movementModel 260
Beat28,800 per hour
SettingDay and date without 24 hour rotation
ManualService Manual · Model 262
Set Without the 24 Hours
The Timex Model 262 is an 11¾ by 12¾ ligne high frequency electric watch movement with a day and date feature. The basic Model 262 movement is similar to the Model 260 movement, with added parts and modifications to provide the day and date features.
The setting mechanism: The watch contains a mechanism which permits both the day and the date to be set without turning the hands through 24 hours of rotation. That is what separates it from the Models 42, 52 and 255.
Not interchangeable: The parts of the day and date mechanism are not interchangeable with similar parts from other Timex electric day and date watches.
For the basic movement, its cleaning, lubrication and balance work, see the Model 260 guide.
Caution: Since the watch contains permanent magnets, no attempt should be made to demagnetize it.
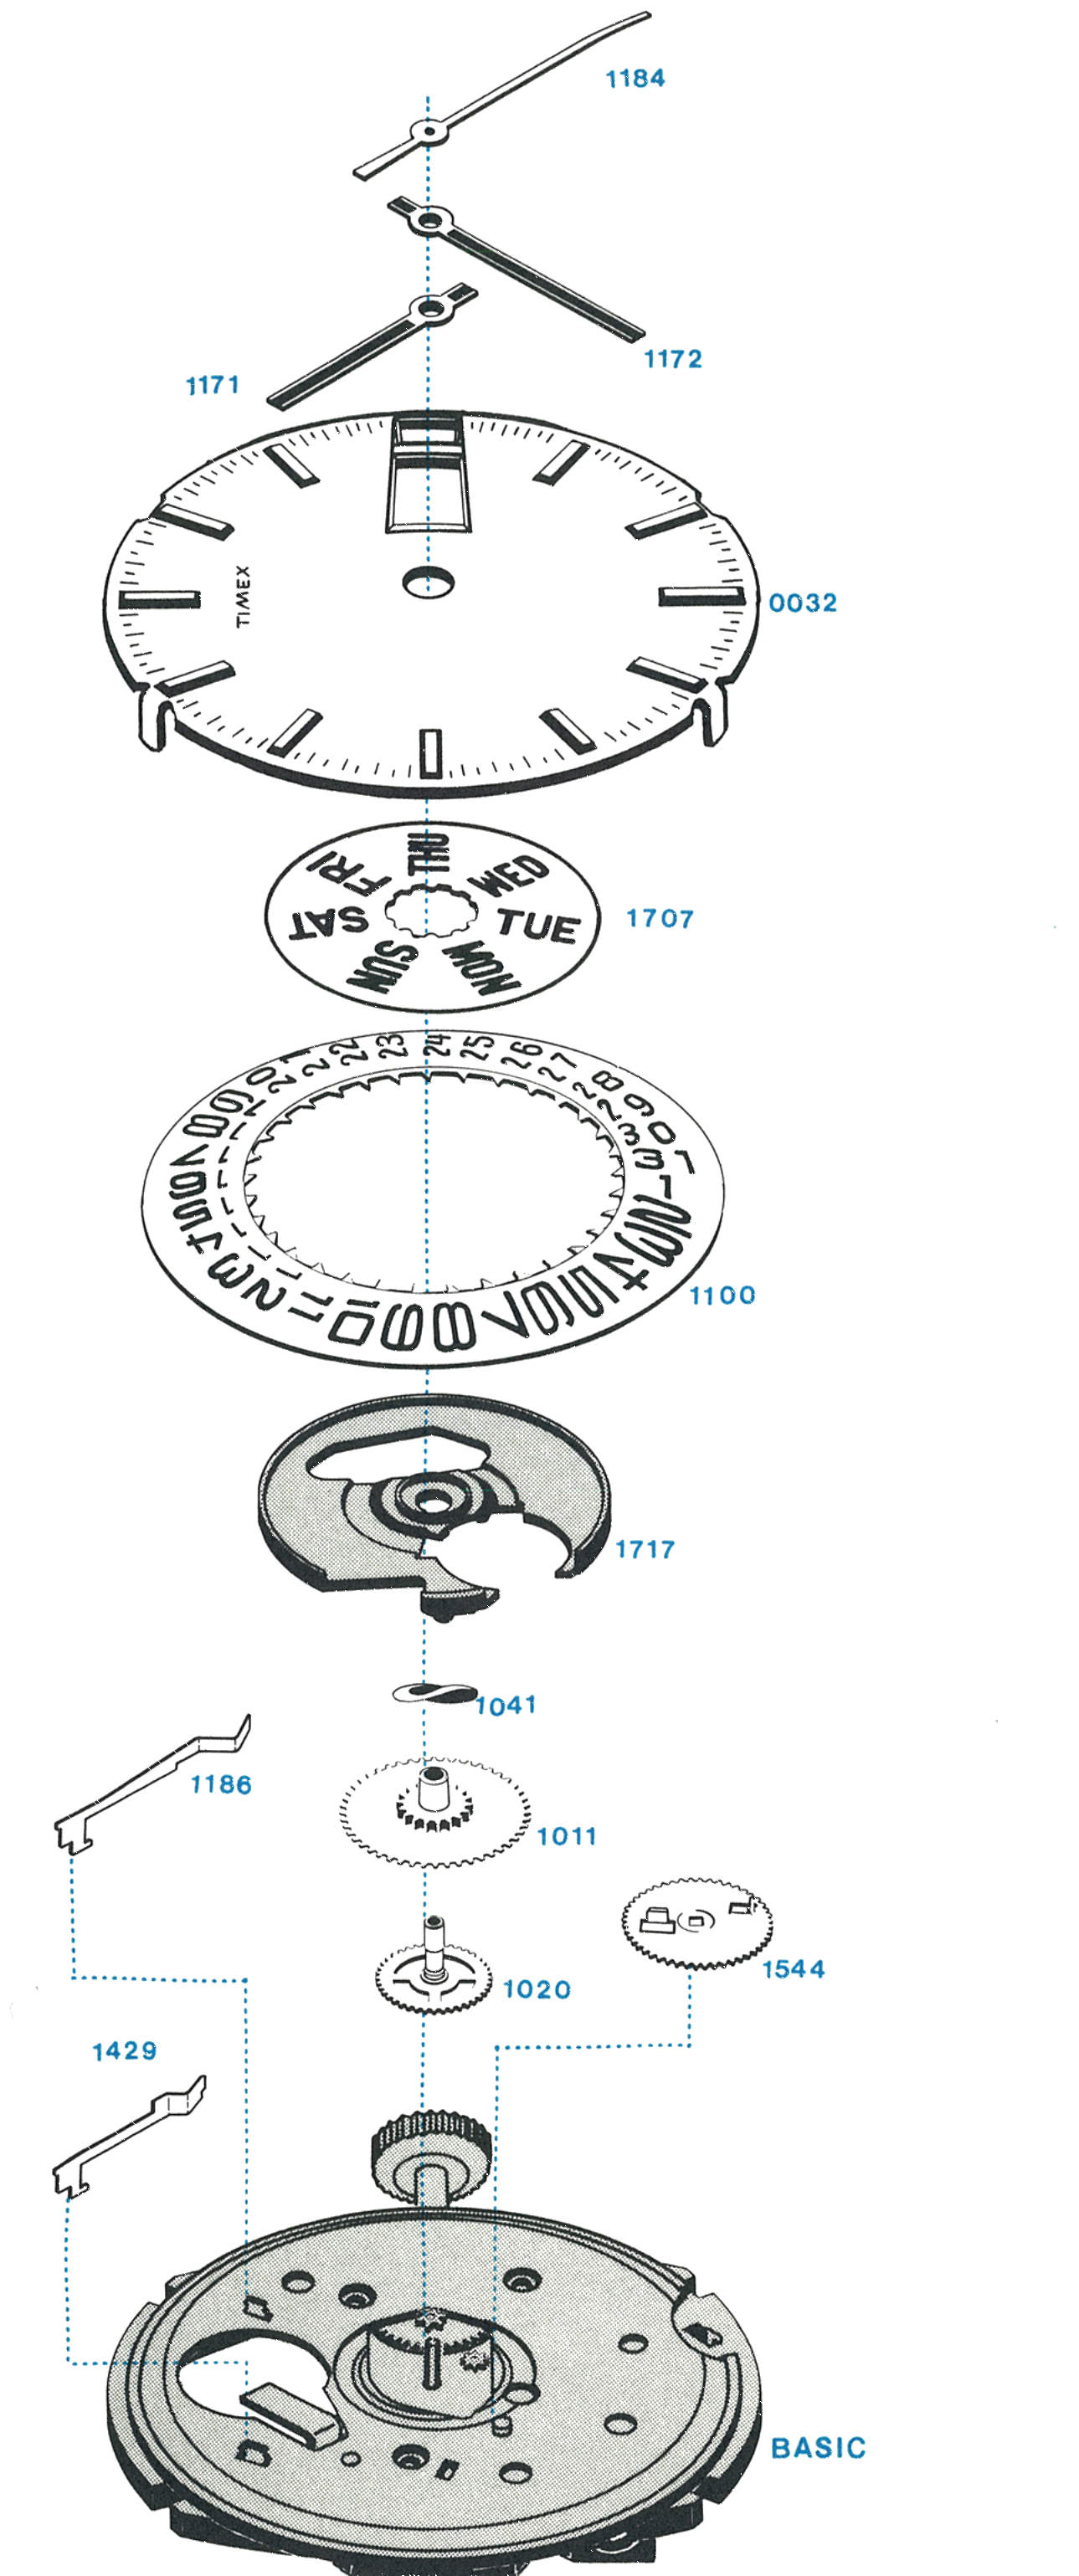
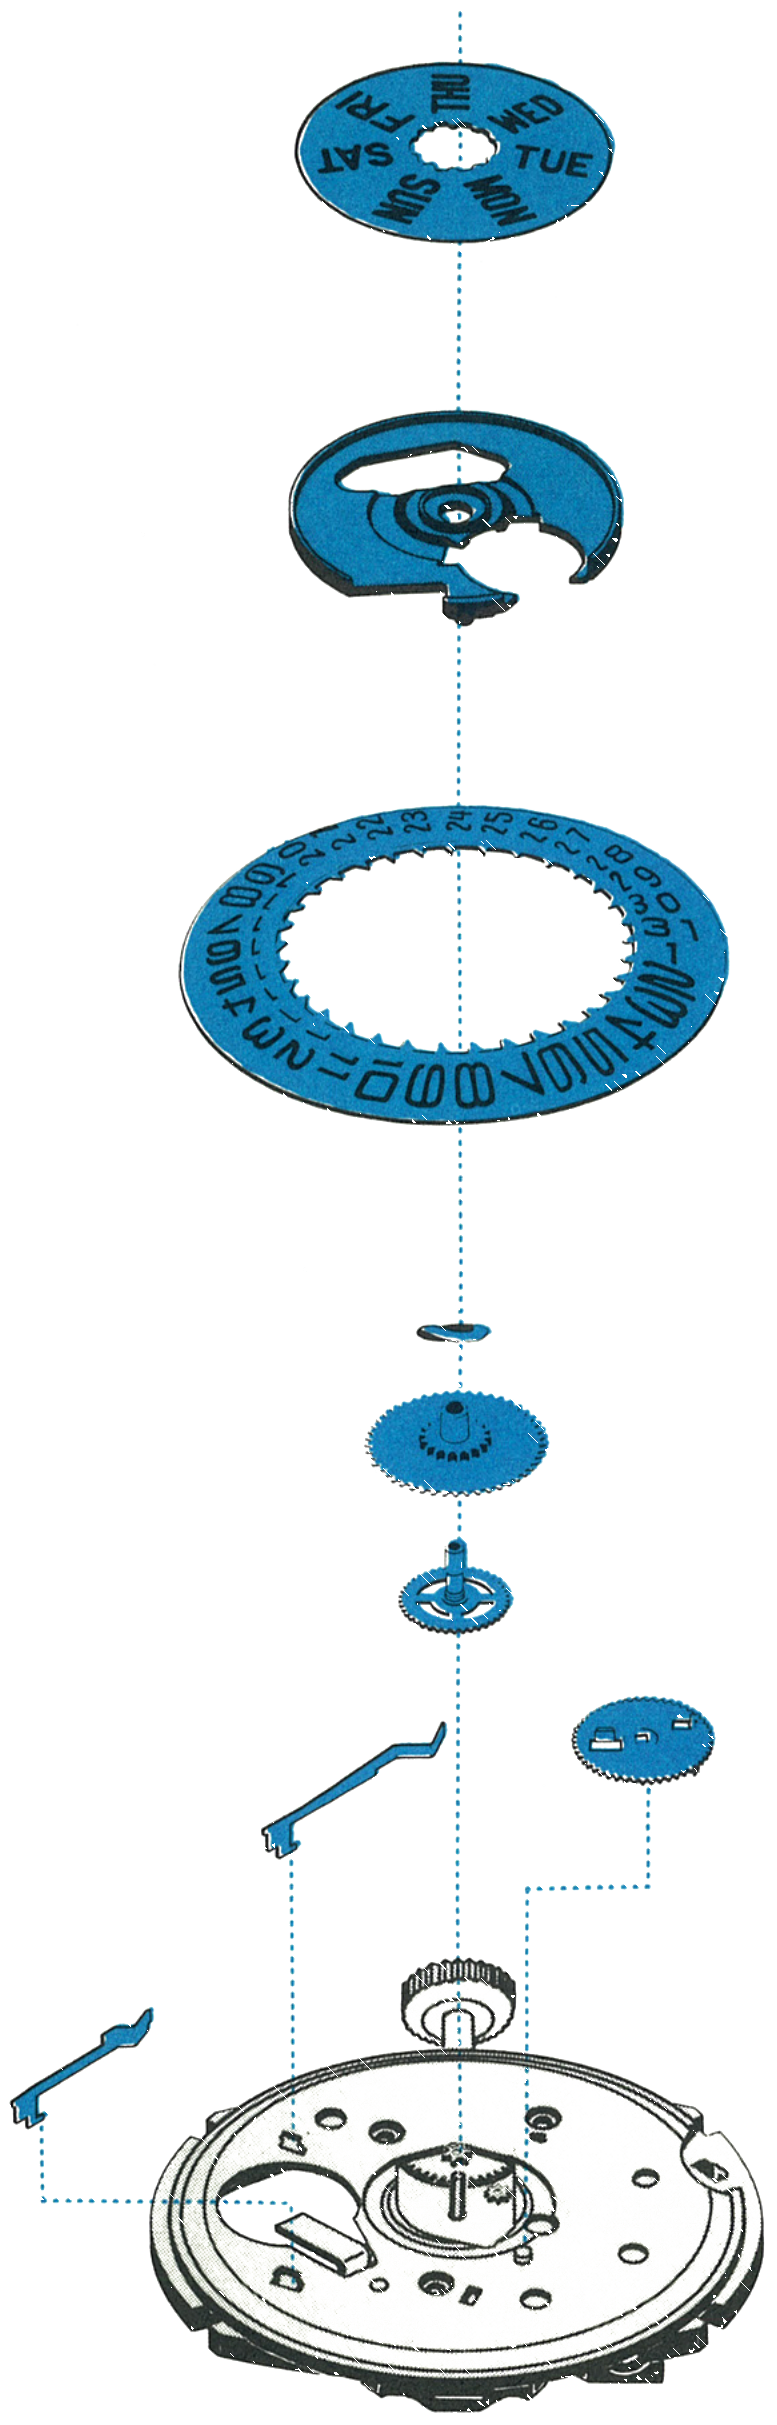
Exploded View
Everything below the numbered parts is the basic Model 260 movement.
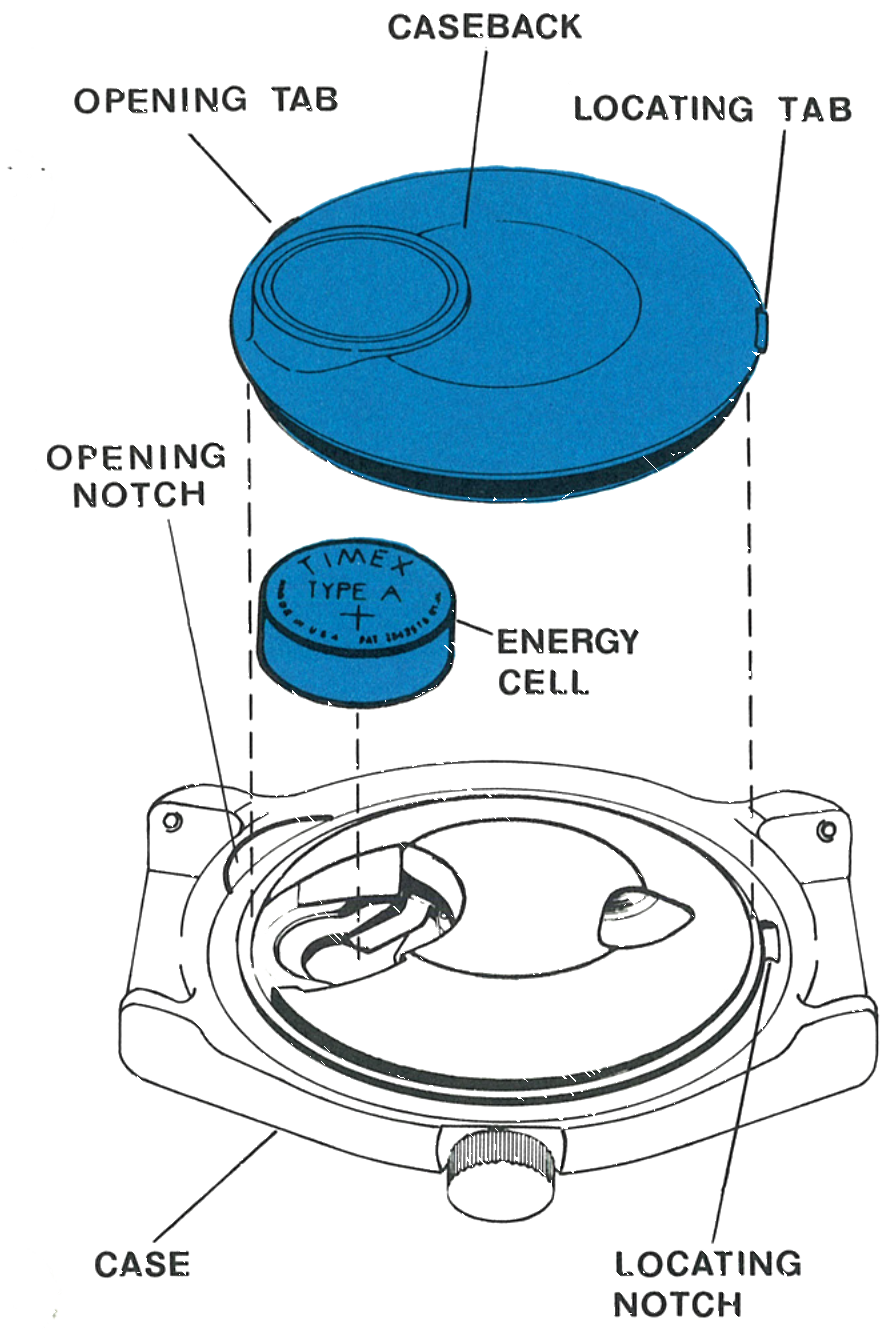
Insert a blade into the opening notch on the bezel and pry the caseback off. The locating tab on the caseback is used for orientation of the back during reassembly.
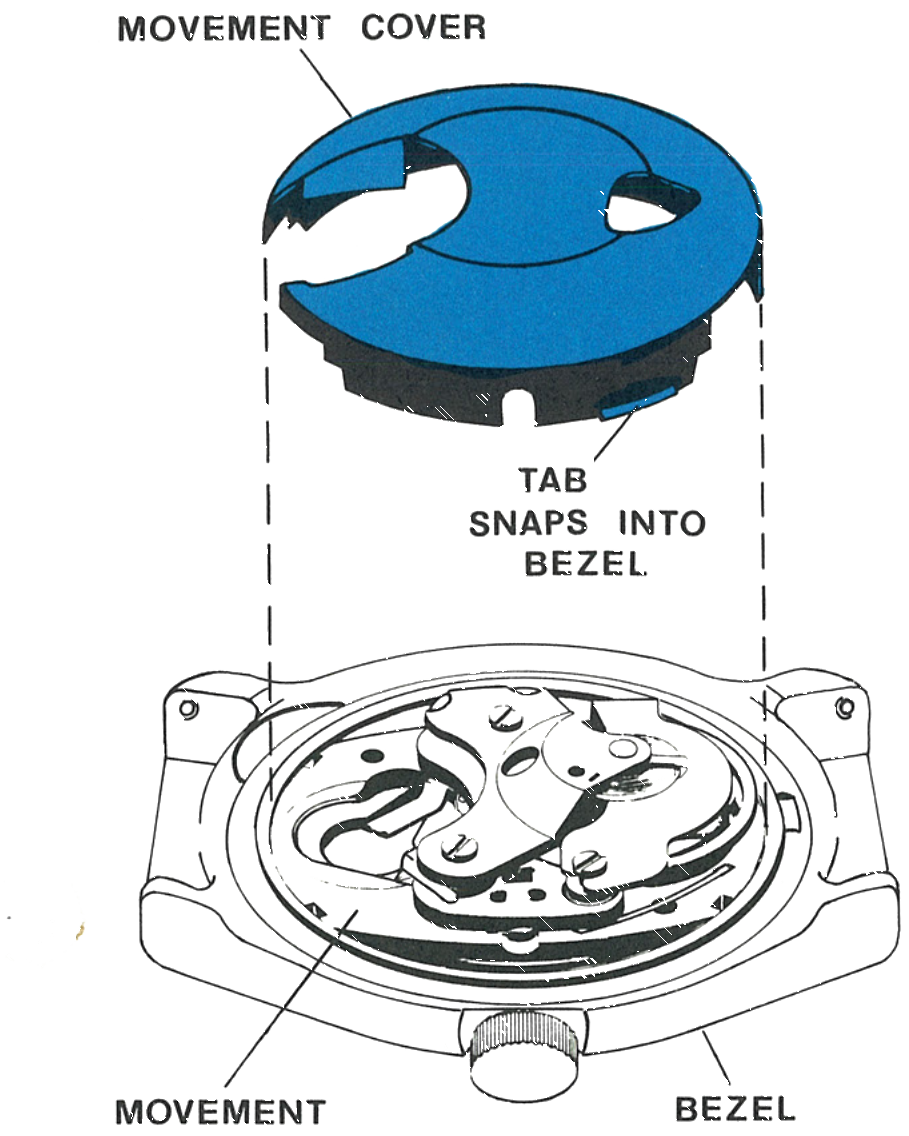
Remove the energy cell, then lift off the movement cover. The cover is held in place by two tabs which snap into recesses in the bezel.
Note: Any energy cell with a voltage of less than 1.5 volts, or one in service in excess of one year, should be replaced. Use of an energy cell not meeting Timex specifications may cause the watch to malfunction.
Fig. 262.3 · Caseback
2 · The Movement Cover
The cover and the tab which snaps into the bezel, with the movement beneath.
Fig. 262.3 · Movement Cover
3 · Stem and Case
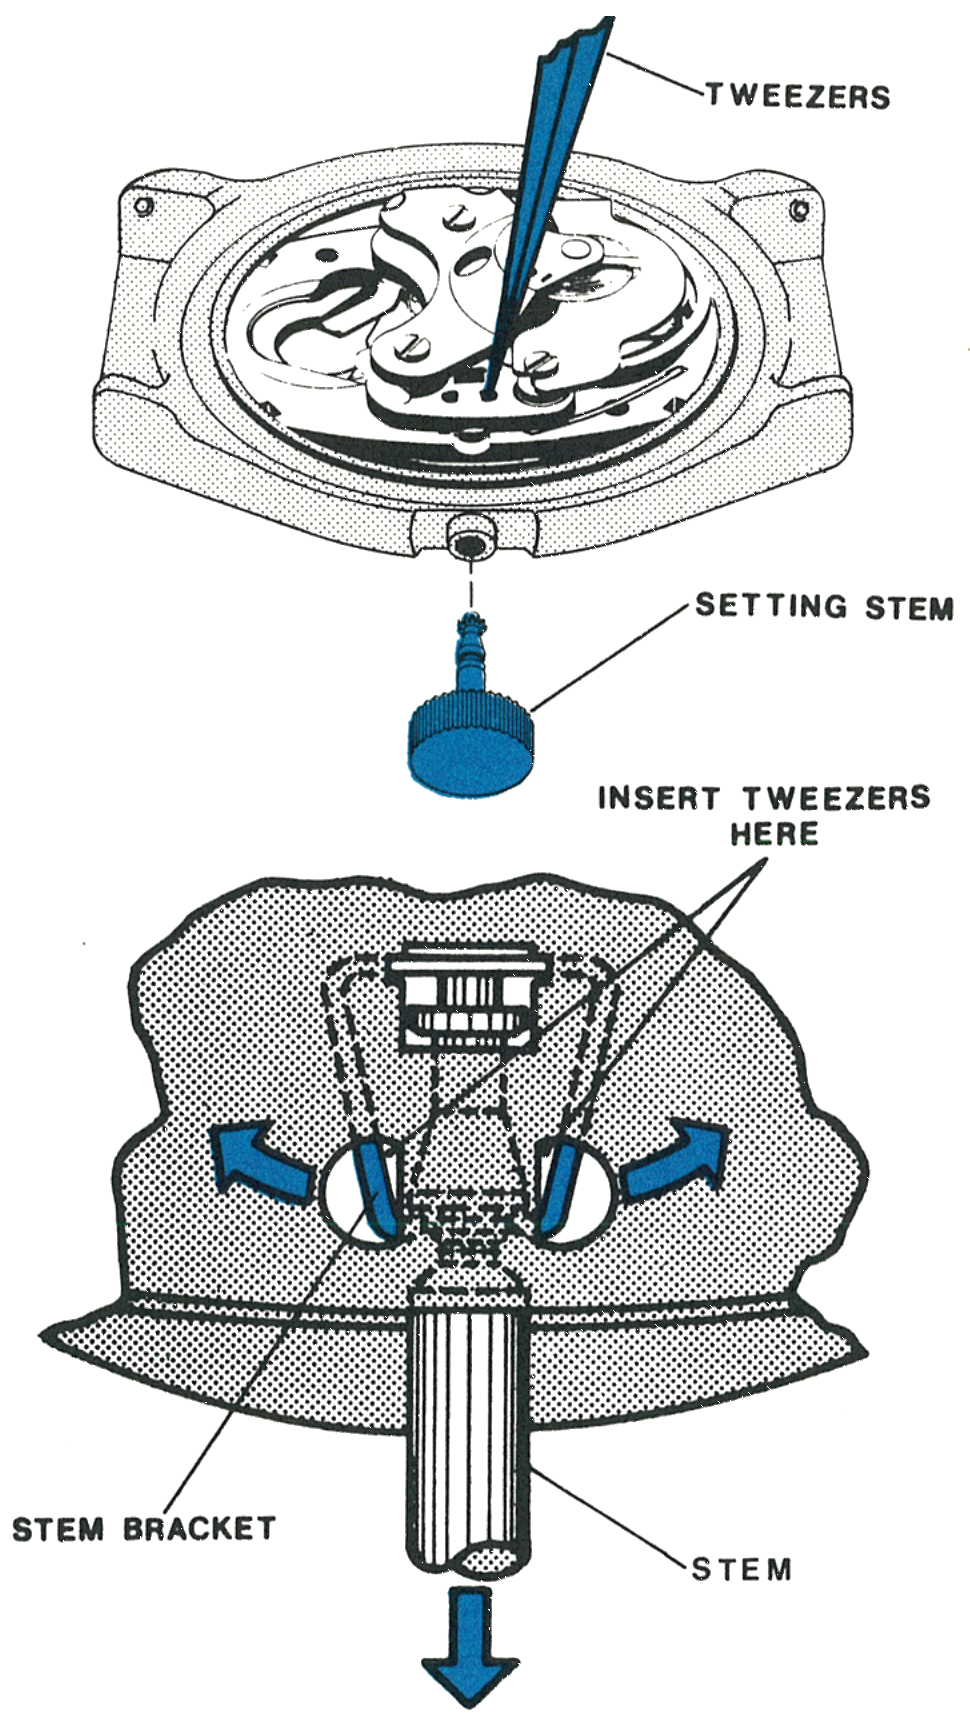
The stem is held in position by the stem bracket. Release the stem from the stem bracket with a tweezer, as described for the Model 260.
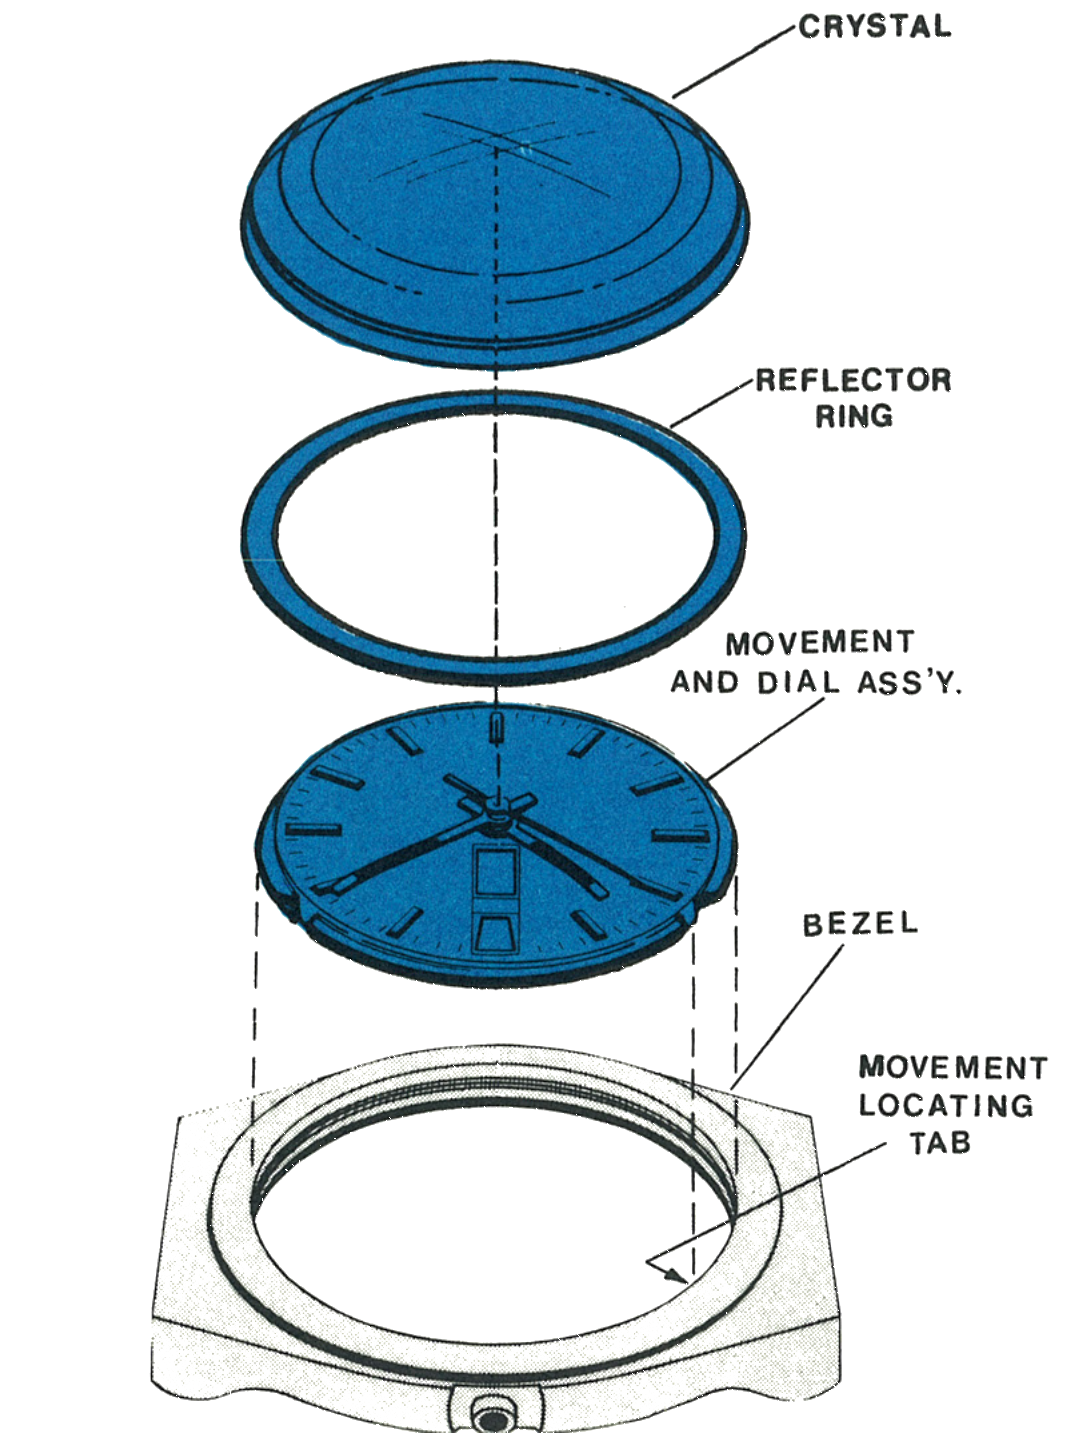
When the crown and stem assembly is removed, the movement can be removed through the crystal side of the case. Remove the crystal with a crystal seating tool and then lift the reflector ring and movement free of the case.
Fig. 262.4 · Stem Bracket
4 · Out of the Bezel
The crystal, reflector ring, movement and dial assembly, and bezel.
Note: Note the position of the movement locating tabs inside the bezel. Tabs should be properly aligned in the notches of the plate when reassembling.
Fig. 262.4 · Figure A
5 · The Hands and Dial
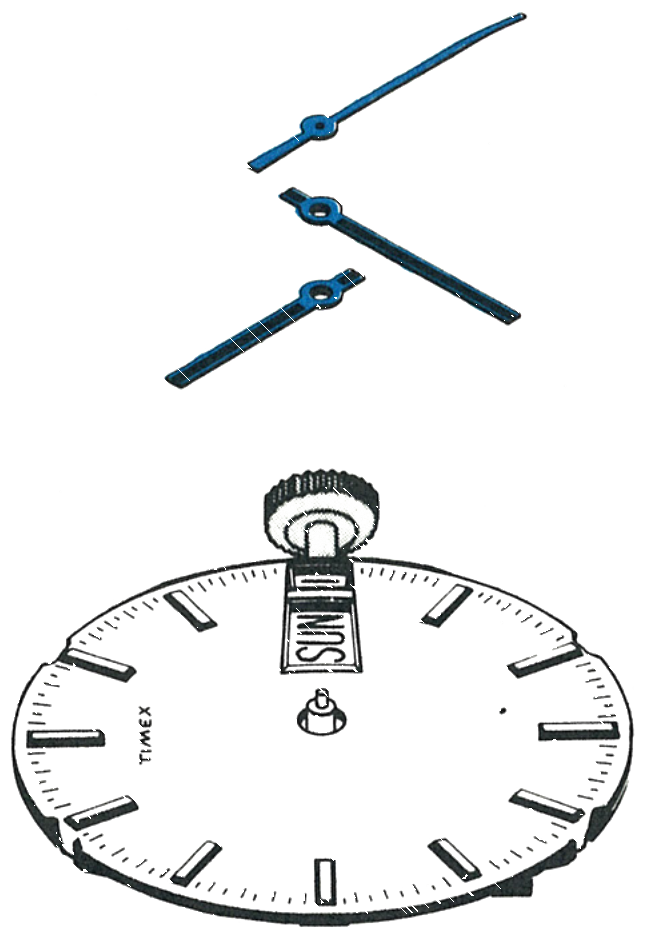
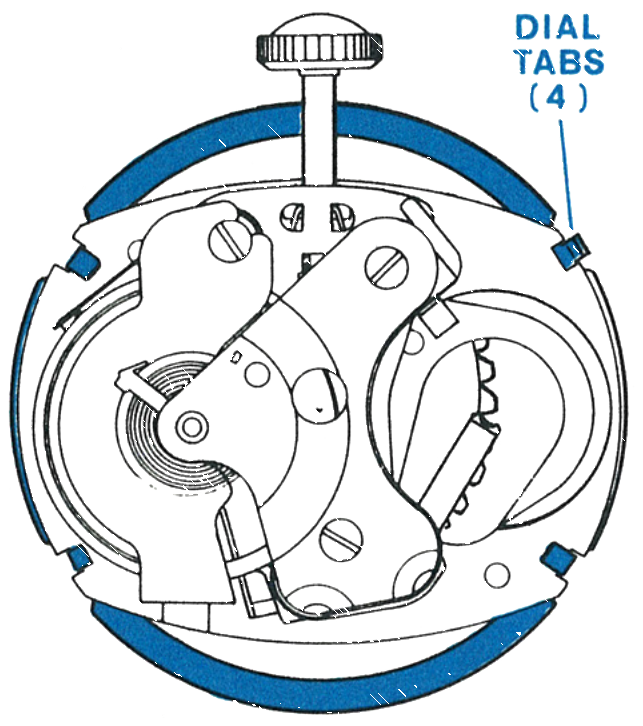
Remove all hands. Straighten the four dial tabs enough to free the dial from the movement.
Turn the assembly over and carefully lift the dial off the movement, noting the position of the parts underneath.
Fig. 262.5 · Figures B and C
6 · The Dial Tabs
The four dial tabs on the plate.
Fig. 262.5 · Figure C
7 · Under the Dial
The day disc and the parts beneath it.
Fig. 262.5 · Figure D
8 · The Removal Order
Remove in order: day disc, day/date frame, date ring, day detent spring, date detent spring, date wheel, hour wheel washer, hour wheel assembly, center wheel assembly.
Caution: With these parts removed the basic movement may be replaced with a Timex reconditioned movement, or serviced as for the Model 260. Extreme care must be exercised in cleaning dials, hands, day discs and date rings.
Fig. 262.6 · Figure E
Reassembly
Reassemble in order: day detent spring, date detent spring, center wheel assembly, hour wheel assembly, hour wheel washer, date wheel.
Lubrication: Lubricate the bearing surface of both detent springs with a small amount of non-spreading watch oil; Moebius Synt-A-Lube is used in the factory.
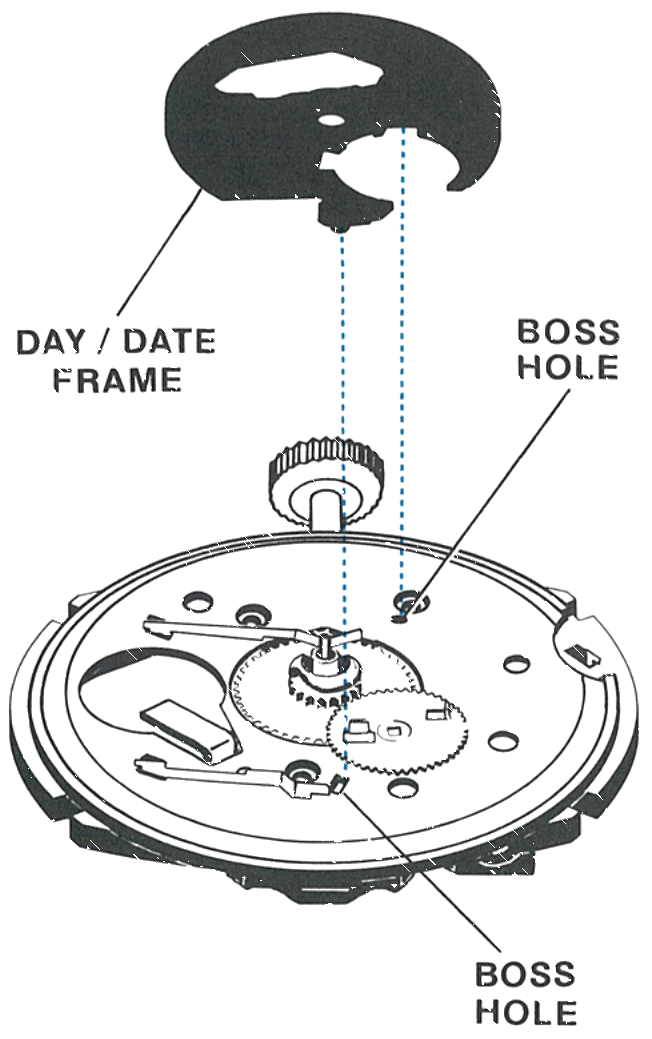
1 · The Day/Date Frame
Assemble the day/date frame, noting the two bosses on the back of the frame, and engage the bosses in the corresponding holes in the dial rest. Position the date wheel with its tabs located as shown.
Fig. 262.7 · Day/Date Frame
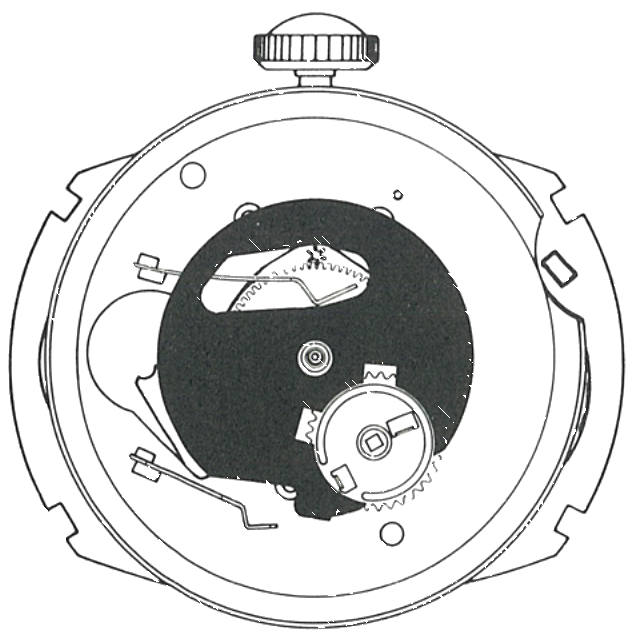
2 · The Date Wheel
The date wheel positioned on the plate with its tabs as shown.
Fig. 262.7 · Date Wheel
3 · The Day Disc
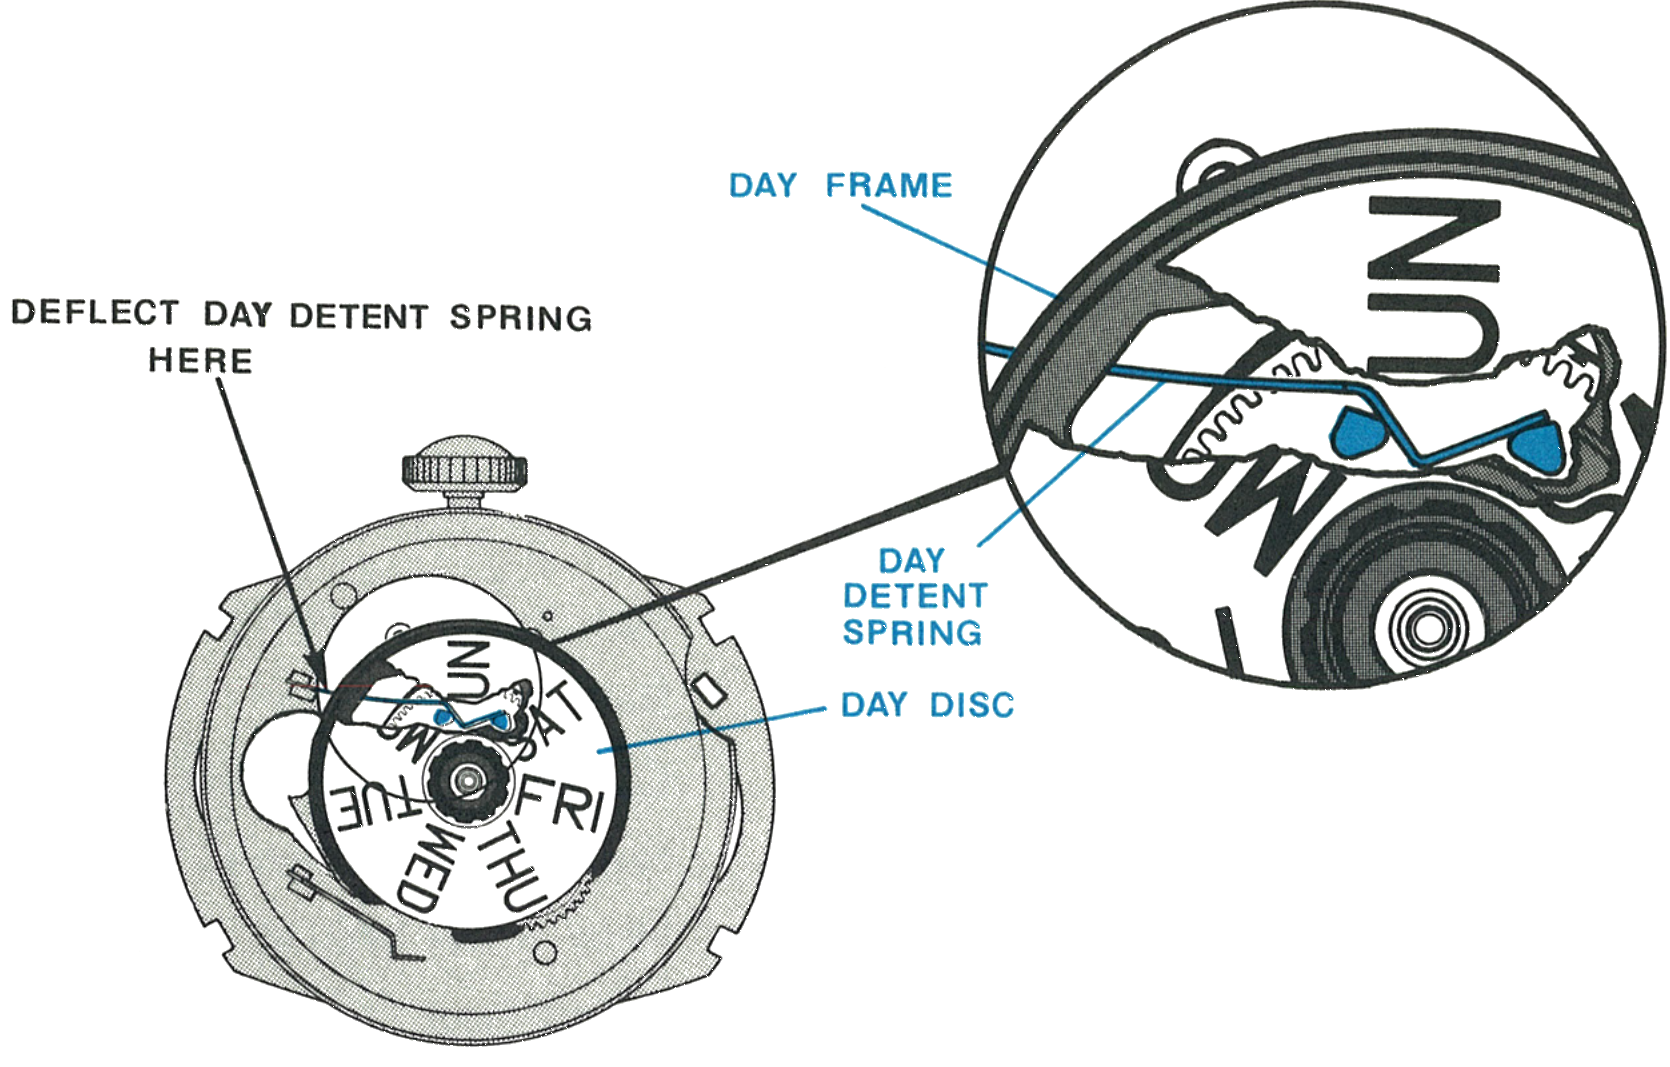
Place the day disc on the day frame with any day located on the centre line from the hour wheel to the set stem. With a tweezer, deflect the day detent spring and the day disc will drop into proper engagement.
Fig. 262.8 · Day Disc
4 · The Date Ring
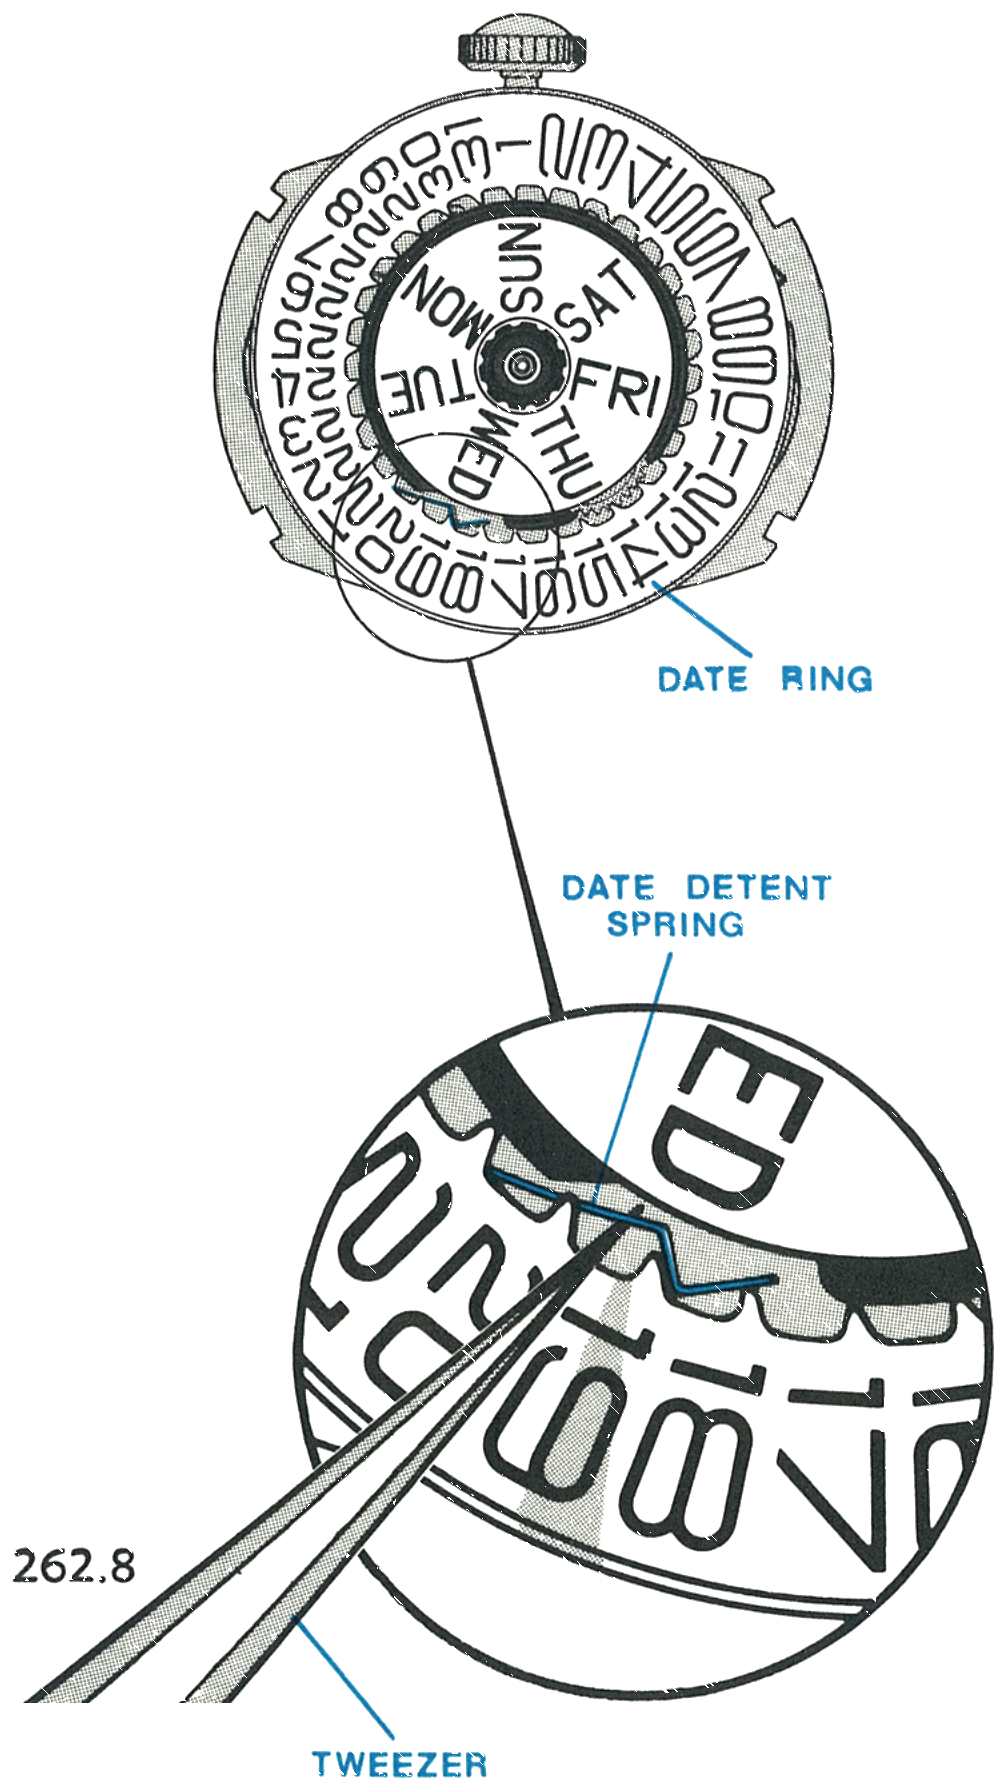
Position the date ring on the assembly. With a small tweezer or pick, deflect the date detent spring slightly to engage the date ring properly.
Carefully orient the dial on the movement so the dial tabs engage the notches in the dial plate assembly, then, holding the dial firmly in place, turn the movement over and bend the tabs to secure the assembly.
Fig. 262.8 · Date Ring
Checking the Change
Rotate the hands clockwise until the date changes. This change should occur about midnight.
Continue to rotate the hands clockwise until the day changes with a snap. The day change should occur between midnight and 4:30 AM.
Rotate the hands counterclockwise past midnight, until the day snaps back into position, then rotate them clockwise until the day advances again, before 4:30 AM.
Rotate the hands counterclockwise past 12 midnight until they indicate 9 PM, then rotate clockwise until the date changes with a snap. This change should occur between 11:45 PM and 12:15 AM.
Rotate the hands clockwise through 29 hours and both the day and the date should advance one position.
Insert the crown and stem assembly into the movement assembly. Rotate the crown until the date advances with a snap, then assemble the hands at the 12 o’clock position.
1 · Rotate the hands clockwise until the date changes. This should occur about midnight.2 · Continue clockwise until the day changes with a snap. The day change should occur between midnight and 4:30 AM.3 · Rotate counterclockwise past midnight until the day snaps back, then clockwise until the day advances again, before 4:30 AM.4 · Rotate counterclockwise past 12 midnight to 9 PM, then clockwise until the date changes with a snap. This should occur between 11:45 PM and 12:15 AM.5 · Rotate clockwise through 29 hours and both the day and the date should advance one position.
Remove the crown and stem assembly from the movement assembly. Place the dial and movement assembly into the bezel, being careful to position it so the movement locating tab is in the locating notch. Position the reflector ring on the dial and replace the crystal in the bezel. Turn the watch over and insert the setting stem and crown through the bezel and into the stem bracket in the movement.
Examine the energy cell ground spring in the movement to be sure it is in position to prevent a short circuit and to assure proper grounding. Position the movement cover in the bezel, put in a Timex energy cell Type A and snap in the caseback. Push the crown into the run position and check that the watch runs, then pull the crown out and check the proper function of the day and date features.
This guide is based on the original Timex factory service manual for the Model 262 movement.