How Timex cases are built, sealed and opened, brought together from the original factory repair manuals and service bulletins. Knowing which case you have is what tells you how it comes apart, and the dial code that identifies a watch is not visible until it does.
All ModelsFactory ManualService Bulletins
Dust sealsTypes A to D
Case typesTypes A to H
One-piece casesFront-loading, no case back
Case back removalElectric models 40 and 41
Metal bandsTypes A to C
SourcesFactory service manual · Bulletins 100, 110
Dust Seals
Factory service manual · dust seal construction
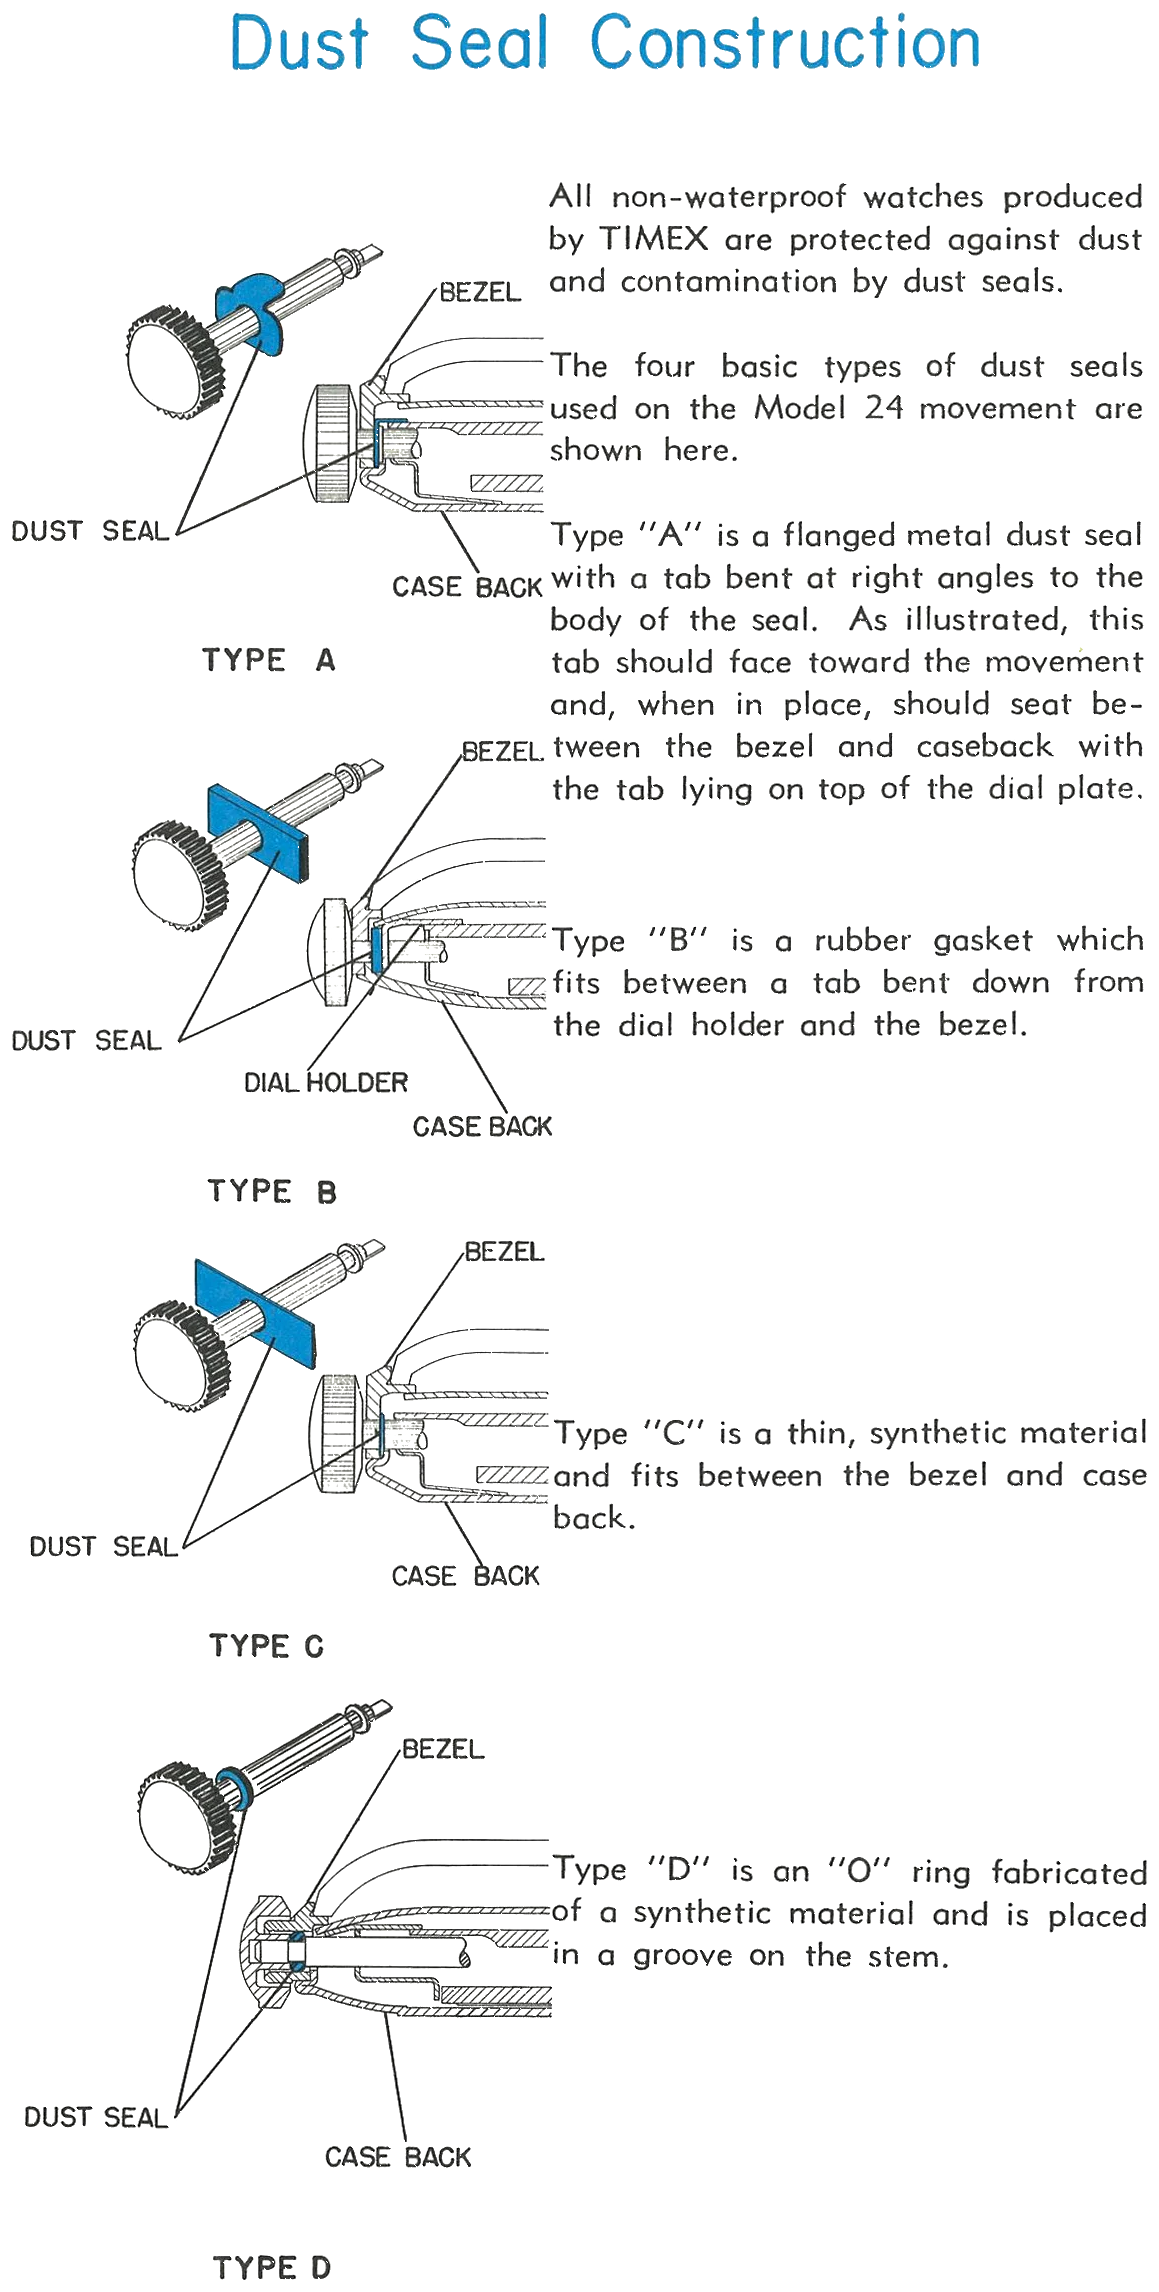
All non-waterproof watches produced by Timex are protected against
dust and contamination by dust seals. The four basic types used on the
Model 24 movement are shown here.
Type A
A flanged metal dust seal with a tab bent at right angles to the body of the seal. As illustrated, this tab should face toward the movement and, when in place, should seat between the bezel and caseback with the tab lying on top of the dial plate.
Type B
A rubber gasket which fits between a tab bent down from the dial holder and the bezel.
Type C
A thin, synthetic material which fits between the bezel and case back.
Type D
An “O” ring fabricated of a synthetic material, placed in a groove on the stem.
Case Types
Factory service manual · types A to DFactory service manual · types E to H
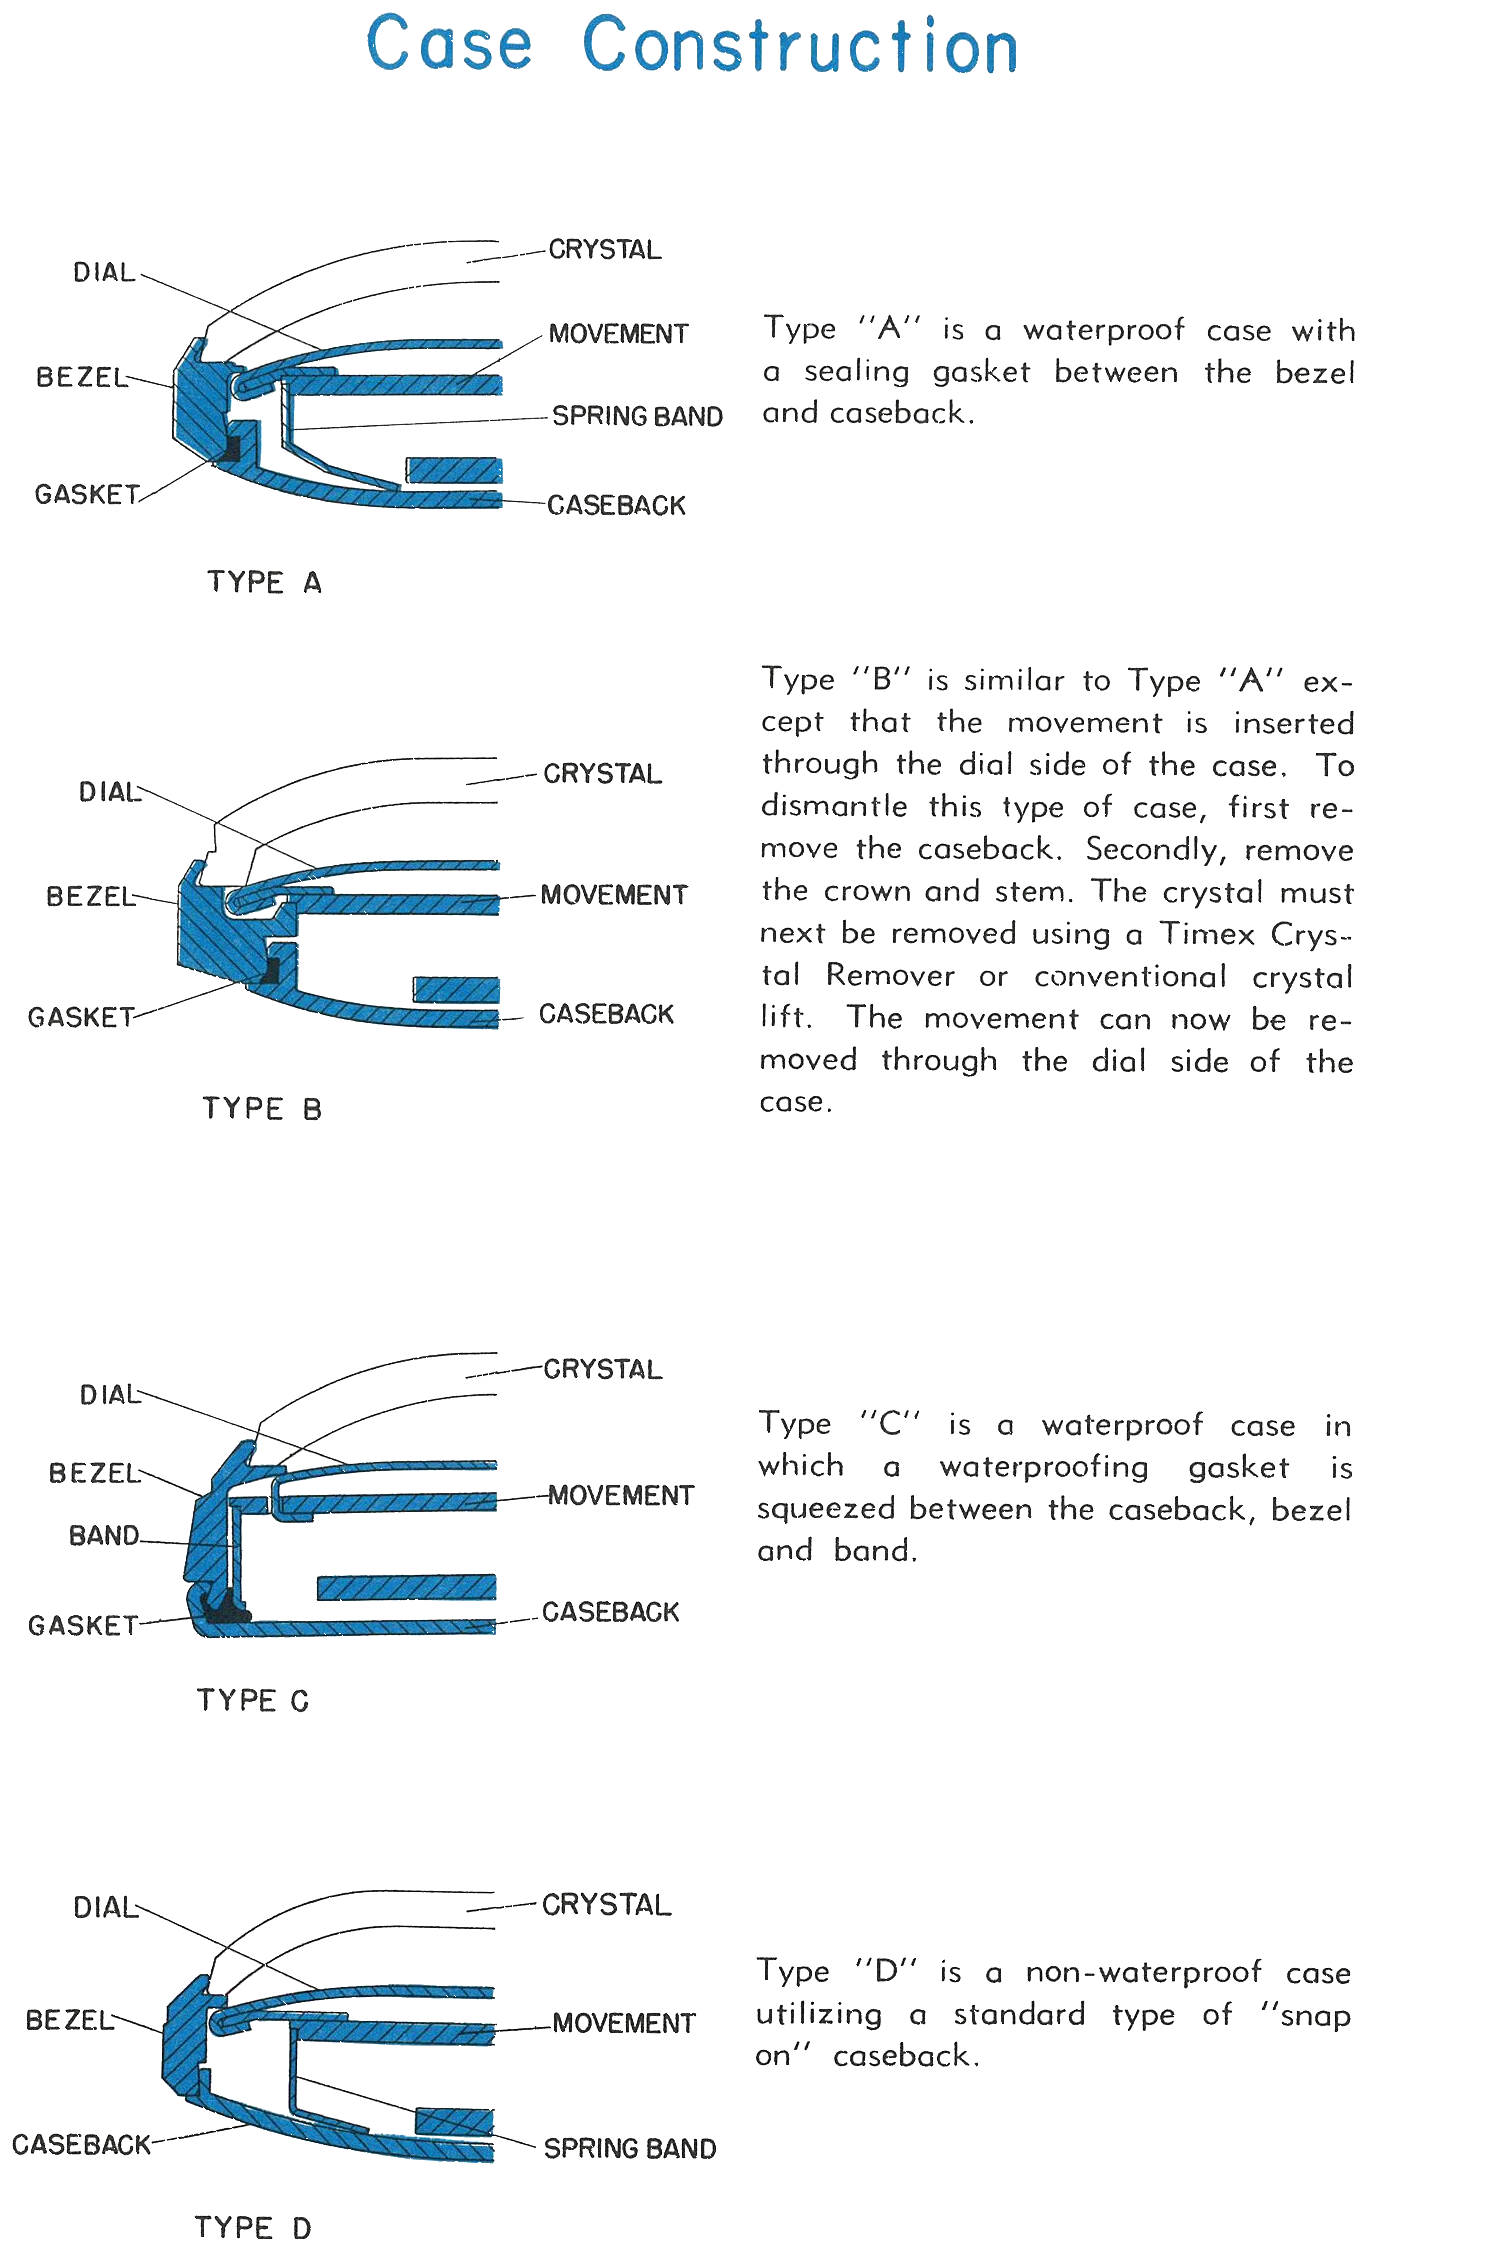
Type A
A waterproof case with a sealing gasket between the bezel and caseback.
Type B
Similar to Type A except that the movement is inserted through the dial side of the case. To dismantle this type of case, first remove the caseback. Secondly, remove the crown and stem. The crystal must next be removed using a Timex Crystal Remover or conventional crystal lift. The movement can now be removed through the dial side of the case.
Type C
A waterproof case in which a waterproofing gasket is squeezed between the caseback, bezel and band.
Type D
A non-waterproof case utilizing a standard type of “snap on” caseback.
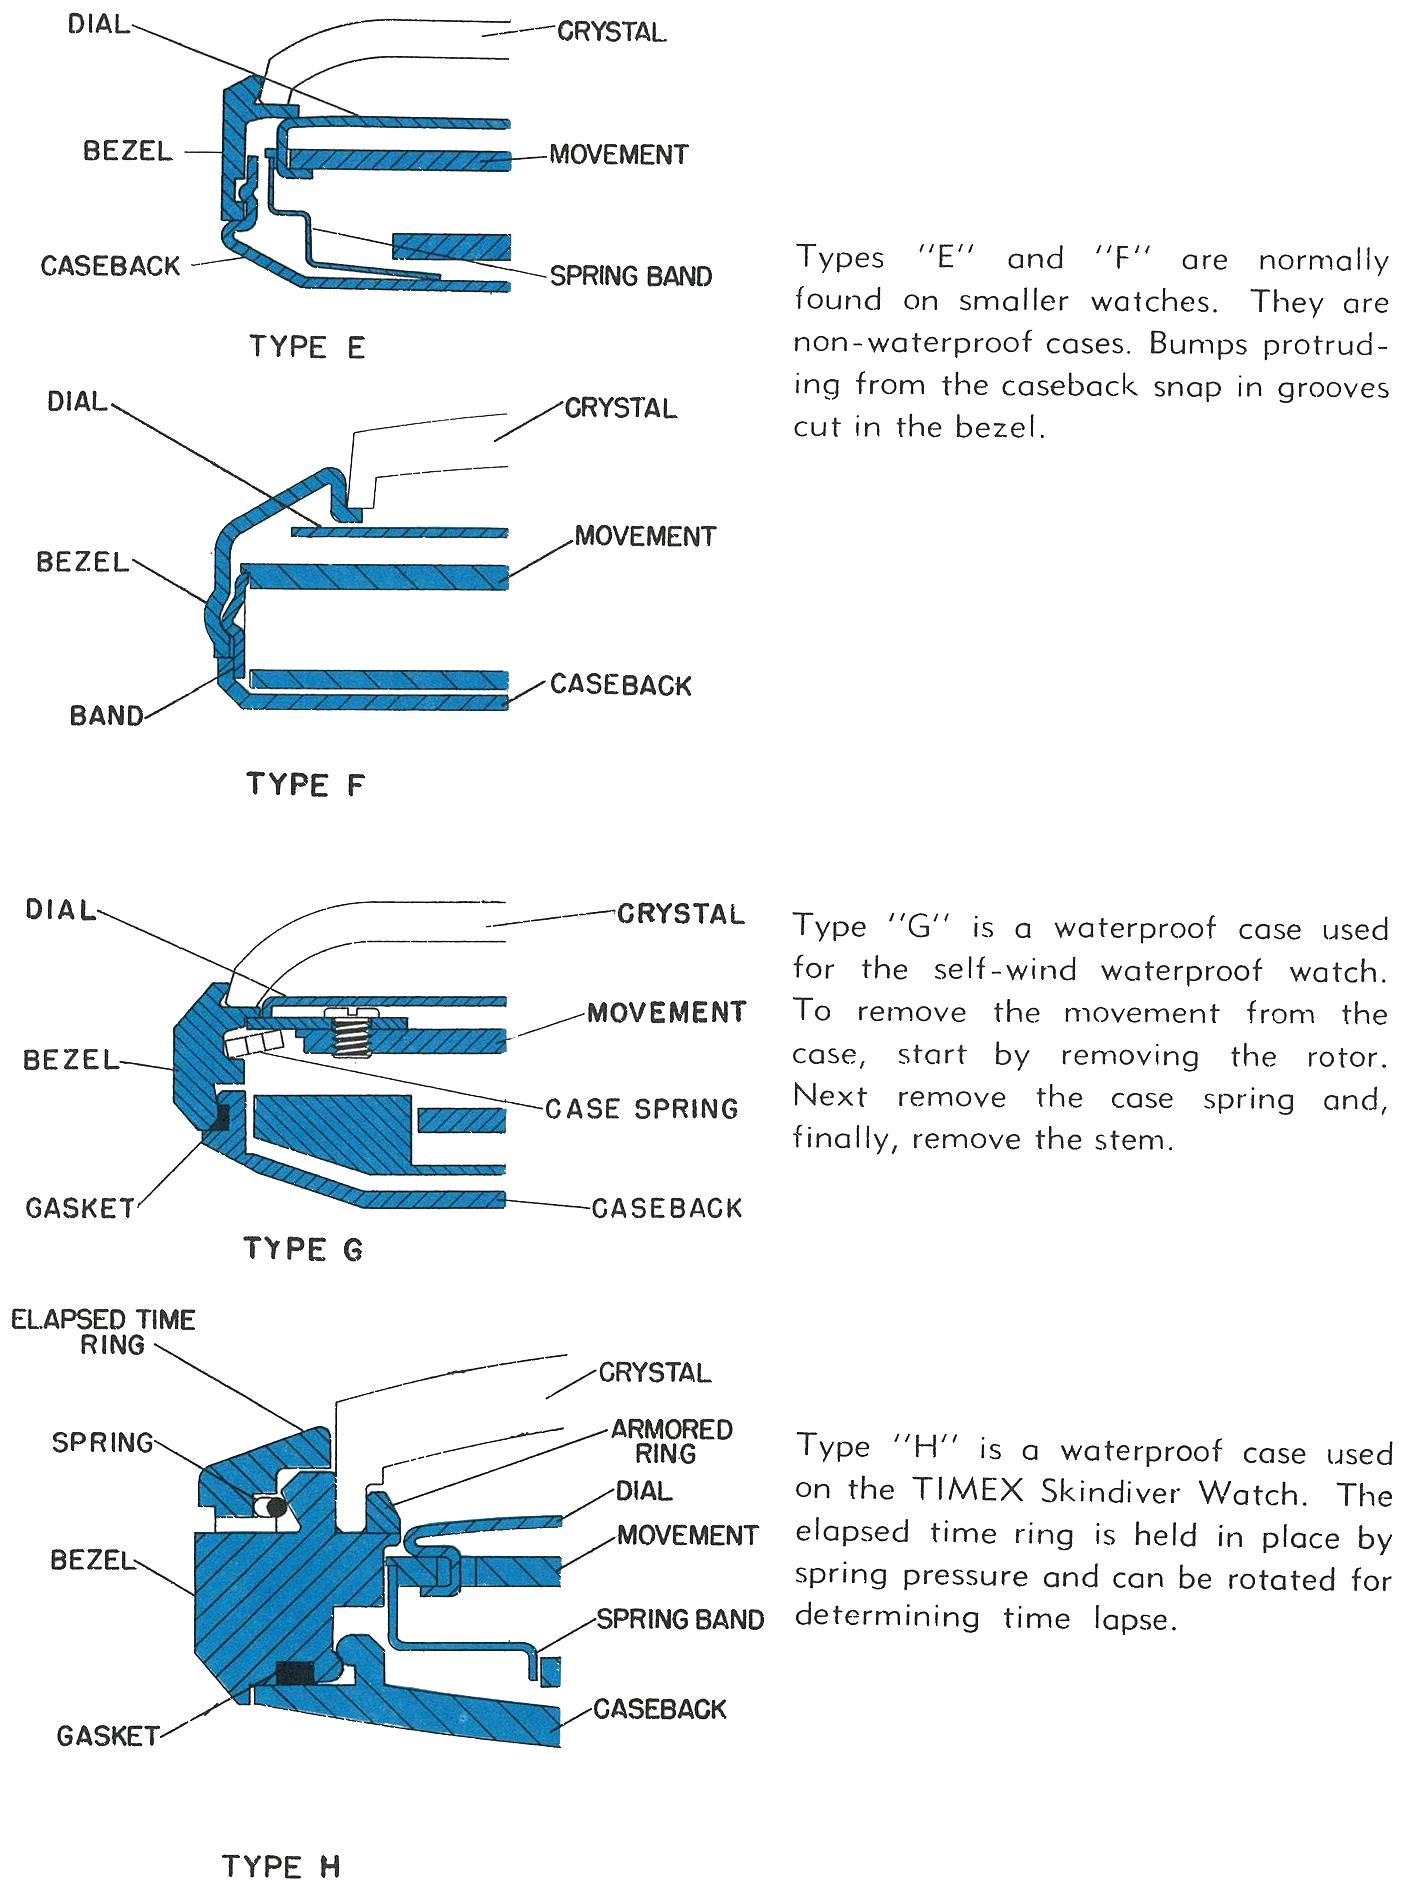
Types E and F
Normally found on smaller watches. They are non-waterproof cases. Bumps protruding from the caseback snap in grooves cut in the bezel.
Type G
A waterproof case used for the self-wind waterproof watch. To remove the movement from the case, start by removing the rotor. Next remove the case spring and, finally, remove the stem.
Type H
A waterproof case used on the TIMEX Skindiver Watch. The elapsed time ring is held in place by spring pressure and can be rotated for determining time lapse.
One-Piece Cases
A one-piece case has no case back: the movement comes out through the front, and the crown must come off the stem first.
To remove the movement
Remove crystal and retaining ring.
Pull stem into set position.
Rotate crown so stem is positioned with flats upright.
Place flat of screw driver bit against flat of stem at 6 o’clock side of stem. Wedge screw driver between flat of stem and shoulder of clearance notch in case. Use screw driver with bit diameter of .050 to .060. Unscrew crown from stem and remove movement from case.
To replace the movement
Insert movement in case and start crown on stem.
Pull stem in set position and rotate stem with flats upright.
Place flat of screw driver bit against flat of stem at 12 o’clock side of stem. Wedge screw driver between flat of stem and shoulder of clearance notch in case. Tighten crown.
Replace retaining ring and crystal.
The U.S. Time Corp. · factory instruction sheet
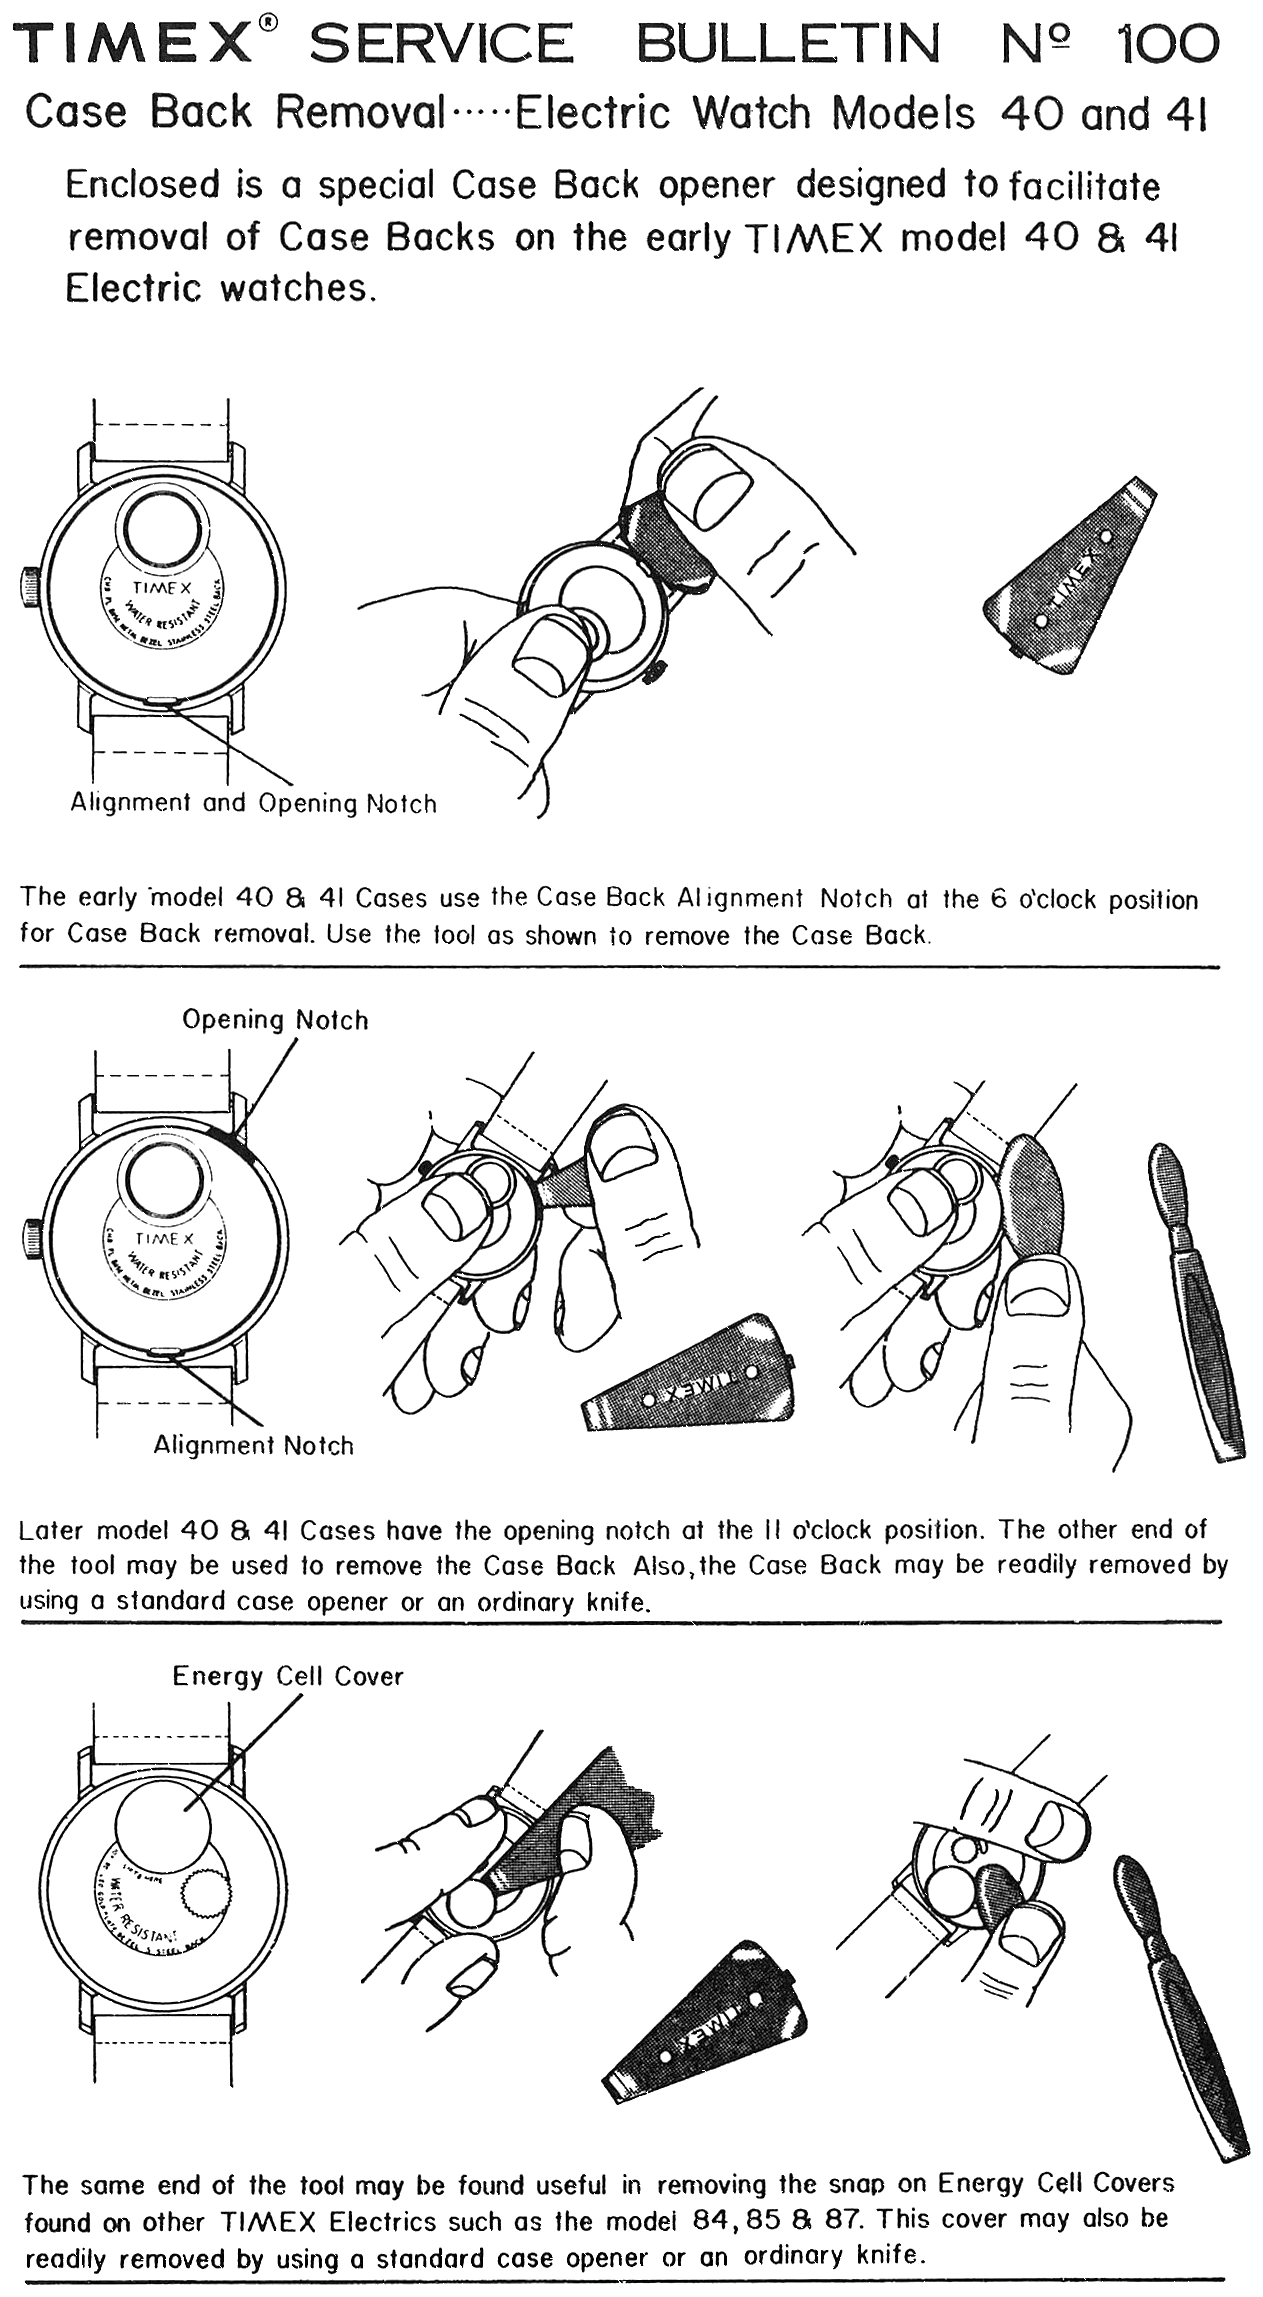
Case Back Removal
Electric models 40 and 41. Timex supplied a special case back opener
for the early cases.
Timex Service Bulletin No. 100
Early cases
The early model 40 and 41 cases use the case back alignment notch at the 6 o’clock position for case back removal.
Later cases
Later model 40 and 41 cases have the opening notch at the 11 o’clock position. The other end of the tool may be used to remove the case back. The case back may also be readily removed using a standard case opener or an ordinary knife.
Energy cell covers
The same end of the tool is useful for removing the snap-on energy cell covers found on other Timex Electrics such as models 84, 85 and 87. This cover may also be removed with a standard case opener or an ordinary knife.
Integral Metal Bands
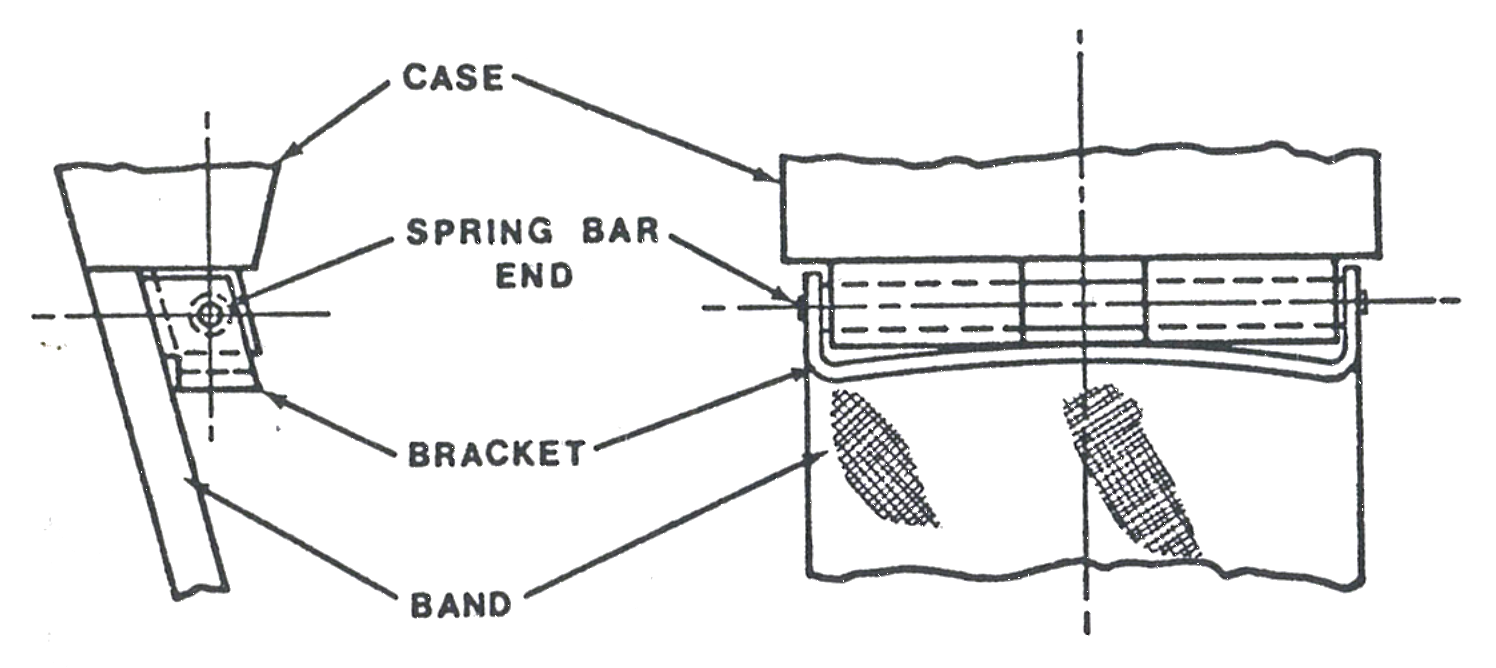
Timex watches with integral metal bands use several methods of attachment which permit replacement of the bands.
Type A
Metal band in the Type A assembly is fastened to the case with a spring bar. The band is held flush to the case by the spring action of the metal bracket fastened to the band. The band is released by pushing each end of the spring bar inward to release the bracket. Reassembly requires that the spring bar be placed inside the tube (or lugs) on the case and engaging the bracket over the ends of the spring bar. It is necessary to apply pressure to overcome the spring pressure of the bracket and align the holes to permit the spring bar ends to enter the bracket.
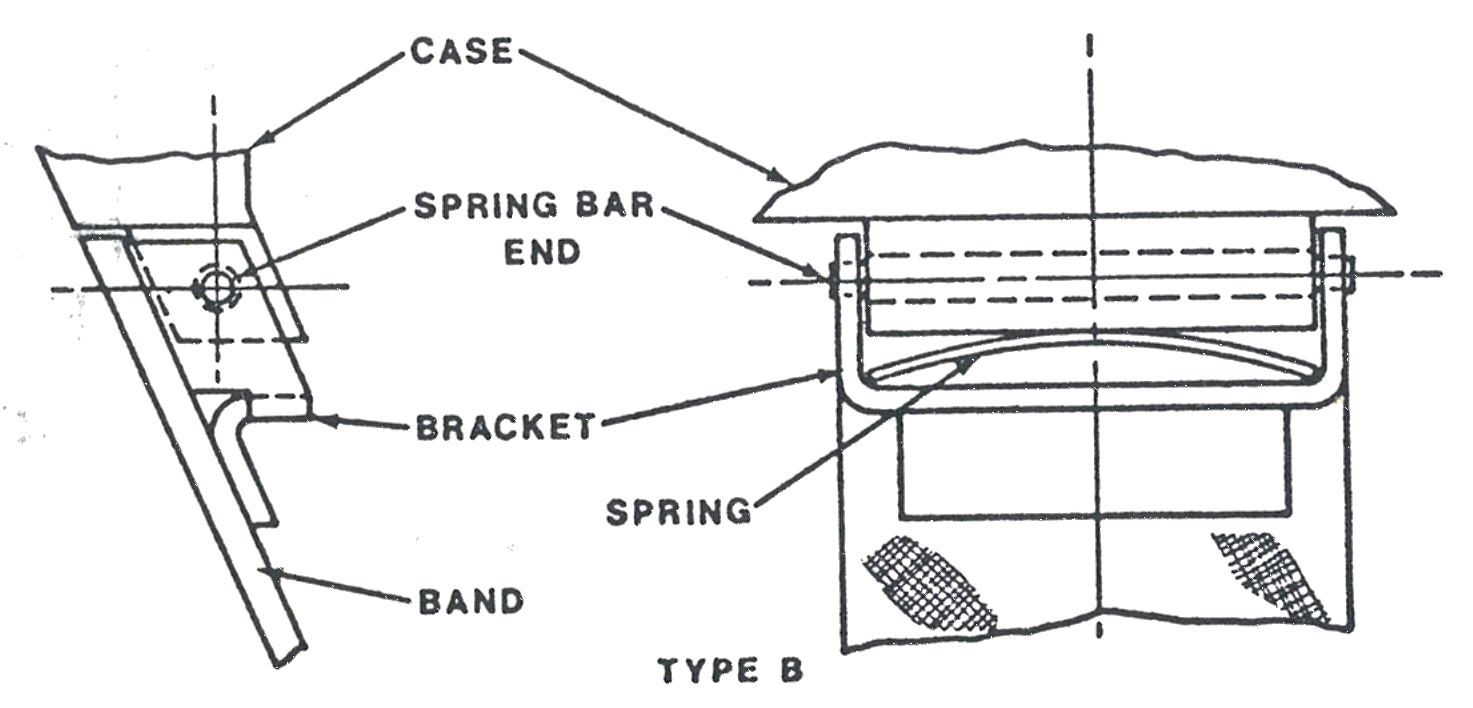
Type B
The metal band in the Type B assembly is fastened to the case as in Type A except that a separate spring is used to hold the band flush against the case. The band is released and replaced in the same manner as Type A except the spring must be positioned as shown in the illustration with the formed corners against the band before the spring bar ends are engaged in the bracket.
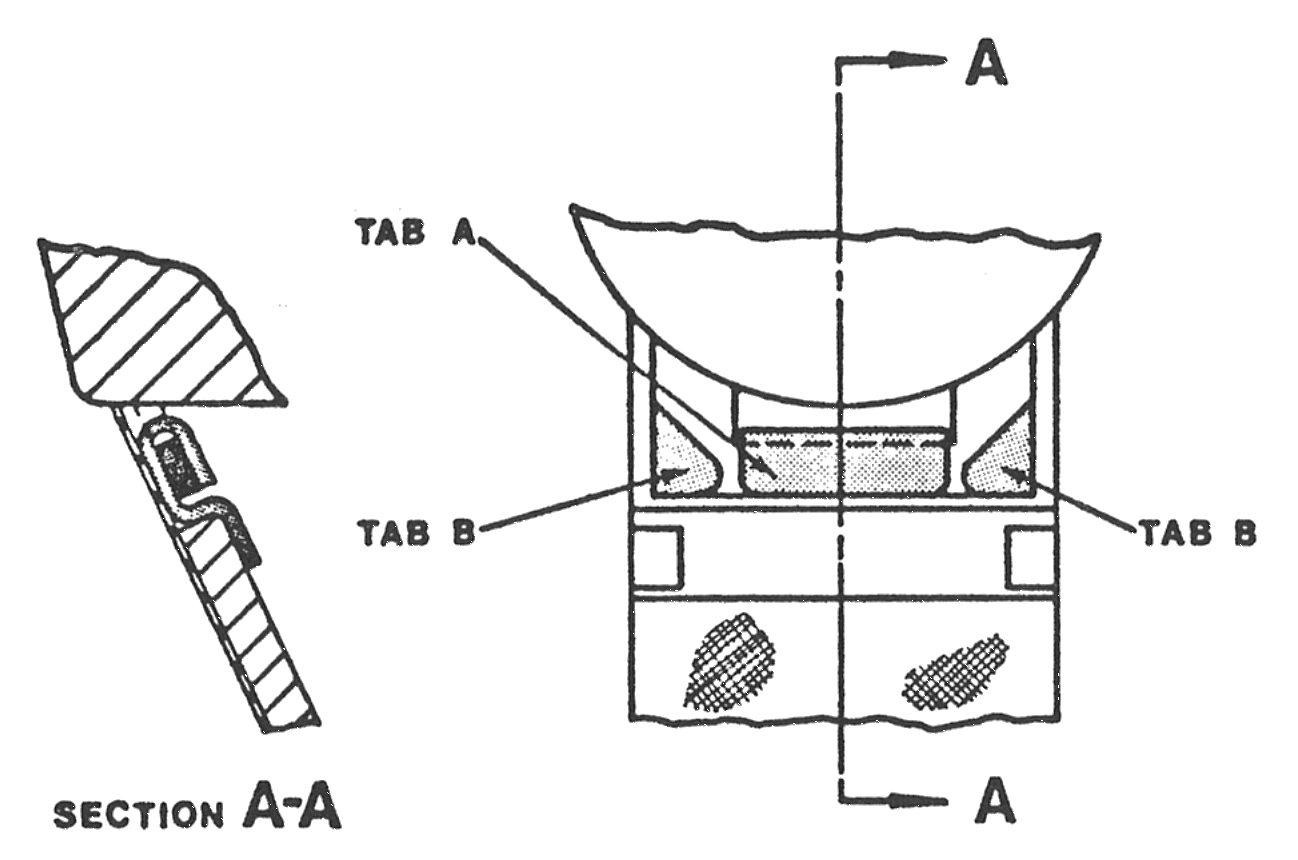
Type C
The metal band in the Type C assembly is fastened to the case with bent metal tabs. The band is released from the case by bending the A and B tabs up sufficiently to clear the slotted lug on the case. The band is replaced by inserting tab A into the slotted lug and forming over to hold the band flush to the case. Bend B tabs down on lug to secure band. All tabs should be pressed down flat.